Pages

Friday, February 26, 2010

Bunnies for Spring

Tutorial by
Jcuttlebear01 aka JoAnn
2/26/2010
I do these for fun and as a learning tool.
I don't sell or make a profit from any of the
supplies I have collected. Or from writhing these tutorials.

Supplies:

Template I used is number 37 by
Kristi and you can get it
Here

Scrapbook kit is the awesome work
of Kristi Westling is called Sweet Spring and you can find it
Here

Open your template and make a copy
Shift D on your keyboard close original.
delete the top layer there.
The Butterflies if you don't want to use them.
I never used the words either.

1. Highlight the circle layer. Then selection tool and make
it active. Get a paper you wish to use for the circle.
This is the one I'm using kristiw_sweetspring_p7
Copy and paste as a new layer, selection invert,
and hit delete one time on key board.

2. Highlight the circle layer and delete it.
Deselect.

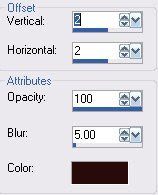
3. Add a drop shadow

4. Highlight Rectangle 1
Activate it with your selection tool.
Get another paper you wish to use for it.
this is the one I'm using kristiw_sweetspring_p3
Do the same as in step 1.
Deselect.

5. Use same drop shadow as before.

6. Highlight Rectangle 2
Activate it with your selection tool.
Get another paper you want to use.
this is the one I'm using kristiw_sweetspring_p5
Do the same as in step 1.
Deselect

7. Add same drop shadow as before.

Now we will add some tubes.

8. Add kristiw_sweetspring_cloud
Duplicate as many as you wish.
You can arrange them after you place some of the other
tubes so you know how you want them.

9. Add this drop shadow to all tubes.


10. Add kristiw_sweetspring_tree1 re size by 35 percent
Arrange how you want it.
Add same drop shadow.

Move tube over to the left.

11. kristiw_sweetspring_tree2
Re size by 35 percent
Place it how you want it.
Add drop shadow

12. I added kristiw_sweetspring_house
Re sized it by 35 percent.
Place how you want it.
Add drop shadow.
I used my deform tool and pulled it out and up like
I wanted it.

13. Add kristiw_sweetspring_tulip3
I added all 3 to give more color.
Re size the tube by 15 percent
And any where else you might want some.
Add drop shadow to all of them.

14. Add kristiw_sweetspring_fence
Place it how you want it.
Cut off with your selection tool any part you don't want.
Add drop shadow

15. Add kristiw_sweetspring_bug1and
kristiw_sweetspring_butterfly1
I used my deform tool and moved them how I wanted them.

16. Add kristiw_sweetspring_bunny1 place him up on the
top of the rectangle 2
Re size by 30 percent.
Add drop shadow

17. Add kristiw_sweetspring_bunny4
re size to 50 percent.
Add drop shadow.

18. Add kristiw_sweetspringwateringcan1
re size it by 15 percent.
Add same drop shadow and move it over to the right side.
I mirrored mine.
Add same drop shadow.

19. Add kristiw_sweetspring_cart and re size it 25 percent move it
over to the right and down some, see my finished tag.
Add same drop shadow.

20. Add some carrots if you wish into the wheel barrow
re size them 25 percent.

This is how mine looks so far.

Add anything else now that you wish to.

22. Now I highlighted the background and
flood filled with a color from one of the tubes.

23. I then went to filters unlimited and gave it
a paper effect. I gave it a mineral limestone.
That is all up to you.

24. Add a 3 pixel border color of choice.

25. Add a 10 pixel border color of choice.

26. Add a 3 pixel border first color, or one of choice.
Filters unlimited and give it a glass frame 2
adjust the size how it looks best to you.

27. Add a new raster layer, and add your water mark.
Re size all layers how you would like it.

We are now finished and ready to save you work of art.

Would love to see what you do with this.
Thank you for giving my tutorial a try.
I do hope you have enjoyed this tutorial, and learned
something new.

Have any questions or need help.
Just let me know, I'm always happy to help any way I can.
Jcuttlebear01@aol.com

Tuesday, February 23, 2010

Hunny Bear


Tutorial by
Jcuttlebear01 aka JoAnn
2/23/2010
I do these for fun and as a learning tool.
I don't sell or make a profit from any of the
supplies I have collected. Or from writhing these tutorials.

Scrapbook kit is the awesome work of Kristi you can get this darling
it is called Bears Bees n Apple Trees
kit
HERE

No outside plug ins used for this tag.
Font I used Gaelic Regular
Here

I did this tutorial in PSP 9
but sure any would work.
Some knowledge of PSP is helpful.

OK lets get started

1) New image 600 X 500

2) Pick a frame from the kit
I'm using frame
kristiw_bearsbees_frame5

3) Copy and paste to your new image...
re size it by 50 percent.

4) Get your magic wand and select the inside of the frame.
Selection modify expand by 7.

5) Pick a paper you want to use for your back ground.
I'm using...kristiw_bearsbees_p2
copy and paste as a new layer, selection invert.
Hit delete on your key board....layer arrange move down.
deselect.

6) I added kristiw_bearsbees_cloud
copy and paste to your work layer arrange, down
you want it below the frame.

7) Re size by 50 percent......I used my deform tool
to get them how I wanted them to look.

Place them how you want them.

8) Add a drop shadow, these are the settings
I used, can reduce if you want.

9) Add kristiw_bearsbees_sun
Re size it by 30 percent and place how you want it.
add same drop shadow.

10) I added kristiw_bearsbees_tree next re sized by 35 percent
Layer arrange and move down place where you like it best.
Add a drop shadow

11) Add the ladder and re size it by 35 percent place
by the tree.
Add kristiw_bearsbees_bear4
Re size by 30 percent I placed him like he is climbing the ladder.
Add same drop shadow.

12) Add kristiw_bearsbees_scallop2
Re size 80 percent don't worry about the over hang
will be gone when we re size tag.
Duplicate and arrange like you want.
add same drop shadow.
This is how it looks now.


12) Add kristiw_bearsbees_beehive re size by
30 percent I moved him below the bear.
Add same drop shadow.

13) Add kristiw_bearsbees_bee re size by
30 percent place him where you want.
Duplicate mirror and I took deform tool and
adjusted like I wanted.
Add as many as you wish.
Drop shadow as before.


14) Add kristiw_bearsbees_bear3 and re size it
same drop shadow.

15) Add the wagon re size by 45 percent
add drop shadow.
add some apples to your liking.

16) Add a bear of choice......this is the one I'm using
kristiw_bearsbees_bear2 and
Copy and paste to your work
Layer arrange bring to top.
Re size by 50 percent.
Place the bear where you like him.
add drop shadow.

17) Get a paper you want to add for the background
I'm using kristiw_bearsbees_p7
copy and paste as a new layer.
Layer arrange move to bottom.

18) Crop your tag and get rid of anything you don't want
around the edge of it.


19) When your happy with the way everything looks then merge all
layers. This is what mine looks like now.

20) Add a 2 pixel border of choice, I used white.


21) Add a 10 pixel border color doesn't matter, selection tool
and copy and paste a paper into it.
I used kristiw_bearsbees_p14
Add a bevel to this.


22) Deselect and your now ready to add your water mark.
Then save and share your work of art.

Would love to see what you do with this.
Thank you for giving my tutorial a try.
I do hope you have enjoyed this tutorial, and learned
something new.

Have any questions or need help.
Just let me know, I'm always happy to help any way I can.
Jcuttlebear01@aol.com

Thursday, February 18, 2010

Delightful frame

Graphic I'm using is by Carol Cavoloris

Tutorial by Jcuttlebear01 aka JoAnn
2/18/2010
I do these tutorials for fun and not
for any profit. I use them also as a learning tool to
help others learn the fun and art of paint shop pro.

Supplies
Here
I have made some extra corners and that, which are in the supplies.
Graphic of choice
Tubes of choice
Font of choice

Plug ins
Screen Works
HERE
Filters Unlimited HERE
AAA foto frames HERE
Graphic plus HERE

PSP
I'm using 9
Some knowledge of PSP is helpful.

Ok lets get started
Remember to save often in case your PSP crashes.

Open a new image
500 X 500
can resize later.

Go to your preset tools
and change it to ellipse.
Set the line width to 5.

Close off your background color.
Starting in the center of your blank image,
draw an ellipse out not to large, you can adjust it
by pulling on the nodes you see and get it how you want it to look.

Now go to object and align and center on your canvas.
Layers and convert to raster layer.

Click on this ellipse with your selection tool, and
flood fill it with a nice gold pattern.
One I used is in the supplies.

Give this a nice inner bevel

Deselect

Click on the inside of the frame, and selection modify
expand by 3, new raster layer.
Copy and paste your graphic into the selection.
Layer arrange and move down.
Deselect

Merge layers

Pick a light color from your graphic and make that your foreground,
A dark color for your background.
Add a new layer and flood fill it with your light color.
Arrange and move down.

Effects and screen works fabric weave.
Now take your crop tool and crop your image, so you get rid
of some of the extra background.

Don't get to close to the frame leave some room for the next step.
Once your happy with it, the effects AAA frame, foto frame
These are the settings I played around tell I got colors that
went with my graphic.


Add a 2 pixel border, select and flood fill with the gold pattern your using.
Deselect

Add a 4 pixel border, make it your foreground color
Select and effects screen works, and Graphic paper.
Deselect

Add a 2 pixel border, select and flood fill with the gold.
Deselect.

Add a 10 Pixel border your background color, select
and add the graphic paper effect to this

Give this the same bevel as we did earlier.
Deselect

Add a 2 pixel border, select and flood fill with the gold.
Deselect

Add a 20 pixel border and select, effects graphic plus
Quick tile 2 these are the settings I used.


add the same bevel as before.
Deselect.

Add a 2 pixel border select and flood fill with the gold pattern.
Deselect

Add a 30 pixel border background color
Select and effects screen works grid layout.
Or play around and try some other things.

Then graphic plus cross shadow.
You can move the bars to suit your taste.

Effects Filters unlimited


Deselect

Add some corners or any thing else you wish you add

When all done be sure and merge all layers
Resize your final project.
Add your water mark and your ready to save.

Would love to see what you do with this.
Thank you for giving my tutorial a try.
I do hope you have enjoyed this tutorial, and learned
something new.

Have any questions or need help.
Just let me know, I'm always happy to help any way I can.
Jcuttlebear01@aol.com

Couple more examples I made


These all below are members of my JAB
list, great talent ladies.
Next 2 are by
mydachshund aka Barb
Photobucket

Photobucket

ggmom9 aka Mary
Photobucket
These two are by
ameripex97 aka Kay
Photobucket
Photobucket
Fairladi101 aka Pati
Photobucket

Thursday, February 11, 2010

Nap time with mom


Tutorial by Jcuttlebear01 aka JoAnn
2/11/2010
I do these tutorials for fun and not
for any profit. I use them also as a learning tool to
help others learn the fun and art of paint shop pro.

PSP 9 used for this tutorial

Knowledge of plug ins needed.
Remember to save often in case your psp closes.

Supplies:
Graphic of choice
Corner accents some I made
HERE
Any tube you might want to add.
Font of choice.

Plug ins:
Filters unlimited
HERE
Screen works
HERE
FM Tile tools
HERE

I'm using a darling bear graphic from the awesome work of John Bindon.
http://www.bindonart.com/index.html

Graphic of choice duplicate and close the original.
Re size it

Pick a color from the graphic for the foreground
I'm using #956e6c which is from the bear.

Pick another color the background I'm using
#62332d

Find a gold patter that you want to use
This is the one I'm using.

Add a 3 pixel border color not important.
Click on it with your magic wand.
Flood fill with the gold pattern.

Selection invert
Effects 3D cut out

Repeated but this time change it to minus 2
Deselect.

Add 3 pixel border color is up to you.
I used my background color.

Add 3 pixel border flood fill with the gold pattern

Add 10 pixel border I used my foreground color

Select with magic wand and effects texture effects Blinds.

Keep activated FM blend emboss,
Screen works canvas mess
Deselect

Filters unlimited and button and frame glass frame 1
Frame size 15 contract 150

Add a 3 pixel border and flood fill with the gold pattern

Another 3 pixel border color you used the first time.

Add 3 pixel border and flood fill with the gold.

Add a 20 pixel border use the other color you used
for the 10 pixel border.
Activate it.

Filters unlimited use the
I clicked on the randomize until I got an effect I liked.
this is the settings I used


Filters unlimited and Buttons and frame
Glass 1 I changed the frame size to 25
and the contrast to 130
Deselect

Add some corner accents if you wish
and anything else you want to finish the tag off.

I made some corners and they are in the supplies,
if you want to use them.

Copy and paste the corner, you wish to use
and add a drop shadow.


Layer duplicate and image mirror,
duplicate and image flip,
duplicate, image mirror.
Merge all layers.

Now if you wish to add a tube or anything else do so now.
Add your water mark, re size all layers to your liking.
Now you can save and share your work of art.

Would love to see what you do with this.
Thank you for giving my tutorial a try.
I do hope you have enjoyed this tutorial, and learned
something new.

Have any questions or need help.
Just let me know, I'm always happy to help any way I can.
Jcuttlebear01@aol.com

Couple more examples I made


Photobucket

Tuesday, February 9, 2010

Oldies Band

Tutorial by Jcuttlebear01 aka JoAnn
2/9/2010

I do these tutorials for fun and not
for any profit. I use them also as a learning tool to
help others learn the fun and art of paint shop pro.
All things I use are collected, the only thing I claim
Is the tag I make with these as my work.
Feel free to share my tutorials, but link them back
to my site please.

This tutorial is wrote to where you need some
knowledge of psp.

PSP 9 is what I used

Scrapbook kit is from Wicked Princess and you can
buy it here
Wicked Princess : Twilight Scraps

Supplies are here
Template I used is from Cuddley/cuddley's blog
If anyone has the link let me know I couldn't find it.
Template # 1
Fonts Stereofidelic
WSL mask 204

Plug ins
Screen works HERE
Filters unlimited HERE
Open the template and duplicate it
close the original one off.

You will have a total of 9 layers in your layer pallet.
Delete # 9

Activate raster 7 and 8 find a paper from the kit
you wish to use. Or you can just flood fill with a color from your tube.
I'm using paper 15 re size it down to 500 X 500
copy and paste as a new layer.
Arrange how you want it then selection, invert and delete.
Deselect add a bevel to this.

Add a drop shadow to this layer.

you can delete layer 7 and 8 now if you wish.

Activate layer 2
I'm using paper 11 re size it down.
Copy and paste as a new layer arrange how you like it.
Then invert, and delete.
Deselect.......can add the same bevel if you wish, and the drop shadow.
Delete layer 2.

Activate layer 3 and find another paper you want to use.
I'm using paper 17 for this layer.
copy and paste as a new layer, invert and delete.
Deselect
Add a same drop shadow.
Delete layer 3

Activate layer 4 I flood filled with different colors
From which I have used so far and did each one
a different colors.
I added eye candy glass to them.
Give this layer a slight drop shadow if you wish.

Activate layer 5 and use a different paper for it.
I used paper 13 copy and paste as a new layer.
Selection invert and delete.
don't deselect yet

Go to selection and modify expand by 2, then selection, modify
select, selection border by 3
add a new layer and flood fill with a color from your back ground.
Or use another paper its all up to you.
Deselect, add a the same bevel as before.

I left raster 6 alone and left it white.
If you happy with everything then merge these layers together.
This is what I have so far.


Now your ready to add any tubes or accents you wish to your tag.
I canvas sized the template to 700 X 700 centered, to give me more room to add things.
You can re size when your done.
Now just add what you wish, be sure and re size your tubes as needed.
I used my deform tool to pull some of them like I wanted them.
It's all up to you.

Add a drop shadow as you go to each tube if you wish.
When done and your happy with the way everything looks.
Merge all layers.
Then re size your this by 80 percent or so its up to you.

Copy and paste a paper as a new layer that you want for the background.
Or flood fill with a contrast color if you do this be sure and add a new layer first.
Layer arrange send to bottom.

Find your mask and apply it to the background.
If you don't know how to use a mask, please e-mail me
and I will be more then happy to teach you. It really is simple.

Now add any sayings or anything else you wish to at this time.
Add a new layer and flood fill with a nice color that you want to use
for you main background, layer arrange and send to the bottom.
Now crop off anything you don't want extra around the edge.
Be sure and leave enough room for your name.

Merge all layers.......Add a border 1 pixel color of choice.

add another 2 pixel border color of choice.

Add another border 10 pixel
Select and then
effects pattern generator.

Deselect
Effects plug in filters unlimited button and frame
glass 1 frame size 20
We are now done.
Add your water make and your ready to re size to your liking.

Would love to see what you do with this.
Thank you for giving my tutorial a try.
I do hope you have enjoyed this tutorial, and learned
something new.
Have any questions or need help.
Just let me know, I'm always happy to help any way I can.

Jcuttlebear01@aol.com

another example of what I did with this darling kit.