Tutorial by Jcuttlebear01 aka JoAnn
2/3/2012
I do these tutorials for fun and not
for any profit. I use them also as a learning tool to
help others learn the fun and art of paint shop pro.
Everything I use I have collected don't claim to have
made anything other then the tag.
Supplies
Mask
tubes of choice
font of choice~Black Rose
Graphic of choice
Template~
Supplies~HERE
Plug in
Eye candy impact 5 HERE
Open all your supplies in PSP
minimize them until needed.
Duplicate the template and close original
Delete the top layer.
Also raster 9, and both raster 8 layers, I also decided I
didn't want raster 4 so got rid of it also.
That's up to you.
I didn't use them in this tutorial.
What I have
Canvas size 800 X 700 we
will resize when done.
Highlight Raster 2
Magic wand and select this.
Flood fill with a color of choice.
I used one from the graphic I'm using.
Effects>texture>blinds
Deselect
Eye candy 5 impact>bevel
In case you can't import the setting here is what I used.
Effects>3D drop shadow
Repeat but change the V and H to minus -2
In layer pallet highlight raster layer 3
Add a new raster layer>copy and paste into
selection>the graphic of choice>adjust>
Deselect
Layers>merge down.
Effects>plug in eye candy 5 impact>bevel
use the same settings as above.
Layer merge>merge down.
This is what you should have now.
Select>raster layer 5 flood fill with a different
color of choice.
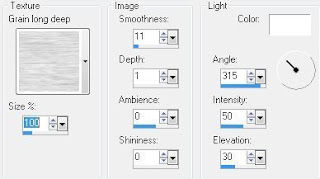
Effects>texture effects>texture> Settings I used.
Use a different effect if you wish.
Deselect
Add the same bevel>eye candy 5 impact.
Except change the bevel width to 7.59
Select>copy of raster layer 5> and flood fill
Effects>texture effects>texture, I used a different
one for this last strip.
If you use a light color as I did you can
go to effects enhance and it brightens it up better.
Deselect
Add same eye candy 5 bevel
Except in lighting change it to your background
color so it stands out better.
Highlight layer 6
Select and flood fill with color
of choice.
Effects>Weave
Add same eye candy 5 bevel
Except in lighting change it to your foreground
color so it stands out better.
Layers>merge down twice.
Give this the same drop shadow as earlier.
Open up the frame I included in supplies, or use
one of your choice.
Copy and paste as a new layer>Resize it so it
fits around layer 7, I resized by 90 percent>with
mover tool place it over layer 7
You can change the color of the frame if need be
I change the color so it would stand out more on
the green.
Add a drop shadow of choice.
Select raster layer 7 add a new raster layer>copy
and paste into the graphic of your choice.
Deselect
This is how mine looks now.
You can now add your tubes
Copy and paste as new layer mushroom tube>resize by 55 percent
mirror and place over on the right hand side at the bottom
of the frame.
Duplicate>resize by 50 percent>mirror and with mover tool
move how you want it to look
Add a drop shadow to them if you wish.
Copy and paste as a new layer frog or what you
want to sit on the mushrooms.
The one I used is in the supplies.
Resize them by 50 percent>with mover tool
place how you want him.
Add a drop shadow
Add the squirrel tube, or one of choice.
Resize it by 30 percent.
Add same drop shadow as
you did to the mushrooms.
Copy and paste as a new layer>a flower of choice.
I'm using one from the supplies>ast>resize it by
60 percent>take deform tool and turn it up and down
or how you want it to look. Place on the left hand
side over one of the bars.
I then duplicated this layer>mirrored and just
moved with mover tool how I wanted it.
Give them a drop shadow.
Copy and paste as a new layer>flower branch
resize by 20 percent and turn with deform tool.
You can colorize the flowers, that is what I did.
I took my easer tool and got rid of some of the stuff
on the flowers I didn't want there.
Drop shadow.
Add the bow resize by 30 percent.
Colorize the bow to go with your theme.
Give it the same drop shadow.
Open the fairy and resize her by
60 percent move her down and to the left
or how you would like her to look.
This is mine so far.
You can add any thing else you wish to at this time
Some wording. The one I used is in supplies.
When happy with every thing click on layer 1
and flood fill with a color you want your mask.
Layer>new mask layer>from image>
Merge group.
Resize the mask by 90 percent and move it over some.
If your going to add words do so now.
Highlight the top layer
and use the one of choice.
The one I did is in the supplies.
If your happy with every thing you can start at
the top and merge down some if you like, just be
sure that nothing is hooked to raster 7, and the frame,
also the graphic. This is how I stopped.
Add your water mark now before you do the
animation steps.
I added it down on raster 2
Close off your graphic layer>so the blue color is showing
select it with your magic wand.
Reopen the graphic layer and make sure
your on it should be raster layer 4 we will add the animation now.
To the graphic
Keep selected
Add 3 new raster layer 3, rename them rain 1, rain 2, and rain 3
Close off rain 2 and 3 make sure your on rain 1
Plug in VanDerLee>snowflakes
Adjust
Deselect
Edit copy merge
Open you animation shop
Paste as a new animation
Go back to your psp
edit undo, until your back to the ants and just the plain graphic
before
after
Now close off rain layer 1 and open
rain layer 2 and repeat the steps we just
did except change the speed by 20
Make sure you have highlighted rain 2
Deselect
Edit copy merge, in animation shop
edit>paste after current layer.
Go back to psp and undo what we just did like before.
Close off rain 2>add the snow change speed to 1050
and motion blur.
Deselect
Edit copy merge>back to animation
edit paste after current layer.
You should now have 3 layers in animation shop.
Go to frame 1
View animation and you can see the rain.
We are going to slow it down some.
Go to animation>frame properties, and that is where
you change the speed.
Frame 1 leave it........frame 2 change to 20
You can leave frame 3 also if you like.
Before I save mine I go to animation>animation
properties, and change my background to white, or
what ever color you want.
If your happy with every thing you can resize
your tag.
File>Save as>name it>and place
it where you want it to go.
Just keep hitting next and let it do its thing.
Your now all done.
Would love to see what you do with this.
Thank you for giving my tutorial a try.
I do hope you have enjoyed this tutorial, and learned
something new.
Have any questions or need help.
Just let me know, I'm always happy to help any way I can.
another I did
Thank you Mary


No comments:
Post a Comment