


Tutorial by Jcuttlebear01 aka JoAnn
7/13/2010
I do these tutorials for fun and not
for any profit. I use them also as a learning tool to
help others learn the fun and art of paint shop pro.
All things I use are collected, the only thing I claim
Is the tag I make with these as my work.
This tutorial is wrote with the idea you
have some knowledge of psp.
have some knowledge of psp.
This was done in psp 9 but should work with any.
1) Open template in psp duplicate and close original.
You will have these layers.
Delete the ones I have closed off here.
We won't be using them.
You will have these layers.
Delete the ones I have closed off here.
We won't be using them.

2) Highlight layer Kreis>Magic wand and select.
Flood fill with a color from your tube or use the pattern
I have supplied.
Hint
You can colorize the silk to make it go with your tube.
If you don't know how to do that, open up the your
color pallet and see what the H and S are.

Then go to adjust>hue and saturation>Colorize
 Deselect
3) 3 D inner bevel

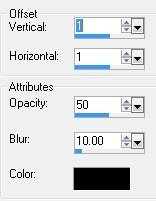
4) Add a drop shadow
 5) Striche Kreis >activate and >layers>merge down.
 6) Rechteck>activate>magic wand and select inside this layer.
7) Flood fill with a color from your tube I used #d69b7d.
8) Effects texture>add blinds
 9) Adjust>Blue>motion blur
10) Inner bevel with same settings as earlier.
11) Then add same drop shadow as earlier.
Deselect
12) Highlight>Rahmen Rechteck layer
Magic wand and select inside the frame part......
Flood fill with a gold bead pattern.

13) Inner bevel, same as before.
14) Add drop shadow.
Deselect
Deselect
15) Layers merge down.
16) Activate Dia layer>selection tool you will need to
select each square.
and fill with a nice background color.
I used #eec1a0 from my tube.
select each square.
and fill with a nice background color.
I used #eec1a0 from my tube.
17) Copy and paste your tube as a new layer.
Move it how you want it to look, then invert
and delete on your keyboard to get rid of
what you don't want showing.
Move it how you want it to look, then invert
and delete on your keyboard to get rid of
what you don't want showing.
When your happy with the way it looks then deselect.
Lower the opacity to 60.
Lower the opacity to 60.
18) Add a drop shadow.
I used the same as before except lowered the blur to 2.
I used the same as before except lowered the blur to 2.
19) Layers merge down.
20) Activate your Rahmen Dia next>Magic wand, and select that.
Flood fill with back ground color.
Flood fill with back ground color.
21) Then selection>modify select>selection border
22) Add a new raster layer and flood fill with the gold beads.
Make sure you get around each frame.
23) Then inner bevel and drop shadow.
Deselect
30) Crop around your tag to remove any unwanted background.
Would love to see what you do with this.
Thank you for giving my tutorial a try.
I do hope you have enjoyed this tutorial, as much
as I did writing it,
and learned something new.
Have any questions or need help.
Just let me know, I'm always happy to help any way I can.
Jcuttlebear01@aol.com
24) Add your tube resize as needed.
Add a drop shadow to this now.
Move it where you want it to be.
Add a drop shadow to this now.
Move it where you want it to be.
25) Add some wording to your tag if you wish.
Add a new layer before you apply the brush.
I have placed the brush I used in the supplies.
26) Your ready to add any accents you wish to at this time.
I have placed everything in the supplies I used.
The bow you can colorize it to go with your things.
Same with the flowers and butterflies.
Resize them as you need to, and just place how you want them.
It's all up to you.
When your happy with the way it looks, close off the bottom layer,
and merge all visible layers.
27) Resize just your tag about 85 percent and repeat.
Adjust > brighten and adjust> clarify by 5.
Adjust > brighten and adjust> clarify by 5.
28) Open your bottom layer and,
Flood fill with your background color.
Flood fill with your background color.
29) Add the blinds, and the motion blur to this.
30) Crop around your tag to remove any unwanted background.
Add a new raster layer and add your water mark
when you have finished your tag.
when you have finished your tag.
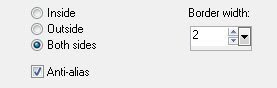
31) Add a border of white 2 pixel
32) Add a border of 5 pixel of your background color.
Yippee your all done.
Would love to see what you do with this.
Thank you for giving my tutorial a try.
I do hope you have enjoyed this tutorial, as much
as I did writing it,
and learned something new.
Have any questions or need help.
Just let me know, I'm always happy to help any way I can.
Jcuttlebear01@aol.com

These examples are by ladies on my list. Thank you Pati, Mary, and Helen


