Tutorial by Jcuttlebear01 aka JoAnn
11/2/2010
I do these tutorials for fun and not
for any profit. I use them also as a learning tool to
help others learn the fun and art of paint shop pro.
All things I use are collected, the only thing I claim
Is the tag I make with these as my work.
This tutorial is written with the idea you
have some knowledge of PSP.
This was done in PSP 9 but should work with any.
Plug insEye candy 5 texture HERE
Nik Software>Color efex pro 3 HERE
Filters unlimited HERE
Supplies:
Mine> HERE
except for the scrapbook kit, you can buy it
from Wicked Princess by Shani its a new
kit called Georgetta Cartrite
find it HERE
Tube of choice
Graphic of choice
Font of choice>Avalon Medium
is what I used.
Find the tube you wish to use, open and
minimize in your psp.
Place the 2 masks in your mask folder in psp.
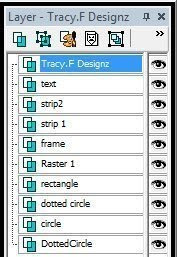
Open a new image 1000 X 700
Pick a light color for foreground I'm using #af9f97
Dark color for background I'm using #734535
Flood fill your image with background color
Filters unlimited>apply edge square
 Effects>plug in Eye candy 5 texture weave
Image resize 85 percent
New layer>find a nice paper you want to
use from the kit, select all and copy and paste
I used WP_GC_PP1.jpg and colorize it to
my foreground color.
New layer>find a nice paper you want to
use from the kit, select all and copy and paste
I used WP_GC_PP1.jpg and colorize it to
my foreground color.
copy and paste
into your selection>deselect.
Or you can flood fill with
your foreground color.
into your selection>deselect.
Or you can flood fill with
your foreground color.
Layers>load saved mask>load mask from disc.
Apply mask>06_luzmaria
Need to check invert.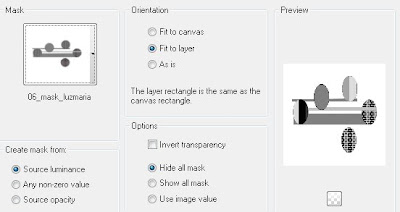
Merge group>duplicate layer>Layer merge down.
Effect> image effects> offset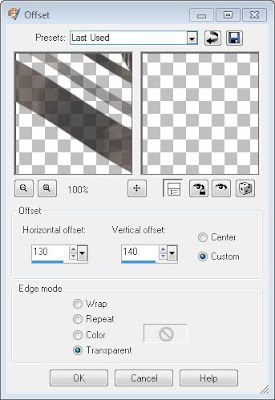
New layer
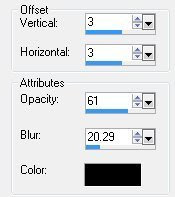
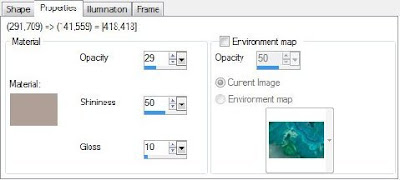
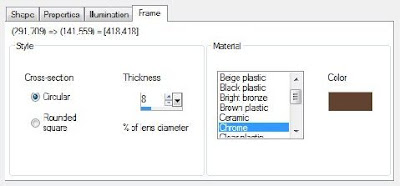
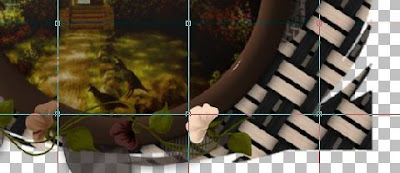
Effects>artistic>magnifying lens
Settings I used, you can change the colors to your liking.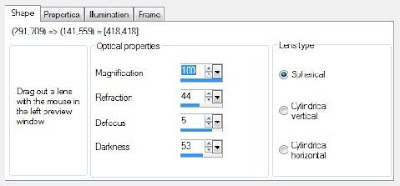

Image>resize>125 percent.
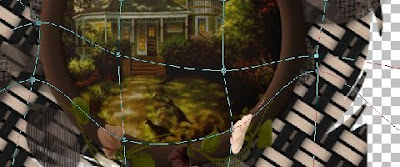
Selection tool>click in the blank area
select>invert
Modify contact by 20 new layer
Copy and paste your graphic into selection.
Layer move down.
Deselect
Plug in>Nik software>color effects pro 3.0
This is an awesome plug in, has a lot of different settings.
Settings I used:

I left everything else as is. It's up to you. Play around
and see what you like.
Hint:
If you would like to use this on you other
back grounds in your tag to change the color
to blend with everything you can.
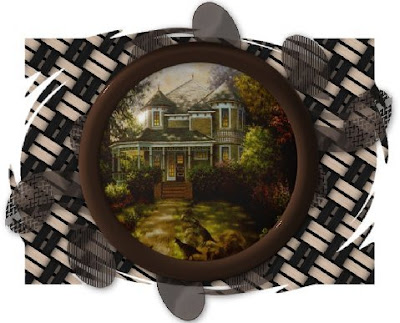
This is what I have so far.
If your happy with this merger visiable.
Now we are ready to add accents>and tubes
I add from the kit WP_GC_PANSYFLOWER.
Take your Mesh wrap tool,
this is in with your deform tool.
Take the noted you see and push and pull
your flower around the frame like you want it.
before
 after pulling the nodes around.
 When your happy with it just click up on the mover
tool and the nodes will go away.
Duplicate this layer>layers merge down.
With easer tool you can remove any part
you don't want showing over the frame part.
Duplicate this layer, with deform tool,turn it how you want it.
Image flip>erase any part you don't want hanging over the other.
I wanted more flowers on the bottom there>so duplicated
flipped and mirrored them and erased any thing I didn't want
to cover up the other one.
Layers merge down>drop shadow
Hint
If you wish to change the colors and brighten
these up use the Nik plug in......it's really cool.
I have fallen in love with that thing....lol
Now add you poser tube or one of choice.
I used from the kit.
IWP_GC_GEORGETTASTANDING
resize to your liking.
Add a pair of old fashion boots, I used from the kit
WP_GC_BOOTS.png
resize to your liking I went 40 percent.
Move how you want them, give same drop
shadow.
If your happy with your work, merge all layers.
I added WP_GC_FANCYBUTTERFLY>resized to 20 percent
add a drop shadow
Merge all layers.
Resize your image by 80 percent
and with crop tool get rid of some of the edge
around the tag you don't want.
Add a new raster layer>selection all
Layer>arrange and move to bottom.
Flood fill with a color of choice, or use a paper
I used>WP_GC_PP12.jpg from the kit.
Copy and paste into the selection>deselect.
Layers load mask from disc
 Merge group, effects inner bevel
  Effects>drop shadow
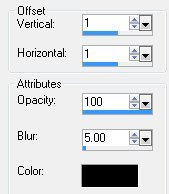 Merge visible
Add a new layer and
place your water mark.
Crop around your tag to get rid of the extra.
Add a name and your now done, with your work of art.
Good job we are all done.
You can now save your wonderful
creation and share with others.
Would love to see what you do with this.
Thank you for giving my tutorial a try.
I do hope you have enjoyed this tutorial, as much
as I did writing it,
and learned something new.
Have any questions or need help.
Just let me know, I'm always happy to help any way I can.Jcuttlebear01@aol.com
example below made by me

Apply mask>06_luzmaria
Need to check invert.
Merge group>duplicate layer>Layer merge down.
Effect> image effects> offset

Layer duplicate>image mirror>Flip.
Merge down>add drop shadow
Merge down>add drop shadow

New layer
Effects>artistic>magnifying lens
Settings I used, you can change the colors to your liking.


Image>resize>125 percent.
Selection tool>click in the blank area
select>invert
Modify contact by 20 new layer
Copy and paste your graphic into selection.
Layer move down.
Deselect
Plug in>Nik software>color effects pro 3.0
This is an awesome plug in, has a lot of different settings.
Settings I used:
I left everything else as is. It's up to you. Play around
and see what you like.
Hint:
If you would like to use this on you other
back grounds in your tag to change the color
to blend with everything you can.
This is what I have so far.
If your happy with this merger visiable.

Now we are ready to add accents>and tubes
I add from the kit WP_GC_PANSYFLOWER.
Take your Mesh wrap tool,
this is in with your deform tool.
Take the noted you see and push and pull
your flower around the frame like you want it.
before
 after pulling the nodes around.
  When your happy with it just click up on the mover
tool and the nodes will go away.
Duplicate this layer>layers merge down.
With easer tool you can remove any part
you don't want showing over the frame part.
Duplicate this layer, with deform tool,turn it how you want it.
Image flip>erase any part you don't want hanging over the other.
I wanted more flowers on the bottom there>so duplicated
flipped and mirrored them and erased any thing I didn't want
to cover up the other one.
Layers merge down>drop shadow
Hint
If you wish to change the colors and brighten
these up use the Nik plug in......it's really cool.
I have fallen in love with that thing....lol
Now add you poser tube or one of choice.
I used from the kit.
IWP_GC_GEORGETTASTANDING
resize to your liking.
Add a pair of old fashion boots, I used from the kit
WP_GC_BOOTS.png
resize to your liking I went 40 percent.
Move how you want them, give same drop
shadow.
If your happy with your work, merge all layers.
I added WP_GC_FANCYBUTTERFLY>resized to 20 percent
add a drop shadow
Merge all layers.
Resize your image by 80 percent
and with crop tool get rid of some of the edge
around the tag you don't want.
Add a new raster layer>selection all
Layer>arrange and move to bottom.
Flood fill with a color of choice, or use a paper
I used>WP_GC_PP12.jpg from the kit.
Copy and paste into the selection>deselect.
Layers load mask from disc
 Merge group, effects inner bevel
  Effects>drop shadow
 Merge visible
Add a new layer and
place your water mark.
Crop around your tag to get rid of the extra.
Add a name and your now done, with your work of art.
Good job we are all done.
You can now save your wonderful
creation and share with others.
Would love to see what you do with this.
Thank you for giving my tutorial a try.
I do hope you have enjoyed this tutorial, as much
as I did writing it,
and learned something new.
Have any questions or need help.
Just let me know, I'm always happy to help any way I can.Jcuttlebear01@aol.com
example below made by me

Thank you Barb