
Tutorial by Jcuttlebear01 aka JoAnn
11/3/2010
I do these tutorials for fun and not
for any profit. I use them also as a learning tool to
help others learn the fun and art of paint shop pro.
All things I use are collected, the only thing I claim
Is the tag I make with these as my work.
This tutorial is written with the idea you
have some knowledge of PSP.
This was done in PSP 9 but should work with any.
Supplies
Scrapbook kit is the work of Black Cherry scraps kit I'm using is
Deep into Autumn and is a FTU kit can be found HERE
Template is work of Tracy template designs HERE
What I used HERE
Tube of choice
Font of choice>
Plug-in
Optional eye candy 4 HERE
NOTE:
All settings stay the same unless other wise stated.
Image>canvas size
It gives you room to work.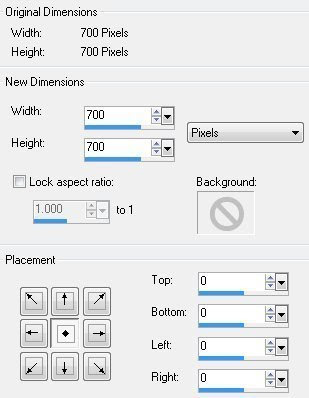


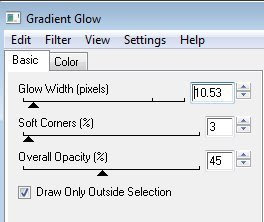
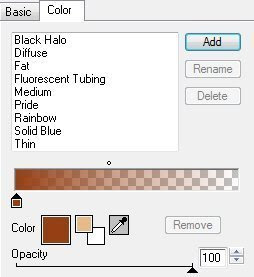
Then I went back and changed the color
and added it to the words.
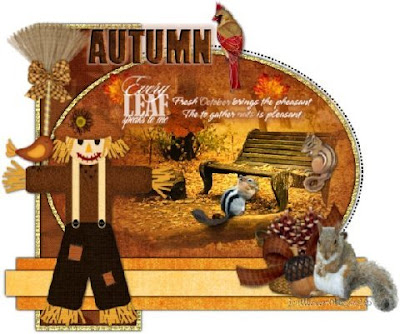

I added some squirrels and a couple chipmunks.
They are in the supplies if you wish to use them.
I resized them by about 40 percent and added
drop shadow, and placed them where I wanted them.
Add the scarecrow and place a bird from the kit
on his arm>merge those layers and resize.
Move where you would like them to be.
I also added a new layer and put brush words on
and gave them just the second granite glow, twice.
added a few leaves under the wording.
When your happy with the way everything looks,
merge all layers.
Add a new layer and place your water mark.
Crop all extra from the tag, and resize as needed.
Good job we are all done.
You can now save your wonderful
creation and share with others.
Would love to see what you do with this.
Thank you for giving my tutorial a try.
I do hope you have enjoyed this tutorial, as much
as I did writing it,
and learned something new.
Have any questions or need help.
Just let me know, I'm always happy to help any way I can.
Jcuttlebear01@aol.com
Both examples below
made by me
I resized the words to my taste, its up to you.
If you wish you can add eye candy granite glow
I used the faint white
Highlight the large rectangle and copy and paste
a paper of choice>I used
DeepIntoAutumn_pp4_BCS
Move how you want it and selection invert>delete
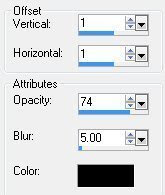
Drop shadow
So the same with the other rectangle except use a different color.
DeepIntoAutumn_pp5_BCS.
Same drop shadow.
When your happy with the way everything looks
close of the words and merge all layers.
Reopen them>Select>and copy and paste a paper
of choice>or you can flood fill with a different color on each letter
if you wish.
Deselect
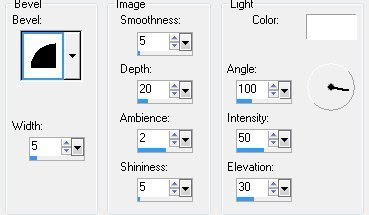
Effects 3 D inner bevel
Take your easer tool and make sure there
is no mist over lapping your frame .
When your happy with the way it looks,
layers merge down.
Move up a layer on the layer pallet
Activate>select>
Copy and paste and new paper>DeepIntoAutumn_pp10_BCS
Selection>invert delete on key board.
or flood fill with color of choice.
Layer merge down
Next is the frame use same color as before.
Flood fill>add same drop shadow>Layer merge down.
Now I decided to pull that one below the big circle Its up
to you.
repeat changing the V N H to -1
Layers arrange merge down.
Add a nice misted fall tube on the big
circle, the one I used I resized it by 80 percent.
take your move tool and move the other layers
in the template so you can see the background.
This is what I have so far.
In layer pallet high light the circle layer.
Magic wand and select it.
Paper of choice>I'm using
DeepIntoAutumn_pp3_BCS. from the kit.
Resize it by 80 percent>copy and paste as a new layer.
Selection>invert delete.
Deselect
Layer merge down.
Move up one layer in your pallet>highlight>select
and you can flood fill with a nice gold pattern, I used gold 64
it is in the supplies if you want to use it.
Or a paper of choice, its up to you.
Deselect
Effects drop shadow
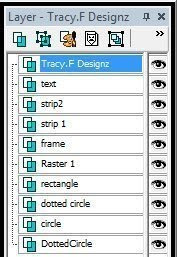
Open supplies in your psp.
Duplicate the template and close the original.
Delete the top layer there with the water mark.
Duplicate the template and close the original.
Delete the top layer there with the water mark.

Image>canvas size
It gives you room to work.


Then I went back and changed the color
and added it to the words.


Thank you Wendy for trying my tut.
Tag by Wendy
Now your ready to add some accents.I added some squirrels and a couple chipmunks.
They are in the supplies if you wish to use them.
I resized them by about 40 percent and added
drop shadow, and placed them where I wanted them.
Add the scarecrow and place a bird from the kit
on his arm>merge those layers and resize.
Move where you would like them to be.
I also added a new layer and put brush words on
and gave them just the second granite glow, twice.
added a few leaves under the wording.
When your happy with the way everything looks,
merge all layers.
Add a new layer and place your water mark.
Crop all extra from the tag, and resize as needed.
Good job we are all done.
You can now save your wonderful
creation and share with others.
Would love to see what you do with this.
Thank you for giving my tutorial a try.
I do hope you have enjoyed this tutorial, as much
as I did writing it,
and learned something new.
Have any questions or need help.
Just let me know, I'm always happy to help any way I can.
Jcuttlebear01@aol.com
Both examples below
made by me
I resized the words to my taste, its up to you.
If you wish you can add eye candy granite glow
I used the faint white
Highlight the large rectangle and copy and paste
a paper of choice>I used
DeepIntoAutumn_pp4_BCS
Move how you want it and selection invert>delete
Drop shadow
So the same with the other rectangle except use a different color.
DeepIntoAutumn_pp5_BCS.
Same drop shadow.
When your happy with the way everything looks
close of the words and merge all layers.
Reopen them>Select>and copy and paste a paper
of choice>or you can flood fill with a different color on each letter
if you wish.
Deselect
Effects 3 D inner bevel
Take your easer tool and make sure there
is no mist over lapping your frame .
When your happy with the way it looks,
layers merge down.
Move up a layer on the layer pallet
Activate>select>
Copy and paste and new paper>DeepIntoAutumn_pp10_BCS
Selection>invert delete on key board.
or flood fill with color of choice.
Layer merge down
Next is the frame use same color as before.
Flood fill>add same drop shadow>Layer merge down.
Now I decided to pull that one below the big circle Its up
to you.
repeat changing the V N H to -1
Layers arrange merge down.
Add a nice misted fall tube on the big
circle, the one I used I resized it by 80 percent.
take your move tool and move the other layers
in the template so you can see the background.
This is what I have so far.
In layer pallet high light the circle layer.
Magic wand and select it.
Paper of choice>I'm using
DeepIntoAutumn_pp3_BCS. from the kit.
Resize it by 80 percent>copy and paste as a new layer.
Selection>invert delete.
Deselect
Layer merge down.
Move up one layer in your pallet>highlight>select
and you can flood fill with a nice gold pattern, I used gold 64
it is in the supplies if you want to use it.
Or a paper of choice, its up to you.
Deselect
Effects drop shadow


No comments:
Post a Comment