
Tutorial by Jcuttlebear01 aka JoAnn
10/27/2010
I do these tutorials for fun and not
for any profit. I use them also as a learning tool to
help others learn the fun and art of paint shop pro.
All things I use are collected, the only thing I claim
Is the tag I make with these as my work.
This tutorial is written with the idea you
have some knowledge of PSP.
This was done in PSP 9 but should work with any.
SUPPLIES
HERE
TEMPLATE 11 HERE
Tubes of choice
Font of choice> I used Edwardian Script ITC
I'm using the wonderful kit from Wicked Princes aka Shani
You will find it Here It is a PTU.
Open template and duplicate, close
the original.
Delete the top layer there.
HERE
TEMPLATE 11 HERE
Tubes of choice
Font of choice> I used Edwardian Script ITC
I'm using the wonderful kit from Wicked Princes aka Shani
You will find it Here It is a PTU.
Open template and duplicate, close
the original.
Delete the top layer there.
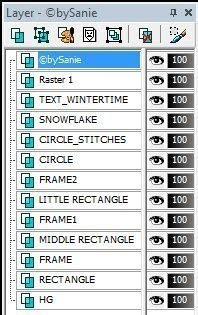
These steps will be the same until we are
done with the template
We will be working from the rectangle layer
on up........so activate in the layer pallet.
Magic wand>select inside of that layer.
Pick a paper from the kit your using, or
you can flood fill with a color of choice.
I'm using WP_SS_PP10. from the kit.
Copy and paste as a new layer>selection>invert
delete on key board one time.
Deselect.
Layer>merge down.
______________________________________
Activate the frame with magic wand>flood fill
with a nice gold>or you can use paper its all up to you.
Deselect
Layer>merge down.
Middle rectangle activate>magic wand
I used......WP_SS_PP4
Frame 1 flood fill like you did the other.
Layer>merge down
Little rectangle activate>magic wand
I used......WP_SS_PP4
once again and moved it how I wanted
it so it looked different.
Frame 2 and do the same as you did with the others.
Layer>merge down.
Circle>activate>copy and paste paper
of choice, or flood fill with color.
I used......WP_SS_PP1
Deselect
Effects>Blind effects
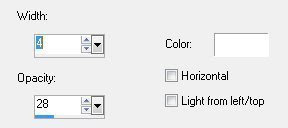 I left the stitch layer alone
Snow flake layer you can leave it or flood fill with
a color if you wish. Or if you don't want to use it,
then delete that layer.
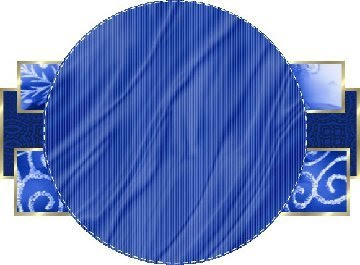
This is where I'm at now, I decided I didn't like the snowflake,
or the wording so I deleted it.
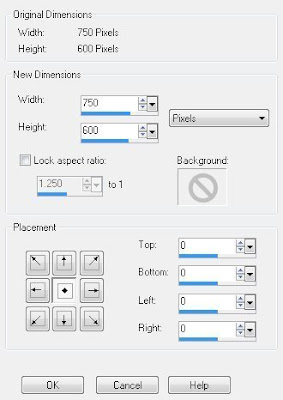
Canvas size>we will crop it later, gives you more
room to add your tubes.
Lets add our tubes now.
I added a misted tube in the circle.
Next I added>WP_SS_TREE.png
resize by 70 per cent and place how you want it.
Effects>drop shadow
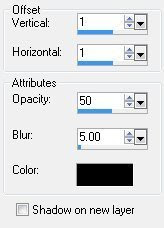
Add
WP_SS_GIFTBAG>resize by 30 percent
Add same drop shadow.
Add
WP_SS_HOLLYPRESENT>resize by 25 percent
Drop shadow
Add
WP_SS_ROUNDPRESENT>resize by 25 percent
Drop shadow
Arrange with mover tool the way you want them.
Add
WP_SS_SANTA>resize by 50 percent
Drop shadow, place where you want him.
I put him over by the tree.
Add
WP_SS_SNOWMAN>resize by 30 percent.
Drop shadow, place where you want.
Add
WP_SS_POINSETTIARIBBON>resize by 30 percent
drop shadow, and place up toward the top.
Add your main tube now
resize as needed.
Add drop shadow.
Crop tool>get rid of any extra around the edge
you don't want there.
If your happy with the way everything looks
merge all layers.

Add a new layer and flood fill it with
a color for the background, or you can just leave it white.
It's all up to you.
Add any wording or anything else you wish to at
this time.
Add a new layer and add your water mark.
Good job we are all done.
You can now save your wonderful
creation and share with others.
Would love to see what you do with this.
Thank you for giving my tutorial a try.
I do hope you have enjoyed this tutorial, as much
as I did writing it,
and learned something new.
Have any questions or need help.
Just let me know, I'm always happy to help any way I can.
Jcuttlebear01@aol.com
Example below by Mary
thank you dear.
