Pages

Wednesday, June 3, 2015

BEACH BEAUTY


Tutorial by Jcuttlebear01 aka JoAnn
6/03/2015
I do these tutorials for fun and not
for any profit. I use them also as a learning tool to
help others learn the fun and art of paint shop pro.
Everything I use I have collected or bought and I
 don't claim to have
made anything other then the tag.
-----------------------------------------------------------------------------
All graphics I use, the copy write stays with the
original artist.
-----------------------------------------------------------------------------
Notes:
All settings will remain the same unless otherwise noted
This tutorial assumes you have a working knowledge of PSP
Remember to save often in case your PSP crashes.

I did this in PSP X 5 but sure any one will work
-----------------------------------------------------------------------------
Supplies
Mask~20-20
Font~Carpenter Script
Eye candy preset drop shadow
 HERE
Tube of choice, I used on by
VERYMANY
Called Hot Summer and can be found HERE
 SBK~By Pink Paradox Productions Called Message in a bottle
Can be found HERE OR HERE
-----------------------------------------------------------------------------
Plug in
Aliens skin eye candy 5 impact
-----------------------------------------------------------------------------
Open new image 700 X 700
Open>Message In A Bottle Frames (15)
Copy and paste to new image
Resize by 50%
Magic wand>select inside frame
Selection>modify>expand by 20
Add new layer
Open>Message In A Bottle Papers (5)
Copy and paste into selection>arrange
move down.
Deselect
Activate top layer
Open>Message In A Bottle (158)>palm trees
copy and paste as new layer>
Resize by 70%
Free hand tool>draw around the one tree
Edit copy>Edit cut
Selection none
Edit paste as new layer.
Move them how you wish.
Don't worry about the over hang there, we
will remove it.
Once you have the two like you want
merge down>freehand tool>
go around the bottom  part that you don't want
in your tag and delete it.
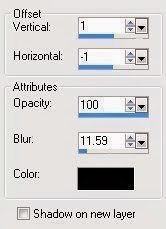
Add a drop shadow>

Layer>duplicate>mirror
Open>Message In A Bottle (157)>Palm tree
copy and paste as new layer>
Resize by>80%
Cut off the part you don't want showing.

Add same drop shadow.
Move down below the other trees.
Arrange how you want them.

How mine look.
Open>Message In A Bottle (110)>Sand
copy and paste as new layer>Resize by 35%
Bring down to bottom of frame>duplicate>mirror
once they are like you want them>merge down.
Add drop shadow

 Layer duplicate

 Open>Message In A Bottle (98)>Boat
copy and paste as new layer>Resize by 20%
Add drop shadow
Place how you want it.

 Open>Message In A Bottle (103)>Lighthouse
copy and paste as new layer>Resize>35%
Move to the left side.
Add>drop shadow

 Layer arrange move down
Open>Message In A Bottle (156)>Fern
copy and paste as new layer>Resize by 30%
Add drop shadow
Place how you want it. 

Open>Message In A Bottle (107)>Sign
copy and paste as new layer>Resize by 30%
Add drop shadow
Place how you want it.

 Message In A Bottle (152)>Grass
copy and paste as new layer>Resize by 25%
Add drop shadow
Place how you want it.

 Open>Message In A Bottle (101)>Poles
copy and paste as new layer>Resize by 25%
Add drop shadow
Place how you want it.

 Message In A Bottle (1)>Cockatoo
copy and paste as new layer>Resize by 20%
Add drop shadow
Place how you want it.

 Message In A Bottle (11)>Seahorse
copy and paste as new layer>Resize by 20%
Add drop shadow
Place how you want it.
Duplicate and place other side of the boat.
Resize by 80%

 Open>Message In A Bottle (75)>Shells
copy and paste as new layer>Resize by 20%
Add drop shadow
Place how you want it.
Mine so far

Open>Message In A Bottle (100)>White chair
copy and paste as new layer>Resize by 30%
Add drop shadow
Place how you want it.

 Open>Message In A Bottle (20)>Umbrella
copy and paste as new layer>Resize by 35%
Add drop shadow
Place how you want it.
Message In A Bottle (17)>Beach bag
copy and paste as new layer>Resize by 25%
Add drop shadow
Place how you want it.
Message In A Bottle (21)>Lotion
copy and paste as new layer>Resize by 20%
Add drop shadow
Place how you want it.
Message In A Bottle (16)>Flip Flops
copy and paste as new layer>Resize by 20%
Add drop shadow
Place how you want it.
Open>place tube of choice>resize to your
liking and place how you want it>drop shadow.
I used Very Many tube Hot Summer
Message In A Bottle (3)>Dog
copy and paste as new layer>Resize by 20%
Add drop shadow
Place how you want it.
Message In A Bottle (9)Seagull's
copy and paste as new layer>Resize by 30%~mirror
Add drop shadow
Place how you want it.
Duplicate image>resize by 75%~mirror
Place how you want it.
Message In A Bottle (40)~Bottle
copy and paste as new layer>Resize by 25%
Add drop shadow
Place how you want it.
Once you are happy with everything merge layers
Layer duplicate
Close the top layer off
On the bottom layer>Resize by 90%
Aliens skin eye candy 5 impact>
Perspective shadow

On the bottom layer>apply mask
20-20
Merge group

 Open top layer>resize 85%

 If your happy with the way it looks
merge visible>add the  


Aliens skin eye candy 5 impact>
Perspective shadow>same as before.
Add all watermarks needed
Resize to your liking>
Adjust>sharpness>  


Save either as a JPEG...or a PNG
file.
Would love to see what you do with this.
Thank you for giving my tutorial a try.
I do hope you have enjoyed this tutorial, and learned
something new.
Have any questions or need help.
Just let me know, I'm always happy to help any way I can.

Thursday, March 6, 2014

Spring time Beauty


Tutorial by Jcuttlebear01 aka JoAnn
3/06/2014
I do these tutorials for fun and not
for any profit. I use them also as a learning tool to
help others learn the fun and art of paint shop pro.
Everything I use I have collected or bought and I
 don't claim to have
made anything other then the tag.

----------------------------------------------------------------------------
All graphics I use, the copy write stays with the
original artist.
-------------------------------------------------------------------------------
Notes:
All settings will remain the same unless otherwise noted
This tutorial assumes you have a working knowledge of PSP
Remember to save often in case your psp crashes.

I did this in PSP 9 but sure any one will work
--------------------------------------------------------------------------------
Supplies
Mask ~ of choice
Tube of choice~Tube I used
 is called Alice, and its a Very Many tube~ you can buy it HERE
On header tag another tube of Very Many called Andrea you can buy it HERE
Check out all the pretty tubes on the site.
Font~ I used Brock Script

Template~(34) By denz designz. HERE
Scrapbook kit is~Spring beauty~by Amy Marie and is on sale HERE
------------------------------------------------------------------------------
Open template duplicate and close original.
You have these layers.
Delete the ones I have closed off I'm not using them.
Canvas size
In layer pallet highlight layer 3, I close off all my layers
except for the one I'm working on.
Select>magic wand tool.  If you use a feather it gives you
smoother edges.
Outside Raster 3>selection>invert
Select a paper I used PP 10 from the kit.
Copy and paste into selection.
Effects>3D>Inner bevel
Deselect
Drop shadow
Close off raster 3 and move up to the circle>magic wand
same setting copy and paste into a paper of choice>PP 12 is what I used.
Same bevel effect>deselect>add drop shadow.
Move up to the back rectangle>select inside>
copy and paste into a background of choice>
I used PP 22
Deselect
Add bevel>add drop shadow
Move up to rectangle frame>magic wand>
I flood filled with gold beads>inner bevel>deselect>drop shadow
Highlight>dotted outline>deform tool and move it so it fits inside the frame.
Highlight the top right rectangle>Magic wand>copy
paste into selection paper of choice>
I used PP 23
---------------------------------------------------------------------
Bevel>deselect>drop shadow.
On the dotted lines>Colorize them if you wish.
I did them in a green.
-----------------------------------------------------------------------
Now we are ready to add the accents
Add>123 from the kit>resize by 65 percent>add drop shadow
Duplicate this about 3 times and spread them out how you want them.
Add>40 from the kit>resize by 60 percent
Add drop shadow.
Duplicate>move over to the left side>I also
wanted the swirl to show up more so resized it
by 110 percent>that is up to you.
Add>number 67 resize>65 percent>
Place over by the stone wall.
Add>number 34>resize by 50 percent>duplicate and move
over on the other stone wall part.
Add drop shadow
---------------------------------------------------------------
Add>number 47>resize 40 percent>drop shadow.
-----------------------------------------------------------------
Add>number 27>mirror image>move to the left toward
the bottom.
Add drop shadow
----------------------------------------------------------------
Add>number 15 resize>60 percent>move over on the stump>
mirror>add drop shadow.
------------------------------------------------------------------
Add>number 35 resize 40 percent>mirror>place on the other stump
add drop shadow
---------------------------------------------------------------
Add>number 41>resize 55 percent>add drop shadow 
Move it how you want it.
----------------------------------------------------------------
Add>number 31 resize 40 percent>add drop shadow
---------------------------------------------------------------
Add>Number 56>resize 45 percent>drop shadow
place in front of the stumps.
------------------------------------------------------------------
Add>number 16 resize 25 percent mirror>place on mushrooms>
drop shadow.
------------------------------------------------------------------
Copy and paste as new layer>tube of choice.
Resize as needed.
The one I used went to 40 percent. Move over to the right side
Add drop shadow.
-------------------------------------------------------------------
Add word art of choice>drop shadow
Add any thing else you wish to at this time.
When you have moved everything around like you want it.
Merge layers>add drop shadow.
-----------------------------------------------------------
Mask
Copy and paste a paper of choice as a new layer>arrange send
to bottom
Mask of choice.
Layers>new mask layer>from image>
Merge group
Effects>3 D inner bevel
Add water mark
Resize to your liking
Adjust sharpen
-----------------------------------------------------------
Your now ready to save your work of art.
Would love to see what you do with this.
Thank you for giving my tutorial a try.
I do hope you have enjoyed this tutorial, and learned
something new.
Have any questions or need help.
Just let me know, I'm always happy to help any way I can.

-----------------------------------------------------------------------
Thank you~BrizExoticEyes

Friday, February 21, 2014

Polar bear fun day

Tutorial by Jcuttlebear01 aka JoAnn
2/21/2014
I do these tutorials for fun and not
for any profit. I use them also as a learning tool to
help others learn the fun and art of paint shop pro.
Everything I use I have collected or bought and I
 don't claim to have made anything other then the tag.
---------------------------------------------------------------
All graphics I use, the copy write stays with the
original artist.
---------------------------------------------------------------
Supplies
Font of choice>or the one I used Black Chancery
Graphic of choice
Tubes of choice
What I used HERE

Plug in
Eye candy 5 impact
Penta>dot and cross
Filters unlimited
-----------------------------------------------------------------
Place selections in the selection folder.

Import the eye candy 5 impact glass

Import>brushed metal to eye candy 5 impact.
-----------------------------------------------------------------
Notes:
All settings will remain the same unless otherwise noted
This tutorial assumes you have a working knowledge of PSP
Remember to save often in case your psp crashes.

I did this in PSP 9 but sure any one will work
------------------------------------------------------------------
Open new image 700 X 550

Pick a light color for foreground>#87b9b0
from your graphic>dark color for background>#1a382e
Colors I used from this graphic
flood fill with light color from your graphic
Selection>Load from disc>selection A
Promote selection to layer>effect>Penta>Cross and Dot
3 D effects>inner bevel>
Deselect
Merge down
Selection>load selection from disc>Selection 3 A
Promote selection to layers>
Filters unlimited>Paper textures>
Effects>Edge effects>Enhance
Eye candy 5 impact>glass>imported from supplies>
eyecandy5impactglassJC
If you can't get it to work for you this is
the settings I used.
Deselect

Merge down

Selection>load selection from disc

1-AA>Hit delete key on keyboard.

Selection>modify>
New raster layer>flood fill with gold beads.

Effects>3D inner bevel
Deselect
Selection>load selection from disc again
1-AA
Copy and paste as new layer graphic of choice.
Resize graphic if need be I went 75 percent

Selection>invert>delete

Layer arrange move down.

Deselect

Merge all layers

Add new raster layer>selection>load
selection from disc>2-A
Eye candy 5>brushed metal>import
Fundayjcuttlebearr01 make sure you change the color
to what your using and want it to be, I went with Foreground
color on the first one.

Settings I used in case the preset don't work for you.
Effects>edge effect>enhance
Give same glass effect as we did with the other.
Deselect

Layer duplicate>image mirror>merge visible

Add new raster layer>

Selection>2-b
Flood fill with color of choice>I used FFFFFF

Add same brush metal, be sure and change the color

Effects>edge effects>enhance>

Add same glass effect.

Deselect

Layer duplicate>image mirror.
Merge visible

Layer new raster layer
Selection>
Flood fill with color of choice>I used background color.
Add same brush metal, be sure and change the color
Effects>edge effects>enhance>
Add same glass effect.
Deselect
Merge visible

What mine looks like now.
Open
Accent>CJBMixAccent005b I used raster layer 1 the gold
Resize 110 pixel>move up along the edge like this
Layer duplicate>image mirror>bring the 2 together so they fill up
across the edge>
Merge down
Add drop shadow
Layer duplicate>image flip
No need to move should be right.
Layer duplicate>image rotate Left>90 degrees
move over to the left
Layer duplicate>image mirror>

Close off background layer

Merge visible

Reopen the background layer

Copy and paste accent> 
JFF_AYNIL_flower

Colorize it to go with you work.
Or use something else if you wish.
Add drop shadow

Duplicate>mirror>duplicate>flip>duplicate

mirror>merge visible layers.

Add>accents_Dani04.psp>resize 105
add drop shadow>duplicate>image flip
merge down>duplicate layer>mirror

Merge visible layers.

Add tube of choice>I added a little polar bear
resized 30 percent>drop shadow
Moved down to lower right of frame.

Add any others you wish>I added a different polar bear
resized 30 percent>drop shadow>mirrored>moved over
to the left of the frame.
Add border 1 pixel foreground color

Add border 5 pixel background color

Add word art or any thing else you want
at this time.

Add water mark

Resize to your liking

Adjust sharpen

Your now ready to save your work of art.

Would love to see what you do with this.
Thank you for giving my tutorial a try.
I do hope you have enjoyed this tutorial, and learned
something new.
Have any questions or need help.
Just let me know, I'm always happy to help any way I can.

I did the 2 below also.
THANK YOU LAURA

Wednesday, February 19, 2014

Lion hearted family

 
Tutorial by Jcuttlebear01 aka JoAnn

2/19/2014

I do these tutorials for fun and not
for any profit. I use them also as a learning tool to
help others learn the fun and art of paint shop pro.
Everything I use I have collected or bought and I
 don't claim to have
made anything other then the tag.
------------------------------------------------------------------------
All graphics I use, the copy write stays with the
original artist.
-----------------------------------------------------------------------
Supplies
 
Font of choice>Affair
Graphic of choice
Tubes of choice
What I used HERE
----------------------------------------------------------------
Plug in
Eye candy 5 impact
Penta>dot and cross

Notes:
All settings will remain the same unless otherwise noted
This tutorial assumes you have a working knowledge of PSP
Remember to save often in case your psp crashes.
I did this in PSP 9 but sure any one will work.
-----------------------------------------------------------------------
Place selections in selection folder.
Install plug ins as needed.
--------------------------------------------------------------------------
Open graphic of choice.
 
Open new image 700 X 500
 Pick a light color from your graphic,for foreground>dark for background.
Flood fill with the foreground color>new raster layer>fill with background color.
Layers>New mask layer>from image>
Merge group>merge visible
Take selection tool and go around the middle where the
frame part is>edit cut
Deselect 
Selection>load saved selection>load selection from disk>
Template 1
flood fill with color of choice>I'm using gold glitter patter, on this set.
It's in the supplies.
Keep selected>effects>eye candy 5 impact>glass>
Athe.f1sglass>or if don't work
Deselect
Selection>load saved selection>load selection from disk>
Template 2
flood fill with color of choice>I'm using a white N gold pattern, on this next set.
It's in the supplies.
Give this the same glass effect as in the last set.
Deselect
 
Selection>load saved selection>load selection from disk>
Template 3
flood fill with color of choice>or leave as is
Give it the glass effect
Deselect
Select inside the frame>selection>modify>expand 7
Add new layer>copy and paste into selection graphic
of choice>layer arrange move down.
Deselect
 
Merge down>if your not adding any thing more inside of frame.
 
Add tube of choice>resize as needed.
Place where you want it.
I used a lion>resized 30 percent mirrored>placed
on left side of the frame.
 
Add drop shadow.
Add corners of choice>resize 50 percent>move to corner
of frame>drop shadow>duplicate>mirror.
Add lion tube of choice>resize as needed.

Add drop shadow>I took and place a part of the tube
on the other side, its in the supplies if you want to use it.

Add same drop shadow.

Add border 1 pixel color of choice

Add border 3 pixel background color

Add border 1 pixel color of choice
 
Add border 25 pixel background color

Select inside last border>eye candy 5 impact>bevel
Settings I used are in the supplies.
Deselect
Select inside the flat part of  that border>
Add>effects>dot n cross
Deselect
Place word art or any thing else you wish to.
Add your watermark
Resize to your liking.
adjust sharpen

Your now ready to save your work of art.

Would love to see what you do with this.
Thank you for giving my tutorial a try.
I do hope you have enjoyed this tutorial, and learned
something new.
Have any questions or need help.
Just let me know, I'm always happy to help any way I can.
Another made by me