
Tutorial by Jcuttlebear01 aka JoAnn
5/21/2010
I do these tutorials for fun and not
for any profit. I use them also as a learning tool to
help others learn the fun and art of paint shop pro.
Everything I use I have collected don't claim to have
made anything other then the tag.
Notes:
All settings will remain the same unless otherwise noted
This tutorial assumes you have a working knowledge of PSP
Remember to save often in case your psp crashes.
I did this in PSP 9 but sure any one will work.
Supplies I used
HERE
Font is included that I use called Apricot
Tubes and all the others in the zip to.
Plug ins:
AAA frame works HERE
Filters unlimited HERE
Filters gallery U HERE
Download all supplies needed,
open and minimize them in
your psp.
Lets get started:
1) Open a new image 600 X 500
2) Open misted tube of choice and duplicate
close the original.
3) Pick a light color for foreground....#e6aba7
Dark color for your Background.....#db5e5f
these are the colors I am using from my tube.
4) Flood fill with your foreground color.
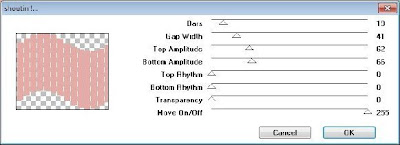
5) Effects>Plug in>VM Extravaganza>Soutin'!
Setting I used
Hint:
You can make your slats different by playing around with the settings.
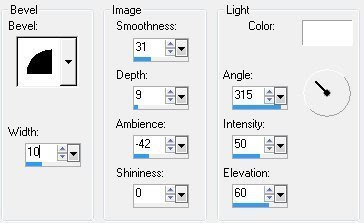
6) Sections>all>selection float.
7) Effects>3 D inner bevel
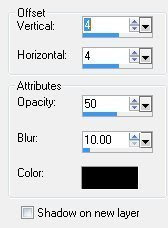
8) Effects>3 D drop shadow
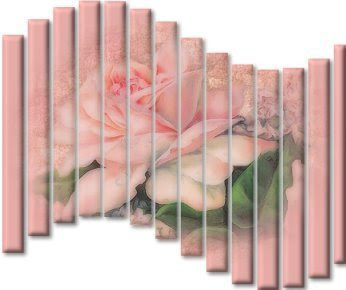
9) Keep selected and copy and paste into
selection your misted flower tube.
Deselect.
This is what I have so far.
10) Add a new raster layer>move it down.
Flood fill with background color.
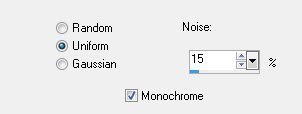
11) Adjust>add noise
12) Copy and paste as a new layer either a nice lady tube,
or one of choice.
13) Add same drop shadow as before.
14) Move and arrange the tube how you like it,
resize if needed.Layers merge all.
15) Add Candle or any other accents you wish
to add to your tag.
16) Add a new layer and add wording I used a brush word art.
Arrange how you want it.
17) Add same drop shadow, merge all layers.
18) Add a 3 pixel border foreground color
2 pixel border background color
3 pixel border foreground color.
19) Select>all modify and contract by 10
Selection>invert
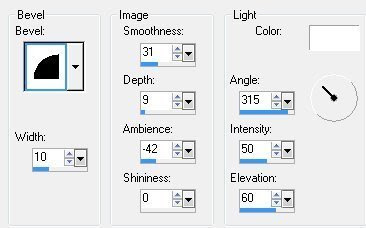
20) Add a inner bevel
 Deselect
21) Add a 20 pixel border background color>magic wand
and select it.
22) Effects>Plug in>AAA frame texture
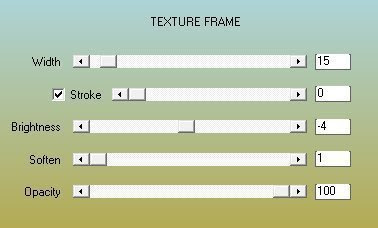 I wanted it darker so I repeated it.
23) Effects>Plug in>Filters unlimited

Deselect
24) Add 3 pixel border light color
2 pixel dark color
3 pixel light color
25) Select>modify>contract by 10>invert
Give same bevel as we did earlier.
Deselect
26) Add a 20 pixel border of the dark color.
Select
27) Get a pattern you can use the one I supplied or
one of your own. It's up to you.
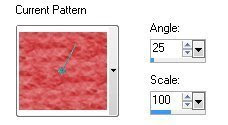
28) Flood fill the border with this pattern.
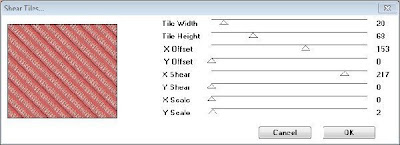
29) Effect>filter factor U Shear tiles
 30) Effects>same inner bevel as we did earlier
Deselect.
31) Add 3 pixel border light color
2 pixel dark color
3 pixel light color
32) Select>modify>contract by 10>invert
Give same bevel as we did earlier.
Deselect
Add a new layer and place your watermark.
Merge all layers.
We are now done.
Would love to see what you do with this.
Thank you for giving my tutorial a try.
I do hope you have enjoyed this tutorial, and learned
something new.
Have any questions or need help.
Just let me know, I'm always happy to help any way I can.
Jcuttlebear01@aol.com
A couple more I did:
These examples are from Mary and Pati a couple of ladies from my list.
Thank you so much.


No comments:
Post a Comment