


Tutorial by Jcuttlebear01 aka
JoAnn
1/28/2014
I do these tutorials for fun and
not
for any profit. I use them also as a learning
tool to
help others learn the fun and art of paint
shop pro.
Everything I use I have collected or bought
I don't claim to have
made anything other then the tag.

This tutorial is written with the idea
you
have some knowledge of PSP.
I did this tutorial using PSP 9 Buy any will work.

SUPPLIES
Tube of choice
One I used is by Ismael Rac
Font of choice
Things I used HERE
Except for the kit.
SBK is the great work by Queen Brat
and the kit is called All my love tagger and you will find
it
Stop by her blog and check out other kits has.
Lets get started
Open new image 700 X 70
We will resize later.
Open frame your going to use.
One I used is in the supplies.
Resize by 80 percent
With magic wand click on the inside of
the
frame>Selection>modify expand by 6>I
used
QBD_All My Love_Paper 02 from the kit.
copy and paste as a new layer your
choice
of paper for your back ground in the
frame.
Resize the paper by 80 percent>selection
invert>
Delete.
Move this below the frame.
Deselect.
Open
QBD_All My Love_Lace Heart 03
and resize it by 37 percent
Copy and paste as a new layer>Add
a drop shadow of choice.

Open
QBD_All My Love_Word Art 01
Resize 35 percent>copy and paste inside the
frame
add drop shadow. I took deform tool and turned it
how
I wanted it.
Highlight the top layer>QBD_All
My Love_Border
03>resize by 37 percent
Copy and paste a new layer and move it
up on the frame at the bottom.
I used selection tool and cut off some of the
lace.

Open>QBD_AllMyLove_Cherub01
Resize by 40 percent.
Copy and paste as a new layer place so it
looks
like its sitting on the lace. Add drop
shadow>change blur
to 15.
Open>QBD_AllMyLove_Gift01 resize by 50
percent
copy and paste and place over on the left
side>add
drop shadow
Open>QBD_AllMyLove_Gift02 resize by 45
percent
copy and paste and place over by the other gift
box>
Add drop shadow.
Open>QBD_AllMyLove_Candy01
Resize by 30 percent>copy and paste as new
layer>
Mirror image>move down to the left side at the
bottom
Of the frame>add drop shadow.
Open>QBD_AllMyLove_Elephant
Resize by 60 percent>copy and paste as new
layer>
Move over like sitting on the box of
candy.
Add drop shadow.
Open>QBD_AllMyLove_LuvBug01
Resize by 25 percent>copy and paste as new
layer>
Place over to the left by the box of
candy.
Add drop shadow.

Open>QBD_AllMyLove_Lollipop01
Resize to your liking>I went 85 percent>move it
down so the edge is
behind the elephant>I took eraser tool and removed the
stick.
Add drop shadow.
Open tube of choice and resize as needed.
Copy and paste move to right side of
work.
Add drop shadow
Open>QBD_AllMyLove_Candles01
Resize by 45 percent>copy and paste as new
layer
Move over to the right side>add drop
shadow.
Open>QBD_AllMyLove_Shoe02 resize by 25
percent>
copy and paste as new layer over by the
candles
give them a drop shadow.
Add any thing else you wish to at this time>make
final
adjustment to tubes
When happy with the way it looks>merge
visible.
Open a paper of choice that you would like for you
mask.
Copy and paste as new layer move down.
Layer>New mask layer>from image>
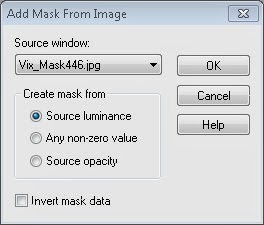
click ok>merge group.
Add your water mark and we are all
done.
Resize to your liking.
Thank you for giving my tutorial a try.
Would love to see what you do with this.
Have any questions or need help.
Just let me know, I'm always happy to help any way I
can.

No comments:
Post a Comment