Pages

Wednesday, September 30, 2009

Fairy Kisses

A tutorial I played with
You can find here here at:
Creations by Chris

Wednesday, September 23, 2009

Day dreamer


Tutorial by Jcuttlebear01 aka JoAnn

9/23/2009

I do these tutorials for fun and not
for any profit. I use them also as a learning tool to
help others learn the fun and art of paint shop pro.

Supplies needed
Graphic of choice.
Tubes of choice.
Font of choice.
Graphic plus plug in
HERE
Filters Unlimited HERE

Remember to save often in case your psp closes.

1. Open a graphic you wish to use.
Duplicate and close the original.


2. Add a 3 pixel border of a color that isn't in your graphic.
Activate it with your magic wand.
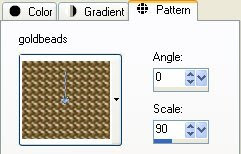
Flood fill with gold beads.

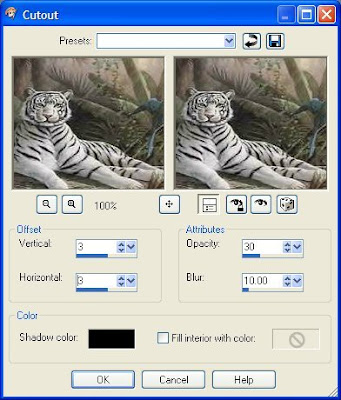
3. Selection invert and Effects 3D
Cut out with these settings.

repeat using a minus 3 on the Vertical, and Horizontal.
Deselect.

4. Add another 5 pixel border using a light color from your graphic.
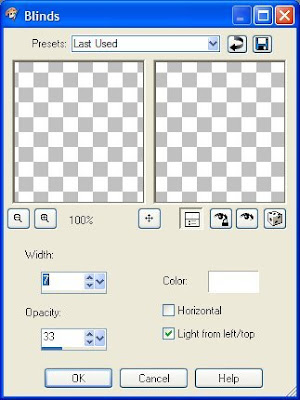
Activate it and effects texture, blinds with these settings.
Then deselect.


5. Add another 3 pixel border with a different color, and select it
flood fill with the gold beads again.

6. Add another 5 pixel border, use a dark color this time from your graphic.
Activate it and add the same blind effect.
Deselect

7. Add a 1 pixel black border.

8. Add a 30 pixel border but use the same light color you did earlier.
Then activate it.
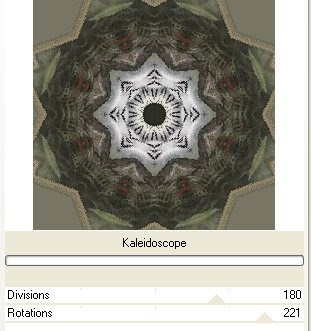
Use graphic plus


This is the settings I used but you can play around
until you get something you like with the graphic you are using.
When happy with it deselect.

9. Activate each of the 4 corners and add a new raster layer,
flood fill with the gold beads.

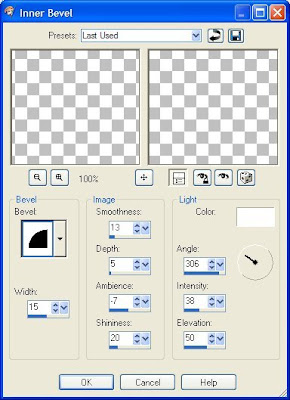
Then effects 3D and add an inner bevel to this.
Then deselect.


10. Add a 1 pixel border color black, or one of your choice.

11. Add a 5 pixel border using the light color, and add
the same blind effect we used earlier

12. Add a 5 pixel border using the dark color you used before.

13. Add a 3 pixel border and select flood fill with the gold beads.
Deselect.

14. Add a 5 pixel border using the light color and add
the same blind effect.

15. Add 1 pixel black border.

16. Add a 40 pixel border using the dark color.
Activate it.

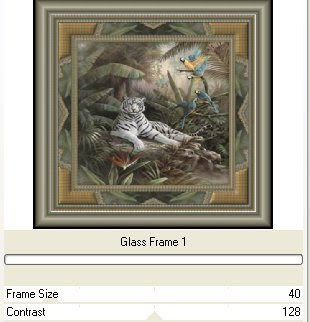
17. Filters unlimited button and Frame
Use the glass frame 1


If your happy with the way it looks
then deselect.

Add any tubes or corner accents you wish to at this time.

Then add your water maker and your all done.
Save your work of art and your ready to share it.

Would love to see what you do with this.
Thank you for giving my tutorial a try.
I do hope you have enjoyed this tutorial, and learned
something new.

Have any questions or need help.
Just let me know, I'm always happy to help any way I can.
Jcuttlebear01@aol.com

Couple more examples by me.


Wednesday, September 16, 2009

Cherish


Tutorial by Jcuttlebear01 aka JoAnn

9/16/2009

I do these tutorials for fun and not
for any profit. I use them also as a learning tool to
help others learn the fun and art of paint shop pro.

Supplies
Tube of choice
No outside plug ins used.
I did this in psp 9 but can be done in any psp.

Kit is called love and its here at....
http://seachellscrapz.blogspot.com/

Template is # 8 and you can find it here.
http://simplysensationalscraps.blogspot.com/search/label/Templates

1. Open you template and duplicate it, close the original.
then delete the top layer.

2. Activate the gray lines layer.
Find a color or paper you wish to use.
I used paper 9 and rotated it by 90 degrees all layers.

3. Copy and paste it into this layer, I then used a inner bevel
with these settings.


4. Deselect and add a drop shadow to this layer.


5. Activate the black rectangle middle
Find another color or paper you wish to use for this.
I used paper 2 for this one.
Copy and paste it into the selection.
then deselect.

6. Activate the frame layer just the edge of it,
Then you can flood fill with a color of your choice.
I used a color from the first layer....#930c33


7. Apply the same inner bevel as before.
Then deselect

8. Activate the other part of the gray there in the frame,
and flood fill with a different color, I used white, then
inner beveled it as before.
Then deselect.

9. Activate the other part there that is still black,
and you can flood fill with a color or use another
paper from the kit.......I used paper 8

10. Activate the little square layer now,
you can do one of two things.
Click on each one, or click on the outside part
and then go to selection and invert, so just the square are activated.

11. Then selection and modify and expand by 1

12. Next pick 2 colors you want to use, and flood fill them alternating the colors.
Once you have them filled give them the same bevel as before,
the deselect, and add the same drop shadow.
except lower the blur to your liking.
This is what I have now, and I'm ready to add
my tube and other accents to this.


Add your water mark, and name or anything else.
Re size to your liking.

Your now done, and ready to share your work of art.

Would love to see what you do with this.
Thank you for giving my tutorial a try.
I do hope you have enjoyed this tutorial, and learned
something new.
Have any questions or need help.
Just let me know, I'm always happy to help any way I can.
Jcuttlebear01@aol.com

Hugs and happy PSP'n
JoAnn

Want to thank my two testers for a wonderful job.
They both are from my list.....JoAnn's Awesome Brats.

Here is another I did using another pretty kit
called
Seachell-Hope Scrap Kit


These two samples below are from
GGMOM9 aka Mary


This sample is from
ameripex97 aka Kay


Thank you Pati

Photobucket

Friday, September 11, 2009

Ready 4 Love

Tutorial by Jcuttlebear01 aka JoAnn

9/10/2009

I do these tutorials for fun and not
for any profit. I use them also as a learning tool to
help others learn the fun and art of paint shop pro.

Supplies needed

Scrapbook kit can be found
HERE
Called Diamond Blues it's a free scrapbook kit.

http://www.scrapsdimensions-dorisnilsa.blogspot.com/

All is the work of Doris of Scrappy Dimensions
Template I used is
HERE
#13

Tube is from My PSP Tubes.com
Here

http://www.mypsptubes.com/
PSP 9
Plug in used.
AAA Foto frame
here

Open your PSP
Find the things your going to use
for this tutorial.
Once you have done that your
ready to go.

1. Open the template and duplicate it and close the original.

2. Delete the all layers except for the 4 bottom ones.
These are the only ones we will be working with.


3. Open a paper that you wish to use on the
scalloped circle layer, activate it and copy and
Paste the paper of choice into the selection.
I used paper 3.
Selection and none.

4. Add a drop shadow to this layer.


5. Activate the next layer and select it.
Find another paper and copy and paste it into
the selection. I used paper 5, the deselect.

6. Effects 3d and inner bevel.


7. Effects texture effects, I used these settings.


8.. Activate the circle layer and find a paper
that you want to use, and copy and paste it
into the selection.
I used paper 9
Keep Selected

9. Find the tube you wish you use
and copy and paste it as a new layer.
Move it to where you want it,
Then go selection, and invert and delete
one time. then deselect.

10. Get the rose wreath and re size it
60 percent, make sure that all layers is not check.
Then copy and paste it to your work as a new layer.

This is what it will look like now.


11. Get your eraser tool, your going to remove the part
of the wreath that is over her face, and arm.


Hint.......
If you lower the opacity on the wreath layer it makes it easy to see where
your wanting to take off.

If you goof and take off to much don't worry remember edit undo.
You don't need to start over with it.


12. Add the same drop shadow you used before to
the tube layer.

If your happy with the way everything looks
your ready to add some accents now.

13. Find a glitter doodle you wish to use,
I used doodle 2 re size it 60 percent and
copy and paste it to your work.

14. Move that layer just above the square layer,
get your mover tool and place how you want it,
Add same drop shadow as before.

15. Then duplicate layer and mirror and flip it.

16. Once your happy with the way everything looks.
Close off the background layer, and merge all layers.

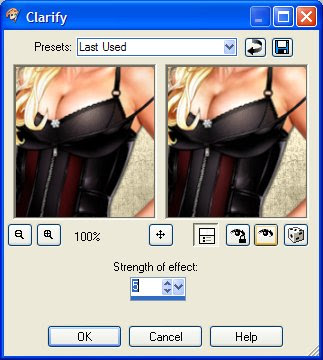
17. Re size this layer to your liking, I went to 90 percent.
Adjust and brightness and contract by 5.


18. Add a new raster layer.
Move it below the merge layer.

Selection and all
find a paper you want to use for the background.
I used paper 1 from the kit.
Deselect

19. Re size to your liking
I went to 400 Pixels.
Check all layers.

Next I added
AAA Foto frame


20. I then added the diamond accents didn't re size them.
You will need to cut off what you don't want showing on the tag.

22. Next I added the candles and re sized them by 25 percent.
And the shoe by 15 percent.
I added the same drop shadow to all my accents
except for the diamonds.

You can do it how you wish its your tag......it's fun to play
and just see what you can come up with your ideas.


23. When your happy with everything, merge all layers.

24. I now added a white 1 pixel border,
then a 5 pixel using the background color I used.

25. Then added the foto frame one more time.
Same as before but change the frame size to 3
and the matte to 0

Add your water mark, and name or anything else.

Your now done, and ready to share your work of art.

Would love to see what you do with this.
Thank you for giving my tutorial a try.
I do hope you have enjoyed this tutorial, and learned
something new.
Have any questions or need help.
Just let me know, I'm always happy to help any way I can.
Jcuttlebear01@aol.com

Hugs
JoAnn
Another way I did this tag.

Thank you ladies for trying my tutorial.
All are members of my list....
JoAnn's Awesome Brats!
Sample by
ameripex97 aka Kay


Photobucket

Sample by

ggmom9 aka Mary

Photobucket

Sample by

Fairladi101 aka Pati

Photobucket

Tuesday, September 8, 2009

Happy Fall


Tutorial by Jcuttlebear01 aka JoAnn

9/6/2009


I do these tutorials for fun and not
for any profit. I use them also as a learning tool to
help others learn the fun and art of paint shop pro.

Supplies needed

Plug in Eye candy 4

Beautiful fall
Scrapbook kit can be found
HERE
Called Autumn days
http://www.scrapsdimensions-dorisnilsa.blogspot.com/
All is the work of Doris of Scrappy Dimensions
Template I used also is
HERE
#26
Graphic of choice.
Tube of choice.
Done in psp 9

1. Open the template and duplicate and close the original.

2. Re size to 500 X 500
all layers.

3. Delete raster 1
and the rectangle one.

4. Click on the leaves with the selection tool, then
get a paper you want to use.
From the scrapbook kit.

Or you can just fill with a color of choice.
It's all up to you.

I used paper 1 for the leaves, copy and paste into your
selection, then keep selected and add eye candy 4 glass
Settings I used.


5. Add a bevel to this, settings I used.


6. When happy with what you have then deselect.
Add a slight drop shadow


7. Select stem and find a color or paper you want it to be.
I used paper 7 for it, then gave it the same eye candy glass, and
added a drop shadow.
When happy with it deselect.

8. Select the doodle, and find a color or paper you want to use for it.
I used paper 1, then inner bevel with same settings we used earlier.
Then add the same drop shadow to it.

9. Select the circle add a paper or color of choice.
I used paper 9

Add a bevel to this but change the


Deselect and
Add same drop shadow.

10. Select the rectangle and eye candy I used these settings.
Glass tubing.


11. Selection and modify contact by 10, copy and paste
the graphic of choice into the selection.
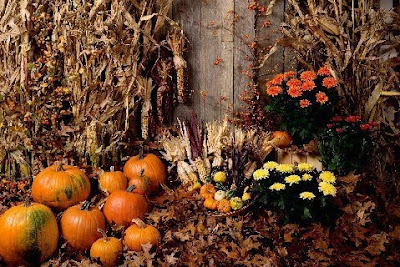
I used a nice autumn graphic that went well with
my colors of paper I used.
This is the one I used, don't know who the artist is.


Then selection and none if your happy with what you have.

Merge all layers


This is what mine looks like so far.

12. Now you can add any accents or tubes you wish to it.
Add your water mark and name.

Be sure and merge all layers,
Re size to your liking, and your ready to save
your work of art if you are happy with it.

Would love to see what you do with this.
Thank you for giving my tutorial a try.
I do hope you have enjoyed this tutorial, and learned
something new.

Have any questions or need help.
Just let me know, I'm always happy to help any way I can.
Jcuttlebear01@aol.com

Hugs


Sample by

ameripex97 aka Kay

Photobucket

Friday, September 4, 2009

My Heart Falls For You

You can find this fun tutorial at
Dels site come check hers out.

Loving passion


Tutorial by Jcuttlebear01 aka JoAnn

9/4/2009

I do these tutorials for fun and not
for any profit. I use them also as a learning tool to
help others learn the fun and art of paint shop pro.
All things I use are collected, the only thing I claim
Is the tag I make with these as my work.

Scrapbook kit can be found here.
SD NIGHT PASSION
Here

Supplies
Graphic of choice.

Open graphic your going to use.
The one I used is in the supplies.

Duplicate the original graphic and close it.

Find the scrapbook kit you are going to use and
open it up.
Open new image 600 X 500

1. Pick a paper I used Paper 4 for the back ground.
selection all and copy and paste into the new image.
Then image mirror.
Selection none.

2. Add a new raster layer, then go
Selection tool and set your


3. Selection modify find border and set to

4. Find a nice gold pattern or one of choice and flood fill the border.
Then add a nice inner bevel.
Selection and none.


5. Select inside the frame and modify and expand by 3, add
a new layer, find graphic your using and copy and paste into the
frame you made and move that layer below the frame, deselect.

6. Close of the back ground layer and merge the frame and graphic.
Reopen the background.

7. Add a new raster layer, and get selection tool and draw a narrow line across your
work, leave selected and flood fill with the gold pattern your using.
If its to your liking deselect.

8. Duplicate that layer 2 times and move them so they are set
the way you want them.
This is what I have now


9. If happy with the way they look close off the frame, and the
background and merge the lines together.
10. add string of beads, I never resized them, place
them over the gold lines you did.

11. I now added the candles and resized them
30 percent. Move them over to the corner where
you would like them.

12. I then took and cut off one of the hearts from the
elements and used my eraser to remove any unwanted
lines from the heart.

13. Copy and paste it on your image, where you want it.
then duplicate and just move them apart some.

14. add a rose 2 resize about 50 percent.
Place it on the right hand corner.

15. I then added butterfly 3
resize it about 15 percent copy
and paste it on the rose.

16. Crop to your liking now and get rid of what you don't want
around your tag.


17. Now if your happy with everything we will add borders.
Add a 2 pixel border pick a color that isn't in your back ground or
anything else......I used a blue, then select and flood fill with the gold pattern.

18. Add another border of 3 pixel black this time.

19. Add another 2 pixel border color doesn't matter, select and flood fill it with
the gold patter, and deselect.

20. Add a black 10 pixel border.
Go to filters unlimited and use button frame, glass frame 1
make the frame size down to 15 and apply.
You can also select and use a bevel of your choice if you like that.

Your ready to add your Water mark
You can also add a name or anything else you wish.

When done save your work of art and have the fun
of sharing.

Would love to see what you do with this.
Thank you for giving my tutorial a try.
I do hope you have enjoyed this tutorial, and learned
something new.
Have any questions or need help.
Just let me know, I'm always happy to help any way I can.
Jcuttlebear01@aol.com

Hugs