
Tutorial by Jcuttlebear01 aka JoAnn
1/26/2010
I do these tutorials for fun and not
for any profit. I use them also as a learning tool to
help others learn the fun and art of paint shop pro.
Scrap kit by Wicked Princess Called
You can download Hippity Hoppity it here
Get your supplies you wish to use for this tutorial, and
minimize them in psp.
OK lets get started.
Open new image 600 X 500
We will re size later.
1. Copy and paste the frame you wish to use.
I'm using frame 4 from the scrapbook kit.
Re size it 80 Percent.
2. Active the inside of your frame, selection
expand by 5 get your paper or graphic your using
for your background in your frame. This is the one I'm using
You can save it if you wish.
 New Raster layer and copy and paste into your frame.
Layer move down. Deselect.
3. Pick a color from the graphic or a paper from the kit
I'm using paper 4 for my background.
Copy and paste as a new layer and move down.
4. Copy and paste some bubbles, I used # 1 from the kit.
Copy and paste to your work as a new layer move it up to how you want it.
Add a drop shadow. I used a contrast color.
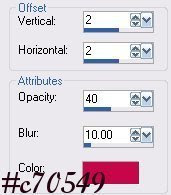
Then duplicate the layer, mirror and flip. Arrange them like you want.
5. Add a bow to the top of the frame.
I used bow 5
Re size by 45 percent.
If it's not on the top of your work, layer move to top.
6. Find the cattails copy and paste as a new layer.
Re size by 50 percent, move them how you want them.
Add same drop shadow but change the color to black.
Duplicate and mirror so you have one on each side.
7. Get the Lilly pad with the dragon fly on it.
I took my selection tool and just got the pad for now.
Copy and paste it to your work as a new layer
Re size it 50 percent and move it how you like it.
Add drop shadow.
Duplicate and mirror if you wish.
8. Get a frog and copy and paste it as a new layer.
I'm using the big bull frog from the kit.
Re size him down to 30 percent. move him to where you want.
Add drop shadow.
9. Add another frog to other side, I used the bull frog girl 1, from the kit.
Re sized by 30 percent.
Add drop shadow, arrange where you like her.
10. Add some dragon flies I used the one that is with the
Lilly pad and re sized by 50 percent.
Add a drop shadow and place where you want.
Duplicate him a couple of times and move them where you want.
11. Add a saying if you wish, I just used a brush
Add a new layer before you use the brush.
Move and place it where you want it.
Crop any excess you don't want around the tag.
Re size all layers, by 90 percent.
Make final adjustments then merge all layers
This is how mine looks now.

12. Add a 2 pixel border color of choice.
13. Add a 10 pixel border color of choice.
Select it and then
I copied and pasted a paper into it.
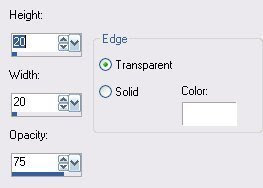
14 Add a 2 pixel border.
15. add a 20 pixel border.
Select and copy and paste another paper of choice.
Add a bevel, what I used.
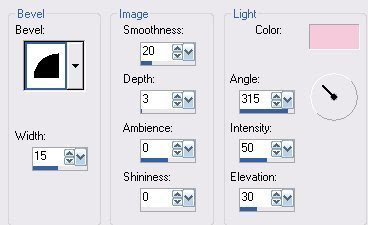
Deselect
Add your watermark and we are all done.
Save and share with your friends.
Would love to see what you do with this.
Thank you for giving my tutorial a try.
I do hope you have enjoyed this tutorial, and learned
something new.
Have any questions or need help.
Just let me know, I'm always happy to help any way I can.
Jcuttlebear01@aol.com
another way I did this
capricorncaz aka Caz
Thank you for giving it a try.
Victorian1123 aka Donna
A memeber of JAB
Thanks Donna
Thank you Claire


No comments:
Post a Comment