 Tutorial by Jcuttlebear01 aka JoAnn
2/9/2010
I do these tutorials for fun and not
for any profit. I use them also as a learning tool to
help others learn the fun and art of paint shop pro.
All things I use are collected, the only thing I claim
Is the tag I make with these as my work.
Feel free to share my tutorials, but link them back
to my site please.
This tutorial is wrote to where you need some
knowledge of psp.
PSP 9 is what I used
Scrapbook kit is from Wicked Princess and you can
buy it here
Wicked Princess : Twilight Scraps
Supplies are here
Template I used is from Cuddley/cuddley's blog
If anyone has the link let me know I couldn't find it.
Template # 1
Fonts Stereofidelic
WSL mask 204
Template # 1
Fonts Stereofidelic
WSL mask 204
Plug ins
Screen works HERE
Filters unlimited HERE
Open the template and duplicate it
close the original one off.
You will have a total of 9 layers in your layer pallet.
Delete # 9
close the original one off.
You will have a total of 9 layers in your layer pallet.
Delete # 9
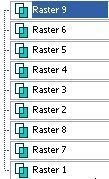 Activate raster 7 and 8 find a paper from the kit
you wish to use. Or you can just flood fill with a color from your tube.
I'm using paper 15 re size it down to 500 X 500
copy and paste as a new layer.
Arrange how you want it then selection, invert and delete.
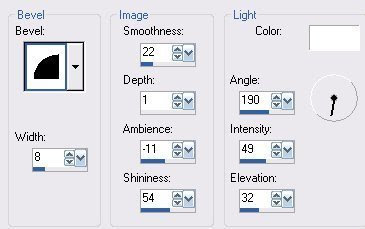
Deselect add a bevel to this.
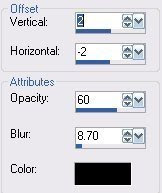
 Add a drop shadow to this layer.
 you can delete layer 7 and 8 now if you wish.
Activate layer 2
I'm using paper 11 re size it down.
Copy and paste as a new layer arrange how you like it.
Then invert, and delete.
Deselect.......can add the same bevel if you wish, and the drop shadow.
Delete layer 2.
Activate layer 3 and find another paper you want to use.
I'm using paper 17 for this layer.
copy and paste as a new layer, invert and delete.
Deselect
Add a same drop shadow.
Delete layer 3
Activate layer 4 I flood filled with different colors
From which I have used so far and did each one
a different colors.
I added eye candy glass to them.
Give this layer a slight drop shadow if you wish.
Activate layer 5 and use a different paper for it.
I used paper 13 copy and paste as a new layer.
Selection invert and delete.
don't deselect yet
Go to selection and modify expand by 2, then selection, modify
select, selection border by 3
add a new layer and flood fill with a color from your back ground.
Or use another paper its all up to you.
Deselect, add a the same bevel as before.
I left raster 6 alone and left it white.
If you happy with everything then merge these layers together.
This is what I have so far.
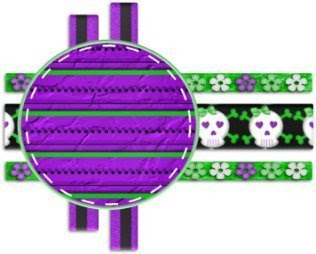
Now your ready to add any tubes or accents you wish to your tag.
I canvas sized the template to 700 X 700 centered, to give me more room to add things.
You can re size when your done.
Now just add what you wish, be sure and re size your tubes as needed.
I used my deform tool to pull some of them like I wanted them.
It's all up to you.
Add a drop shadow as you go to each tube if you wish.
When done and your happy with the way everything looks.
Merge all layers.
Then re size your this by 80 percent or so its up to you.
Copy and paste a paper as a new layer that you want for the background.
Or flood fill with a contrast color if you do this be sure and add a new layer first.
Layer arrange send to bottom.
Find your mask and apply it to the background.
If you don't know how to use a mask, please e-mail me
and I will be more then happy to teach you. It really is simple.
Now add any sayings or anything else you wish to at this time.
Add a new layer and flood fill with a nice color that you want to use
for you main background, layer arrange and send to the bottom.
Now crop off anything you don't want extra around the edge.
Be sure and leave enough room for your name.
Merge all layers.......Add a border 1 pixel color of choice.
add another 2 pixel border color of choice.
Add another border 10 pixel
Select and then
effects pattern generator.
 Deselect
Effects plug in filters unlimited button and frame
glass 1 frame size 20
We are now done.
Add your water make and your ready to re size to your liking.
Would love to see what you do with this.
Thank you for giving my tutorial a try.
I do hope you have enjoyed this tutorial, and learned
something new.
Have any questions or need help.
Just let me know, I'm always happy to help any way I can.


No comments:
Post a Comment