


Tutorial by Jcuttlebear01 aka JoAnn
2/11/2010
I do these tutorials for fun and not
for any profit. I use them also as a learning tool to
help others learn the fun and art of paint shop pro.
PSP 9 used for this tutorial
Knowledge of plug ins needed.
Remember to save often in case your psp closes.
Supplies:
Graphic of choice
Corner accents some I made HERE
Any tube you might want to add.
Font of choice.
Plug ins:
Filters unlimited HERE
Screen works HERE
FM Tile tools HERE
I'm using a darling bear graphic from the awesome work of John Bindon.
http://www.bindonart.com/index.html
Graphic of choice duplicate and close the original.
Re size it
 Pick a color from the graphic for the foreground
I'm using #956e6c which is from the bear.
Pick another color the background I'm using
#62332d
Find a gold patter that you want to use
This is the one I'm using.
 Add a 3 pixel border color not important.
Click on it with your magic wand.
Flood fill with the gold pattern.
Selection invert
Effects 3D cut out
 Repeated but this time change it to minus 2
Deselect.
Add 3 pixel border color is up to you.
I used my background color.
Add 3 pixel border flood fill with the gold pattern
Add 10 pixel border I used my foreground color
Select with magic wand and effects texture effects Blinds.
 Keep activated FM blend emboss,
Screen works canvas mess
Deselect
Filters unlimited and button and frame glass frame 1
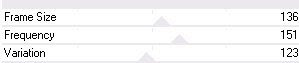
Frame size 15 contract 150
Add a 3 pixel border and flood fill with the gold pattern
Another 3 pixel border color you used the first time.
Add 3 pixel border and flood fill with the gold.
Add a 20 pixel border use the other color you used
for the 10 pixel border.
Activate it.
Filters unlimited use the
 I clicked on the randomize until I got an effect I liked.
this is the settings I used
Filters unlimited and Buttons and frame
Glass 1 I changed the frame size to 25
and the contrast to 130
Deselect
Add some corner accents if you wish
and anything else you want to finish the tag off.
I made some corners and they are in the supplies,
if you want to use them.
Copy and paste the corner, you wish to use
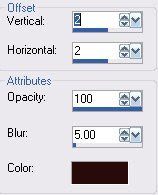
and add a drop shadow.
Layer duplicate and image mirror,
duplicate and image flip,
duplicate, image mirror.
Merge all layers.
Now if you wish to add a tube or anything else do so now.
Add your water mark, re size all layers to your liking.
Now you can save and share your work of art.
Would love to see what you do with this.
Thank you for giving my tutorial a try.
I do hope you have enjoyed this tutorial, and learned
something new.
Have any questions or need help.
Just let me know, I'm always happy to help any way I can.
Jcuttlebear01@aol.com
Couple more examples I made

Copy and paste the corner, you wish to use
and add a drop shadow.
Layer duplicate and image mirror,
duplicate and image flip,
duplicate, image mirror.
Merge all layers.
Now if you wish to add a tube or anything else do so now.
Add your water mark, re size all layers to your liking.
Now you can save and share your work of art.
Would love to see what you do with this.
Thank you for giving my tutorial a try.
I do hope you have enjoyed this tutorial, and learned
something new.
Have any questions or need help.
Just let me know, I'm always happy to help any way I can.
Jcuttlebear01@aol.com
Couple more examples I made


No comments:
Post a Comment