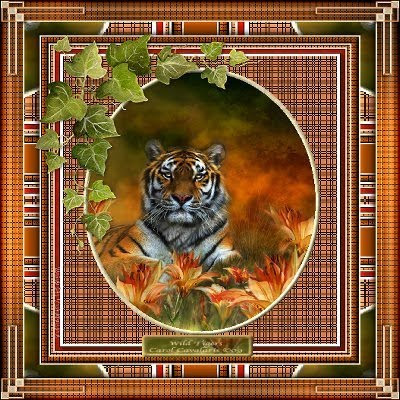
 Graphic I'm using is by Carol Cavoloris
Tutorial by Jcuttlebear01 aka JoAnn
2/18/2010
I do these tutorials for fun and not
for any profit. I use them also as a learning tool to
help others learn the fun and art of paint shop pro.
Supplies Here
I have made some extra corners and that, which are in the supplies.
Graphic of choice
Tubes of choice
Font of choice
Plug ins
Screen Works HERE
Filters Unlimited HERE
AAA foto frames HERE
Graphic plus HERE
PSP
I'm using 9
Some knowledge of PSP is helpful.
Ok lets get started
Remember to save often in case your PSP crashes.
Open a new image
500 X 500
can resize later.
Go to your preset tools
and change it to ellipse.
Set the line width to 5.
 Close off your background color.
Starting in the center of your blank image,
draw an ellipse out not to large, you can adjust it
by pulling on the nodes you see and get it how you want it to look.
Now go to object and align and center on your canvas.
Layers and convert to raster layer.
Click on this ellipse with your selection tool, and
flood fill it with a nice gold pattern.
One I used is in the supplies.
Give this a nice inner bevel
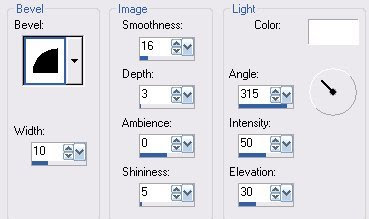 Deselect
Click on the inside of the frame, and selection modify
expand by 3, new raster layer.
Copy and paste your graphic into the selection.
Layer arrange and move down.
Deselect
Merge layers
Pick a light color from your graphic and make that your foreground,
A dark color for your background.
Add a new layer and flood fill it with your light color.
Arrange and move down.
Effects and screen works fabric weave.
Now take your crop tool and crop your image, so you get rid
of some of the extra background.
Don't get to close to the frame leave some room for the next step.
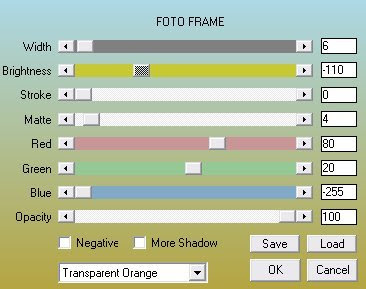
Once your happy with it, the effects AAA frame, foto frame
These are the settings I played around tell I got colors that
went with my graphic.
Add a 2 pixel border, select and flood fill with the gold pattern your using.
Deselect
Add a 4 pixel border, make it your foreground color
Select and effects screen works, and Graphic paper.
Deselect
Add a 2 pixel border, select and flood fill with the gold.
Deselect.
Add a 10 Pixel border your background color, select
and add the graphic paper effect to this
Give this the same bevel as we did earlier.
Deselect
Add a 2 pixel border, select and flood fill with the gold.
Deselect
Add a 20 pixel border and select, effects graphic plus
Quick tile 2 these are the settings I used.

add the same bevel as before.
Deselect.
Add a 2 pixel border select and flood fill with the gold pattern.
Deselect
Add a 30 pixel border background color
Select and effects screen works grid layout.
Or play around and try some other things.
Then graphic plus cross shadow.
You can move the bars to suit your taste.
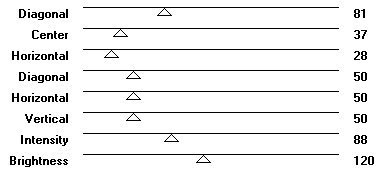 Effects Filters unlimited
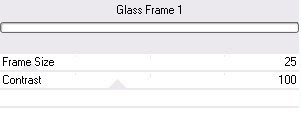
Deselect
Add some corners or any thing else you wish you add
When all done be sure and merge all layers
Resize your final project.
Add your water mark and your ready to save.
Would love to see what you do with this.
Thank you for giving my tutorial a try.
I do hope you have enjoyed this tutorial, and learned
something new.
Have any questions or need help.
Just let me know, I'm always happy to help any way I can.
Jcuttlebear01@aol.com
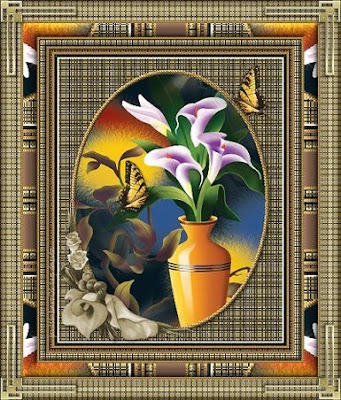
Couple more examples I made
These all below are members of my JAB
list, great talent ladies.
Next 2 are by
mydachshund aka Barb
ggmom9 aka Mary
These two are by
ameripex97 aka Kay
Fairladi101 aka Pati


No comments:
Post a Comment