Pages

Tuesday, August 3, 2010

How To Use A Mask To Make A Simple Tag

Tutorial by Jcuttlebear01 aka JoAnn
8/2/2010

I do these tutorials for fun and not
for any profit. I use them also as a learning tool to
help others learn the fun and art of paint shop pro.
All things I use are collected, the only thing I claim
Is the tag I make with these as my work.

This tutorial is wrote with the idea you
have some knowledge of psp.

This was done in psp 9 but should work with any.

Supplies:

Ones I used
HERE
Or tube of choice
Mask of choice

Open your mask and tube Minimize them in PSP

Pick a light color from your tube, for the foreground,
and a dark color for the background.

1. Go to file new and open a new image
2. Add a new raster layer, flood fill with the color you want your mask to be.
#debfad this is the color I'm using from my tube.

3. Layers>new mask layer>from image.
Open this little box and look for the mask you are using.
then click ok.

4. This is what your layer pallet looks like now.
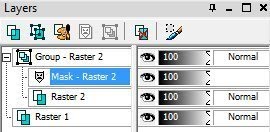
5. Activate the top layer where it says group, and right click on that
go down to merge>and click on merge group.

You now should have 2 layers one is your mask
and the other is the background.
you can rename them as I did if it helps you keep them straight.


6. Effects>texture effects>Weave
Settings I used.


7. Effects>3D>Inner Bevel


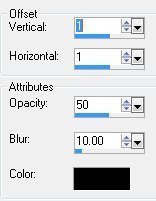
8. Add a nice drop shadow to the mask
Effects>3D>Drop Shadow.


9. If you want to add a background color behind your mask
now is the time to do that.
Activate your bottom layer and flood fill with a contrast color.

10. Effects>Texture effects>Blinds
On the color it's up to you, use a nice contrast color that goes well.


Make sure your top layer is activated

11. Copy and paste your tube now to your image.
Resize as needed.

Take your mover tool and arrange your tube where you want it.
You can now add a drop shadow to it if you wish, same as before.

12. We are now going to get rid of some of the space we don't want around
our tag.......get your Crop tool Which is the 3rd icon on your tool pallet.
Draw a square around your area, be careful not to get any of the tube or mask.

It will look like this.


Now go up on your tool pallet and look for the check mark.
Click on that and the box will go away.
If you like it then go to next step, if not be sure and go to edit undo,
and give it another try tell its right.

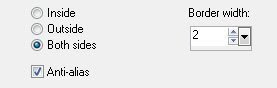
13. Image add a 2 pixel border
A color different from you background.

14. Image add a 2 pixel border your foreground color.

15. Image add a 10 pixel border your background color.

16. Selection tool and get your magic wand, click on the middle of the last border.
Effects>3D>inner bevel with these settings.


You can add anything else you wish at this time.

I added some Ivy and re sized it down to fit.

Then the flower and re sized it.

The cute little bees, and the bows all needed to be re sized.

Add a drop shadow to each accent if you wish.

This is all up to you at what you would like to add, use your imagination it can
be endless.

Yippee your all done.

Would love to see what you do with this.
Thank you for giving my tutorial a try.
I do hope you have enjoyed this tutorial, as much
as I did writing it,
and learned something new.

Have any questions or need help.
Just let me know, I'm always happy to help any way I can.
Jcuttlebear01@aol.com


Thank you Mary


Tuesday, July 13, 2010

Sitting pretty


Tutorial by Jcuttlebear01 aka JoAnn
7/13/2010

I do these tutorials for fun and not
for any profit. I use them also as a learning tool to
help others learn the fun and art of paint shop pro.
All things I use are collected, the only thing I claim
Is the tag I make with these as my work.

This tutorial is wrote with the idea you
have some knowledge of psp.
This was done in psp 9 but should work with any.
Supplies:
Tube of choice or my supplies
HERE
Template # 12 you can get
HERE
1) Open template in psp duplicate and close original.
You will have these layers.
Delete the ones I have closed off here.
We won't be using them.
2) Highlight layer Kreis>Magic wand and select.
Flood fill with a color from your tube or use the pattern
I have supplied.

Hint
You can colorize the silk to make it go with your tube.
If you don't know how to do that, open up the your
color pallet and see what the H and S are.
Then go to adjust>hue and saturation>Colorize
Deselect

3) 3 D inner bevel

4) Add a drop shadow

5) Striche Kreis >activate and >layers>merge down.

6) Rechteck>activate>magic wand and select inside this layer.
7) Flood fill with a color from your tube I used #d69b7d.
8) Effects texture>add blinds
9) Adjust>Blue>motion blur


10) Inner bevel with same settings as earlier.

11) Then add same drop shadow as earlier.
Deselect
12) Highlight>Rahmen Rechteck layer
Magic wand and select inside the frame part......
Flood fill with a gold bead pattern.
13) Inner bevel, same as before.
14) Add drop shadow.
Deselect
15) Layers merge down.
16) Activate Dia layer>selection tool you will need to
select each square.
and fill with a nice background color.
I used #eec1a0 from my tube.
17) Copy and paste your tube as a new layer.
Move it how you want it to look, then invert
and delete on your keyboard to get rid of
what you don't want showing.
When your happy with the way it looks then deselect.
Lower the opacity to 60.
18) Add a drop shadow.
I used the same as before except lowered the blur to 2.
19) Layers merge down.
20) Activate your Rahmen Dia next>Magic wand, and select that.
Flood fill with back ground color.
21) Then selection>modify select>selection border
22) Add a new raster layer and flood fill with the gold beads.
Make sure you get around each frame.

23) Then inner bevel and drop shadow.
Deselect
24) Add your tube resize as needed.
Add a drop shadow to this now.
Move it where you want it to be.
25) Add some wording to your tag if you wish.
Add a new layer before you apply the brush.
I have placed the brush I used in the supplies.

26) Your ready to add any accents you wish to at this time.
I have placed everything in the supplies I used.
The bow you can colorize it to go with your things.
Same with the flowers and butterflies.
Resize them as you need to, and just place how you want them.
It's all up to you.
When your happy with the way it looks, close off the bottom layer,
and merge all visible layers.
27) Resize just your tag about 85 percent and repeat.
Adjust > brighten and adjust> clarify by 5.
28) Open your bottom layer and,
Flood fill with your background color.
29) Add the blinds, and the motion blur to this.

30) Crop around your tag to remove any unwanted background.
Add a new raster layer and add your water mark
when you have finished your tag.
31) Add a border of white 2 pixel
32) Add a border of 5 pixel of your background color.
Yippee your all done.

Would love to see what you do with this.
Thank you for giving my tutorial a try.
I do hope you have enjoyed this tutorial, as much
as I did writing it,
and learned something new.

Have any questions or need help.
Just let me know, I'm always happy to help any way I can.
Jcuttlebear01@aol.com

These examples are by ladies on my list. Thank you Pati, Mary, and Helen

Photobucket

Sitting pretty tut

Photobucket

Friday, May 21, 2010

My Beauty


Tutorial by Jcuttlebear01 aka JoAnn
5/21/2010

I do these tutorials for fun and not
for any profit. I use them also as a learning tool to
help others learn the fun and art of paint shop pro.
Everything I use I have collected don't claim to have
made anything other then the tag.

Notes:
All settings will remain the same unless otherwise noted
This tutorial assumes you have a working knowledge of PSP
Remember to save often in case your psp crashes.

I did this in PSP 9 but sure any one will work.

Supplies I used
HERE
Font is included that I use called Apricot
Tubes and all the others in the zip to.

Plug ins:

AAA frame works HERE
Filters unlimited HERE
Filters gallery U HERE

Download all supplies needed,
open and minimize them in
your psp.

Lets get started:

1) Open a new image 600 X 500

2) Open misted tube of choice and duplicate
close the original.

3) Pick a light color for foreground....#e6aba7
Dark color for your Background.....#db5e5f
these are the colors I am using from my tube.

4) Flood fill with your foreground color.

5) Effects>Plug in>VM Extravaganza>Soutin'!
Setting I used

Hint:
You can make your slats different by playing around with the settings.

6) Sections>all>selection float.

7) Effects>3 D inner bevel


8) Effects>3 D drop shadow


9) Keep selected and copy and paste into
selection your misted flower tube.
Deselect.

This is what I have so far.


10) Add a new raster layer>move it down.
Flood fill with background color.

11) Adjust>add noise


12) Copy and paste as a new layer either a nice lady tube,
or one of choice.

13) Add same drop shadow as before.

14) Move and arrange the tube how you like it,
resize if needed.Layers merge all.

15) Add Candle or any other accents you wish
to add to your tag.

16) Add a new layer and add wording I used a brush word art.
Arrange how you want it.

17) Add same drop shadow, merge all layers.

18) Add a 3 pixel border foreground color
2 pixel border background color
3 pixel border foreground color.

19) Select>all modify and contract by 10
Selection>invert

20) Add a inner bevel

Deselect

21) Add a 20 pixel border background color>magic wand
and select it.

22) Effects>Plug in>AAA frame texture

I wanted it darker so I repeated it.

23) Effects>Plug in>Filters unlimited


Deselect

24) Add 3 pixel border light color
2 pixel dark color
3 pixel light color

25) Select>modify>contract by 10>invert
Give same bevel as we did earlier.
Deselect

26) Add a 20 pixel border of the dark color.
Select

27) Get a pattern you can use the one I supplied or
one of your own. It's up to you.


28) Flood fill the border with this pattern.

29) Effect>filter factor U Shear tiles

30) Effects>same inner bevel as we did earlier
Deselect.

31) Add 3 pixel border light color
2 pixel dark color
3 pixel light color

32) Select>modify>contract by 10>invert
Give same bevel as we did earlier.
Deselect

Add a new layer and place your watermark.
Merge all layers.
We are now done.


Would love to see what you do with this.
Thank you for giving my tutorial a try.

I do hope you have enjoyed this tutorial, and learned
something new.

Have any questions or need help.
Just let me know, I'm always happy to help any way I can.
Jcuttlebear01@aol.com

A couple more I did:


These examples are from Mary and Pati a couple of ladies from my list.

Thank you so much.

Photobucket

Photobucket

Photobucket

Thursday, April 22, 2010

Purple Love

Tutorial by Jcuttlebear01 aka JoAnn
4/22/2010

I do these tutorials for fun and not
for any profit. I use them also as a learning tool to
help others learn the fun and art of paint shop pro.
Everything I use I have collected don't claim to have
made anything other then the tag.

Notes:
All settings will remain the same unless otherwise noted
This tutorial assumes you have a working knowledge of PSP
Remember to save often in case your psp crashes.

I did this in PSP 9 but sure any one will work.

Scrapbook kit is the wonderful work of
Immortal Dreams AKA Missy Lynn
It is called Lavender Spring (T)
you can purchase the kit
HERE

Supplies:
Tubes of choice.
Font of choice.
It is by Melissaz Creationz
Template #71
HERE
Mask HERE

Plug ins:
AAA frame works
HERE
Filters unlimited HERE

Download all supplies needed,
open and minimize them in
your psp.

Place mask in your psp mask folder.

Install any plug ins you need.

Open the template and hit shift D on your key board
and make a duplicate, close the original.
Delete layer 11 you see here in the layer pallet.


Highlight layer 9 select all, select float, select and defloat.
Flood fill with a color you have picked from the tube
your using. #ae6cb6 color I used.......or use scrapbook paper.

Select ~ modify


Add a new layer and flood fill with a nice gold pattern.
Deselect

Layers merge down.

Highlight layer 10 I didn't do anything to that,
layers merge down.

Highlight in your layer pallet layer 2 select
Flood fill layer with a color or a paper from a scrapbook kit.
I used paper 15 copy and paste into selection.

Select ~ modify ~ Select Selection Borders
same as you just did above.

Add a new layer and flood fill it with the gold patter.
Deselect

Layers merge down

Highlight layer 6 in your layer pallet.
Select all~select float~select de~float
I used paper 10 from kit.
Copy and paste as a new layer, invert and hit delete on
your keyboard.

Select ~ modify ~ Select Selection Borders
same as you just did above.
Deselect

Layers merge down.

Highlight layer 4 in your layer pallet.
Select all~select float~select de~float

Flood fill with a color or use a paper from kit.
I used paper 18
If you use a paper copy and paste as a new layer, invert and
hit delete on your key board.

Select ~ modify ~ Select Selection Borders
same as you just did above.
Deselect

Layers merge down.

In your layer pallet close off raster 8 and the copy of 8
Highlight layer 3


select with magic wand and flood fill with color
of choice, I used #e6d3e9

Effects texture effects and pick one
you like. What I used.


Select ~ modify ~ Select Selection Borders
Add new layer and flood fill with the gold.
Deselect

Now you can un hide layer 8 or not use it at all
It is totally up to you.

Open the tube you wish to you resize as needed.
I used one of the fairies from the kit and resized her
by 20 Percent, move her how you want
then erase any thing you don't want showing
out side the frame.

Give your tube a nice drop shadow.


Layers merge, merge down.

Do the same with the copy of layer 3 as you just did.

I added the fairy again and mirrored her.

If your happy with what you see Layers>Merge>Merge Visible,
What I have so far........I didn't like the stitching around the little frames
so I just deleted it, and didn't like the one on the other frame there you see
in white so deleted it also.


Add a new layer and send to bottom, flood fill with color of choice.
This will be your background.

Now add the mask, the one I supplied or one of choice.
Go to layers > Load saved mask > Load mask from disk
Find your mask, make sure your settings are the same as mine,
and hit load.


in layer pallet delete mask, when asked say yes,
layer merge group.

I duplicated the mask a couple of times so it would stand out.
Close off the merged layer you have and then merge
visible, make sure your on the right layer when doing this.
Re size the mask down about 90 percent.

I gave the masks a drop shadow


Close off your mask and merge all visible layers.
Un-hide the mask layer and with mover tool move things the
way you want them. When happy with it then layer merge down.

Add any accents you want to at this time.
When happy with every thing merge all layers.

Add a new layer and flood fill with a color of choice.
Or you can use a paper from the kit.
Layer arrange and send to bottom.

Highlight your layer 1 and effects
AAA frame works, photo frame.


you might use a different color depends on your background.
I re size my merger layer by 95 percent so it wouldn't over lap
into this next step.

Add a 10 pixel border color of choice, I'm using my back ground color.

AAA frame works texture frame


Filters unlimited

You can play with the settings until you get what you like.

Layer new layer add water mark
merge layers

Re size to your liking.

Your all done and ready to save your work of art.

Would love to see what you do with this.
Thank you for giving my tutorial a try.

I do hope you have enjoyed this tutorial, and learned
something new.

Have any questions or need help.
Just let me know, I'm always happy to help any way I can.
Jcuttlebear01@aol.com

Another one I did

mydachshund aka Barb

all 4 below are by
GGmom9 aka Mary
Thank you dear.
Photobucket
Photobucket