


 Tutorial by Jcuttlebear01 aka JoAnn
8/2/2010
I do these tutorials for fun and not
for any profit. I use them also as a learning tool to
help others learn the fun and art of paint shop pro.
All things I use are collected, the only thing I claim
Is the tag I make with these as my work.
This tutorial is wrote with the idea you
have some knowledge of psp.
This was done in psp 9 but should work with any.
Supplies:
Ones I used HERE
Or tube of choice
Mask of choice
Open your mask and tube Minimize them in PSP
Pick a light color from your tube, for the foreground,
and a dark color for the background.
1. Go to file new and open a new image
 2. Add a new raster layer, flood fill with the color you want your mask to be.
#debfad this is the color I'm using from my tube.
3. Layers>new mask layer>from image.
Open this little box and look for the mask you are using.
then click ok.

4. This is what your layer pallet looks like now.
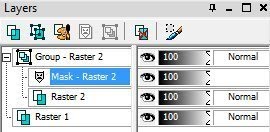
5. Activate the top layer where it says group, and right click on that
go down to merge>and click on merge group.
You now should have 2 layers one is your mask
and the other is the background.
you can rename them as I did if it helps you keep them straight.

6. Effects>texture effects>Weave
Settings I used.

7. Effects>3D>Inner Bevel

8. Add a nice drop shadow to the mask
Effects>3D>Drop Shadow.

9. If you want to add a background color behind your mask
now is the time to do that.
Activate your bottom layer and flood fill with a contrast color.
10. Effects>Texture effects>Blinds
On the color it's up to you, use a nice contrast color that goes well.

Make sure your top layer is activated
11. Copy and paste your tube now to your image.
Resize as needed.
Take your mover tool and arrange your tube where you want it.
You can now add a drop shadow to it if you wish, same as before.
12. We are now going to get rid of some of the space we don't want around
our tag.......get your Crop tool Which is the 3rd icon on your tool pallet.
Draw a square around your area, be careful not to get any of the tube or mask.
It will look like this.

Now go up on your tool pallet and look for the check mark.
Click on that and the box will go away.
If you like it then go to next step, if not be sure and go to edit undo,
and give it another try tell its right.
13. Image add a 2 pixel border
A color different from you background.
14. Image add a 2 pixel border your foreground color.
15. Image add a 10 pixel border your background color.
16. Selection tool and get your magic wand, click on the middle of the last border.
Effects>3D>inner bevel with these settings.

You can add anything else you wish at this time.
I added some Ivy and re sized it down to fit.
Then the flower and re sized it.
The cute little bees, and the bows all needed to be re sized.
Add a drop shadow to each accent if you wish.
This is all up to you at what you would like to add, use your imagination it can
be endless.
Yippee your all done.
Would love to see what you do with this.
Thank you for giving my tutorial a try.
I do hope you have enjoyed this tutorial, as much
as I did writing it,
and learned something new.
Have any questions or need help.
Just let me know, I'm always happy to help any way I can.Jcuttlebear01@aol.com

Thank you Mary


No comments:
Post a Comment