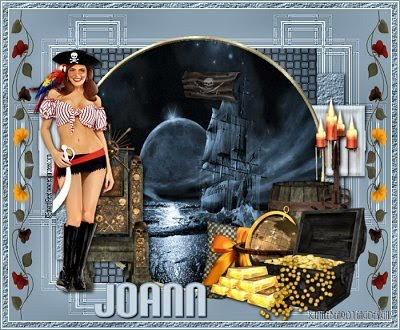
 Tutorial by Jcuttlebear01 aka JoAnn
8/5/2010
I do these tutorials for fun and not
for any profit. I use them also as a learning tool to
help others learn the fun and art of paint shop pro.
All things I use are collected, the only thing I claim
Is the tag I make with these as my work.
This tutorial is wrote with the idea you
have some knowledge ofPSP.
This was done in PSP 9 but should work with any.
Supplies:
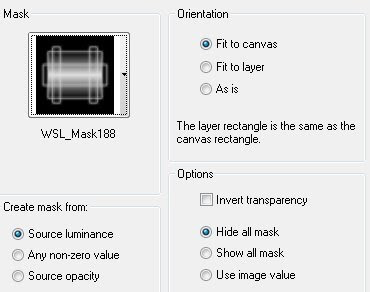
Mask WSL_Mask188 in supplies.
HERE
Template is by Cakes and you can get it HERE
Its called sweetheart template.
Tube of choice
I'm using the wonderful
work of Edward Reed you can buy this tube HERE
Scrapbook kit is the wonderful work of
Shani>Wicked princess you can buy this kit HERE
It's called buried treasures.
Font of choice 2 in supplies
Place mask in your PSP mask folder.
Texture in your PSP texture folder.
Open all your supplies needed in PSP and minimize them
Leave the template open we will be working on it.
On your key board hit shift D and close the original template.
Delete the top layer you don't need it.
Also the word art unless you want to use it.
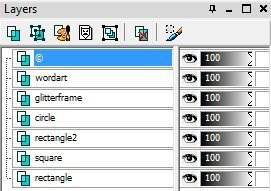
1) Go down to the bottom layer and activate it
Magic wand and select.> flood fill with
a color from the graphic I'm using #8ca1b2
Deselect
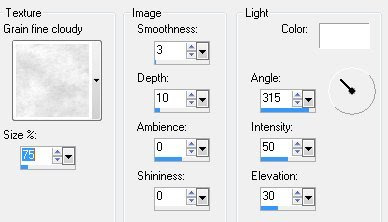
2) Effects texture effects>Texture
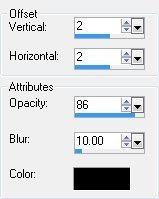
3) Add a drop shadow
4) Activate the square layer
and flood fill with a color from your tube or graphic.
I'm using #617485
5) Effects texture effects>weave
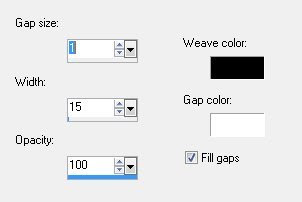
Deselect.
6) Add same drop shadow.
7) Activate rectangle 2 layer>select all>selection float>selection de float
Flood fill with another color>I'm using #c9d7e2
Deselect
8) Add same drop shadow.
9) Effects>texture effects>Blinds
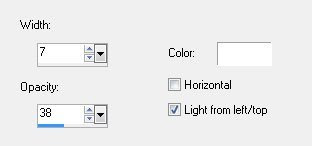
Deselect
10) Add a inner bevel.
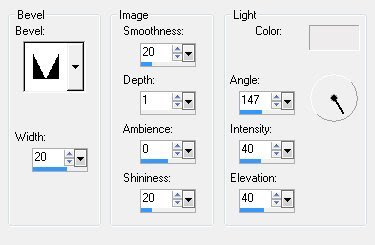
11) Add a drop shadow.
12) Activate the circle layer>select all>selection float>selection De float
13) Open your graphic you want to use, and copy and paste into selection
Deselect.
14) Activate the glitter frame layer>select all>selection float>Selection de float
Flood fill with a nice gold patter, or a color of choice.
15) Effects 3 D inner bevel
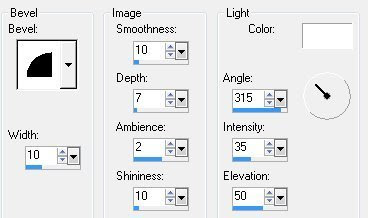
Deselect
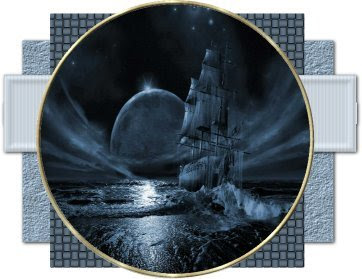
This is what I have so far.
If your happy with it merge all layers.
We now will add some accents to this:
16) Add your tube of choice
Move it to where you want it.
Re size if you need to.
Add drop shadow
17) I added WP_BT_BARRELL.png from the kit
and re sized it by 50 percent
Move how you want it to look.
Add drop shadow
18) I added WP_BT_BURIEDTREASUREBOXSIDE.png
Copy and paste as a new layer>mirror.
Re size it by 50 percent.
Place how you want it.
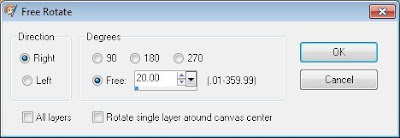
19) Add WP_BT_COINSPLATTER2.png resize by 30 percent
image rotate
 20) Add drop shadow
21) Add WP_BT_GOLD.png copy and paste as new layer
resize by 30 percent
Add drop shadow.
22) Add WP_BT_MELTINGCANDLEABRA.png copy and paste
as a new layer>resize 65 percent.
Move it down so it is behind the chest, and arrange
where you want it.
Add drop shadow.
23) Add WP_BT_CHAIR.png copy and paste as new layer>resize>
70 Percent, move below the tube.
Add drop shadow.
24) Add any thing else you wish to at this time.
When your happy with it merge all layers.
25) Resize just your merged layer by 90 percent.
Repeat
26) Add new raster layer and flood fill with a color of choice.
Layers arrange and move down.
27 Layers>Load saved mask>Load mask from disk.
28) Layers>Merge group
29) Effects edge effect Enhance more
30) Add a new raster layer
and flood fill with a nice color.
Layer and send to bottom.
31) Take your crop tool and get as close as you can
around the mask and get rid of all the extra around
your tag you don't want.
32) Add a 2 pixel border color of choice.
33) Add a 10 pixel border background color.
Magic wand and select.
Effects>Texture>Texture effects
Same one we used in step 2 it should still be there.
Deselect
34) Add a 2 pixel border of your first color.
35) Add a 2 pixel border of your background color.
Add a new layer and add your water mark.
Merge all layers.
Add a name or anything else now.
Re size to your liking, and your ready to save.
Yippee your all done.
Would love to see what you do with this.
Thank you for giving my tutorial a try.
I do hope you have enjoyed this tutorial, as much
as I did writing it,
and learned something new.
Have any questions or need help.
Just let me know, I'm always happy to help any way I can.
Jcuttlebear01@aol.com
Thank you Mary


No comments:
Post a Comment