
Tutorial by Jcuttlebear01 aka JoAnn
8/20/2010
I do these tutorials for fun and not
for any profit. I use them also as a learning tool to
help others learn the fun and art of paint shop pro.
All things I use are collected, the only thing I claim
Is the tag I make with these as my work.
This tutorial is written with the idea you
have some knowledge of PSP.
This was done in PSP 9 but should work with any.
Supplies:
I'm using the wonderful kit from Wicked Princess
You can get it HERE
Template I used is by Graphic fun house
It's in the supplies HERE or on the blog HERE
Plug in Textures HERE
Font of choice One I used Batang
Tube of choice
Remember to save often in case
your PSP decides to crash.
All settings stay the same unless told other wise.
your PSP decides to crash.
All settings stay the same unless told other wise.
Install the plug in needed.
Place mask into your PSP mask folder.
Open the template and duplicate it, by hitting sift D on your keyboard.
Close the original.
Delete the copyright and the info layer you won't need them.
Open the template and duplicate it, by hitting sift D on your keyboard.
Close the original.
Delete the copyright and the info layer you won't need them.
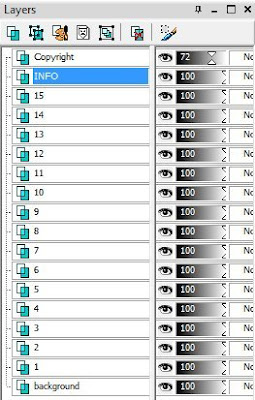 1.) Highlight 1 in the layer pallet, we will be working
right up the layers.
2.) Magic wand and select it on the template.
Pick a color from your tube, or a paper from
the kit.....I'm using....WP_HBM_PP10
Copy and paste it into your selection.
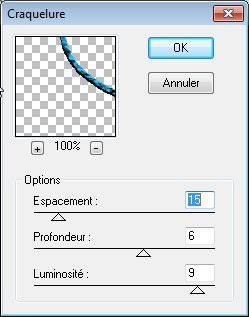
3.) Go to effects>plug ins>Textures
You can do this to your liking,
These are the setting I use.
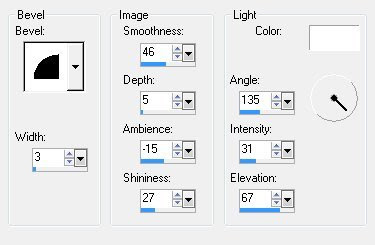
 4.) Effects>3D inner bevel
5.) Highlight 2 and select with magic wand.
Add a color from your tube or....a paper
from kit, I'm using WP_HBM_PP6
6.) Resize the paper by 60 percent, and copy and
paste as a new layer. Selection invert and hit delete on
your keyboard.
Deselect
7.) Layers>merge down
8.) Highlight 3 and select with magic wand.
Add a color, from your tube or a paper
from kit, I'm using WP_HBM_PP2
9.) Resize the paper by 60 percent and copy and paste
as a new layer. Selection>invert and hit delete.
Deselect
10.) Layers>merge down
Effects inner bevel same as in step 4
11.) Highlight layer 6>layers merge down
twice. Unless you want each one a different color.
Then do them one at a time.
Selection>Float>selection De float
Flood fill with a color of choice.
Deselect
12.) Same inner bevel as in step 4
13.) Effects 3D drop shadow.
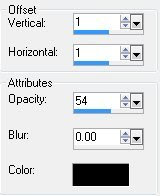
14.) Do layer 7,8, and 9 the same way as
you just did 4,5, and 6.
Deselect
15.) Same inner bevel as in step 4
16.) Drop shadow same as step 13
17.) Highlight layer 10 in layer palletSelect with magic wand,
make sure you get all the large circles.
Flood fill with a color of choice, or a paper
from the kit. I used WP_HBM_PP11
18.) Resize paper by 60 per cent copy and paste
as a new layer>invert>hit delete.
Deselect
19.) Same inner bevel as before.
Layers merge down.
20.) Drop shadow as before.
Except change the blur to 10
21.) Highlight 11 in layer pallet, selection all>
Selection float>De float>Selection modify
expand by 2>flood fill with color of choice.
Deselect.
22.) Same inner bevel as before,
add the drop shadow.
23.) Highlight 12 in layer pallet, select with magic wand.
Flood fill with color of choice or a paper from the kit.
I used WP_HBM_PP16
Resize by 60 percent>copy and paste as a new layer
Move how you want it to look.
Invert and hit delete.
Deselect
24.) Layers>merge down
25.) High light 13 magic wand and flood fill with a color
of choice or a paper, I'm using WP_HBM_PP15
from the kit.......resize, copy and paste as a new layer
move how you want it.
Selection>invert and delete.
Deselect
26.) Layers>merge down
Same inner bevel as before.
27.) Highlight layer 14 selection>select all>Selection float>selection
De float, Copy and paste as a new layer a paper of choice, or flood
fill with a color. I used WP_HBM_PP8
Resize it by 60 percent and copy and paste as a new
layer, move how you want it selection invert and hit delete.
Deselect
28.) Layers>merge down
29.) Inner bevel, and drop shadow, same as before.
30.) Highlight layer 15 and do the same as you just
did with layer 14. I used WP_HBM_PP7
31.) On the background copy and paste as a new layer
a paper of choice, WP_HBM_PP14
or add a new raster layer and flood fill with a nice color.
32.) Layers>Load mask from disc
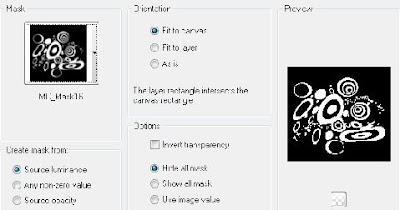
Click ok
Layers merge group.
You can now move it how you want it to look.
Give it the same bevel if you wish, and the same drop shadow.
34.) Copy and paste your tube of choice.
Add any accents you wish>resize them as needed.
I used the bee's from the kit and resized them until they looked right.
Added the bee hive, and the bee bears.
Added some words to the tag.
Close of the back ground when your done.
Merge all visible layers.
35.) Crop off any extra you don't want in your tag,
and resize to your liking.
36.) Flood fill the back ground with a nice color.
I used a yellow.
37.) Effects>plug ins>textures
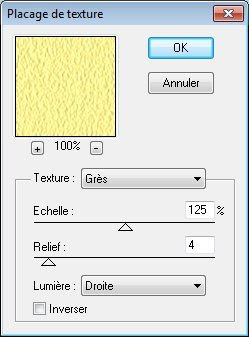
38.) Add a 3 Pixel border color white.
39.) Add a 3 pixel border color of choice.
40.) Add a 10 Pixel border background color.
Select and give it the same texture as your background.
41.) Give it a nice bevel
Deselect
You can now add your water mark
And a name to your tag if you wish.
Your now ready to save and share your work of art.
Yippee your all done.
Would love to see what you do with this.
Thank you for giving my tutorial a try.
I do hope you have enjoyed this tutorial, as much
as I did writing it,
and learned something new.
Have any questions or need help.
Just let me know, I'm always happy to help any way I can.Jcuttlebear01@aol.com
This one is done by Mary


No comments:
Post a Comment