Pages

Wednesday, October 27, 2010

Winter Time


Tutorial by Jcuttlebear01 aka JoAnn
10/27/2010
I do these tutorials for fun and not
for any profit. I use them also as a learning tool to
help others learn the fun and art of paint shop pro.

All things I use are collected, the only thing I claim
Is the tag I make with these as my work.

This tutorial is written with the idea you
have some knowledge of PSP.
This was done in PSP 9 but should work with any.

SUPPLIES
HERE
TEMPLATE 11 HERE
Tubes of choice
Font of choice> I used Edwardian Script ITC

I'm using the wonderful kit from Wicked Princes aka Shani
You will find it Here It is a PTU.

Open template and duplicate, close
the original.

Delete the top layer there.
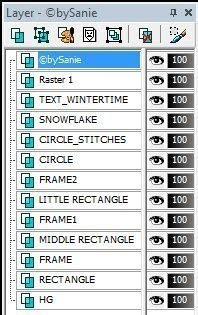

These steps will be the same until we are
done with the template

We will be working from the rectangle layer
on up........so activate in the layer pallet.

Magic wand>select inside of that layer.
Pick a paper from the kit your using, or
you can flood fill with a color of choice.

I'm using WP_SS_PP10. from the kit.

Copy and paste as a new layer>selection>invert
delete on key board one time.
Deselect.

Layer>merge down.
______________________________________

Activate the frame with magic wand>flood fill
with a nice gold>or you can use paper its all up to you.
Deselect
Layer>merge down.

Middle rectangle activate>magic wand
I used......WP_SS_PP4

Frame 1 flood fill like you did the other.
Layer>merge down

Little rectangle activate>magic wand
I used......WP_SS_PP4
once again and moved it how I wanted
it so it looked different.

Frame 2 and do the same as you did with the others.
Layer>merge down.

Circle>activate>copy and paste paper
of choice, or flood fill with color.
I used......WP_SS_PP1
Deselect

Effects>Blind effects

I left the stitch layer alone

Snow flake layer you can leave it or flood fill with
a color if you wish. Or if you don't want to use it,
then delete that layer.


This is where I'm at now, I decided I didn't like the snowflake,
or the wording so I deleted it.

Canvas size>we will crop it later, gives you more
room to add your tubes.


Lets add our tubes now.

I added a misted tube in the circle.

Next I added>WP_SS_TREE.png
resize by 70 per cent and place how you want it.

Effects>drop shadow


Add
WP_SS_GIFTBAG>resize by 30 percent
Add same drop shadow.

Add
WP_SS_HOLLYPRESENT>resize by 25 percent
Drop shadow

Add
WP_SS_ROUNDPRESENT>resize by 25 percent
Drop shadow

Arrange with mover tool the way you want them.

Add
WP_SS_SANTA>resize by 50 percent
Drop shadow, place where you want him.
I put him over by the tree.

Add
WP_SS_SNOWMAN>resize by 30 percent.
Drop shadow, place where you want.

Add
WP_SS_POINSETTIARIBBON>resize by 30 percent
drop shadow, and place up toward the top.

Add your main tube now
resize as needed.
Add drop shadow.

Crop tool>get rid of any extra around the edge
you don't want there.

If your happy with the way everything looks
merge all layers.


Add a new layer and flood fill it with
a color for the background, or you can just leave it white.
It's all up to you.

Add any wording or anything else you wish to at
this time.

Add a new layer and add your water mark.

Good job we are all done.
You can now save your wonderful
creation and share with others.

Would love to see what you do with this.
Thank you for giving my tutorial a try.
I do hope you have enjoyed this tutorial, as much
as I did writing it,
and learned something new.

Have any questions or need help.
Just let me know, I'm always happy to help any way I can.
Jcuttlebear01@aol.com
Example below by Mary
thank you dear.
Photobucket

Wednesday, September 15, 2010

Love Life


Tutorial by Jcuttlebear01 aka JoAnn

9/15/2010

I do these tutorials for fun and not
for any profit. I use them also as a learning tool to
help others learn the fun and art of paint shop pro.
All things I use are collected, the only thing I claim
Is the tag I make with these as my work.

Feel free to share my tutorials, but link them back
to my site please

Scrapbook kit is by Wickedprincess aka Shani.
This kit is a FTU.
Be sure and check out her other wonderful kits.
orHERE

Supplies
Tube of choice
Or one in supplies
HERE
Font of choice~I used Apricot its in the
supplies if you want it.

Open new image 700 X 600

Open
WP_HW_SCALLOPEDPAPERCIRCLEFRAME
Copy and paste onto your new image.
Resize by 90 percent.

Magic wand and click on the inside of the frame.
Selection modify expand by 7
Find a paper you want to use
for you background in the frame, I'm using
WP_HW_PP 20
Resize by 70 percent, copy and paste
as a new layer, selection invert>delete.

Layer arrange move down
deselect

In layer pallet activate your frame
Magic wand and select inside the frame.
I'm using WP_HW_PP 7
Copy and paste as a new layer
With mover tool arrange it how you want it.

Selection invert>delete.
Deselect
Layer arrange move down

Find the tube your going to use.
I used the poser fair by @medi
If you use the one I did be sure and use
the copy write with it.

Copy and paste as a new layer
Image resize by 60 percent.
Move to where you want it.

Add a drop shadow


I then added WP_HW_ROSECANDLE
Copy and paste as a new layer.
Resize by 50 percent, place how you
want it.
Add drop shadow.

I added the chair>resize by 60 percent
move below your tube arranges how you want it.
Add drop shadow

Add the pillows of choice
Resize by 30 percent.
Place where you like them.
Add drop shadow

I then added WP_HW_SILVERDOODLE 2
adjust change the color to go with
your tag, this is what I used.

Copy and paste as a new layer>resize by
50 percent layer move down just above the
bottom layer.

Image mirror, with deform tool turn the
doodle and arrange it how you want it.
Add same drop shadow.

Layer duplicate>image>Mirror>image>flip
Move it how you want it.
Layers>merge down

Layer duplicate>image>mirror
Layers>merge down.
This is how mine looks so far.


Paper of choice I'm using
WP_HW_PP 3
Copy and paste as a new layer>
Layer arrange send to bottom

Mask of choice or the one I supplied.
KLS-mask-07
Layers>load/saved mask>from disc

Layers>merge group
If you want the mask darker
then just duplicate it>layers>merge down.

Effects inner bevel


Add anything else you wish to at this time.

Add a new layer, and add your water marker>merge all layers
re size to your liking and your now ready to save your tag.


Would love to see what you do with this.
Thank you for giving my tutorial a try.
I do hope you have enjoyed this tutorial, and learned
something new.
Have any questions or need help.
Just let me know, I'm always happy to help any way I can.
Jcuttlebear01@aol.com

Here are 2 I did with the kit.


This one was done by Mary.
Thank you dear


Monday, August 30, 2010

Colors Of Fall

Tutorial by Jcuttlebear01 aka JoAnn
8/31/2010

I do these tutorials for fun and not
for any profit. I use them also as a learning tool to
help others learn the fun and art of paint shop pro.
Everything I use I have collected don't claim to have
made anything other then the tag.

Notes:
All settings will remain the same unless otherwise noted
This tutorial assumes you have a working knowledge of PSP
Remember to save often in case your psp crashes.

I did this in PSP 9 but sure any one will work.

Scrap kit is by Wicked Princess and
is now a free to use you can get it HERE

No plug ins needed for this tutorial.

Supplies:
HERE
Tube of choice
Mask gabeemask22
Fall graphic
Font of choice
I used LHF Goldsmith Script

Place your mask into your mask folder.

Open your tubes you are going to use.
Minimize them for now.

Graphic of choice or the one in
the supplies.

Open new image 700 X 600

Selection tool, draw out a square
not to big but how ever large you want it
for your frame.

Selection> modify>Select Selection border

Add a new raster layer>flood fill with color
or copy and paste a paper from the kit, I used WP_SIF_PP1.jpg
Deselect

Effects 3 D inner bevel


Magic wand and click inside the frame.
Select>modify expand by 4
New raster layer>copy and paste graphic
of choice into selection.

Layer arrange move down.
Deselect

Make the frame layer active, click
on the inside of it, then go down to the graphic
and selection>float
Effects 3 D>Cutout

Repeat change the V N H to - 2
Deselect
Go back up to the frame layer>layers merge down.


Copy and paste as a new layer
the ivy from the kit WP_SIF_IVY1.png
Move down below the frame
Erase any part that shows that you don't
want there.

Add a drop shadow


Duplicate>image mirror
Arrange with mover tool how you want it.

Layer merge down
Copy and paste as a new layer
WP_SIF_LEAFBRANCH.png
Resize about 50 percent
Rotate 90 degrees to the left>duplicate
image flip>place them how you want them
then layer merge down>add drop shadow.

Layer duplicate mirror

Layer duplicate and rotate it
90 degrees either way don't matter
move it to the top of the frame.
Layers merge down when your happy
with how the leaves look around your frame.

Add wheat tube move it how you want.
Resize by 30 percent. Take deform tool and
pull it out how you would like it to look.
Add drop shadow
Move down until its just under the frame.

Add a bow of choice or one from kit WP_SIF_BOW4.png.
Resize it by 50 percent, I took eraser tool and got rid of some
of the bow that hung down into the picture.
Add drop shadow.

Sun flower of choice or one from the kit
WP_SIF_FLOWER17.png resize by 20 percent
move up onto the bow.
Drop shadow

Add fairy tube and place her in the
corner resize it by around 70 percent.
Add drop shadow

Add your word art resize by 50 percent.
add drop shadow, arrange how you want it.

Bottom layer>select all
Flood fill with a color from your graphic>
or copy and paste a paper of choice into selection
I used from the kit WP_SIF_PP9.jpg
deselect

Layers>load saved/mask>load mask from disc.


Layers>merge group
I wanted it darker so I duplicated it.
Then merged down.

Inner bevel same as before.

Drop shadow same except change the color
I changed it to a green from the mask.

Adjust>brighten and contrast>Clarify by 5.
If your happy with the way it looks now
Merge all layers

Add a new layer>add your water mark and your ready
to share your work of art.


Would love to see what you do with this.
Thank you for giving my tutorial a try.

I do hope you have enjoyed this tutorial, and learned
something new.

Have any questions or need help.
Just let me know, I'm always happy to help any way I can.
Jcuttlebear01@aol.com
Ones below are made by other talented
members of my list.
Thank you ladies.

PhotobucketPhotobucket

Photobucket

Photobucket


Wednesday, August 25, 2010

Beauty of Love

Tutorial by Jcuttlebear01 aka JoAnn
8/25/2010

I do these tutorials for fun and not
for any profit. I use them also as a learning tool to
help others learn the fun and art of paint shop pro.

All things I use are collected, the only thing I claim
Is the tag I make with these as my work.

This tutorial is written with the idea you
have some knowledge of PSP.
This was done in PSP 9 but should work with any.

Supplies
Graphic of choice
Tubes of choice
Font of choice
shape template
All supplies I used HERE

Plug ins
Super Blade Pro HERE
Photo shop Fun 2 HERE
Filters unlimited HERE

Open the graphic you wish to use.
Duplicate and close original.

Open the Pre-Set Minimize it for now.

Place the Blade pro presets in the blade pro
environment and texture folder.

Install plug ins that are needed.

1.) Open a new image 600 X 600

2.) Selection all

3.) Add a New layer>copy and paste the
shape into selection.
Deselect

4.) Resize it by 95 percent.
Selection tool and click on the
center of the pre shape>selection
modify>expand by 20>hit delete on key board
1 time.
Deselect.

5.) Now magic wand and activate the larger
part of the shape, flood fill with a color from your graphic.

6.) Plug ins>Blade Pro

Blade Pro or Super Blade Pro>Settings as Desired.

Each one will be different depending on the colors your using.
No two effects are alike, as you will see by my samples at,
the end of the tutorial.

HINTYou can click on the dice until you get something you like.
So many choices.
Deselect when your happy with it.

7.) Magic wand and select the diamonds>pick a color
from the middle one we just did, and flood fill
with that color then>

8.) Give them the same blade pro effect.
Deselect

9.) Magic wand and click on the center of the shape.

10.) Expand by 4 Add a new raster layer

11.) Copy and paste graphic into selection
Layers arrange move down.
Deselect

12.) In layer pallet high light your first layer
and flood fill with a color of choice.

13.) Effects texture effects>blinds

14.) Add your tube and resize as needed.

HINTIf you don't like all the diamonds in the shape,
then just circle the ones you don't want with
your rope tool, and hit delete.
Each tag I made I removed some.

15.) Add a nice drop shadow.

Move where you want it.

16.) Add a 3 pixel border color of choice.

17.) Add a 3 pixel border background color.

18.) Add a 3 pixel border first choice color.

19.) Add a 20 pixel border background color
Magic wand and select.

20.) Effects>Plug ins> Photo shop fun 2
Bud>default settings repeat
until your happy with the way it looks
It took me about 3 times.

21.) Effects>Plug ins>Filters unlimited
Glass frame 1


22.) Adjust>Brightness and contract>clarify by 5
Deselect

23.) Add a 3 pixel border color background color

24.) Add a 3 pixel border your other color of choice.

25.) Add any wording or anything else you wish to at
this time.

26.) Add a new layer and add your water mark.

Good job we are all done.
You can now save your wonderful
creation and share with others.

Would love to see what you do with this.
Thank you for giving my tutorial a try.
I do hope you have enjoyed this tutorial, as much
as I did writing it,
and learned something new.

Have any questions or need help.
Just let me know, I'm always happy to help any way I can.
Jcuttlebear01@aol.com

Couple more by me


Both of these below are
Done by GGmom9 aka Mary
Thanks Hun for testing it out for me.


Photobucket

Friday, August 20, 2010

Queen Bee


Tutorial by Jcuttlebear01 aka JoAnn
8/20/2010

I do these tutorials for fun and not
for any profit. I use them also as a learning tool to
help others learn the fun and art of paint shop pro.
All things I use are collected, the only thing I claim
Is the tag I make with these as my work.

This tutorial is written with the idea you
have some knowledge of PSP.
This was done in PSP 9 but should work with any.

Supplies:
I'm using the wonderful kit from Wicked Princess
You can get it
HERE

Template I used is by Graphic fun house
It's in the supplies
HERE or on the blog HERE

Plug in Textures
HERE

Font of choice One I used Batang
Tube of choice

Tube I used is from Deacon Black and can be found HERE
Remember to save often in case
your PSP decides to crash.

All settings stay the same unless told other wise.
Install the plug in needed.
Place mask into your PSP mask folder.

Open the template and duplicate it, by hitting sift D on your keyboard.
Close the original.

Delete the copyright and the info layer you won't need them.
1.) Highlight 1 in the layer pallet, we will be working
right up the layers.

2.) Magic wand and select it on the template.
Pick a color from your tube, or a paper from
the kit.....I'm using....WP_HBM_PP10
Copy and paste it into your selection.

3.) Go to effects>plug ins>Textures
You can do this to your liking,
These are the setting I use.
4.) Effects>3D inner bevel


5.) Highlight 2 and select with magic wand.
Add a color from your tube or....a paper
from kit, I'm using WP_HBM_PP6

6.) Resize the paper by 60 percent, and copy and
paste as a new layer. Selection invert and hit delete on
your keyboard.
Deselect

7.) Layers>merge down

8.) Highlight 3 and select with magic wand.
Add a color, from your tube or a paper
from kit, I'm using WP_HBM_PP2

9.) Resize the paper by 60 percent and copy and paste
as a new layer. Selection>invert and hit delete.
Deselect

10.) Layers>merge down
Effects inner bevel same as in step 4

11.) Highlight layer 6>layers merge down
twice. Unless you want each one a different color.
Then do them one at a time.
Selection>Float>selection De float
Flood fill with a color of choice.
Deselect

12.) Same inner bevel as in step 4

13.) Effects 3D drop shadow.


14.) Do layer 7,8, and 9 the same way as
you just did 4,5, and 6.
Deselect

15.) Same inner bevel as in step 4

16.) Drop shadow same as step 13

17.) Highlight layer 10 in layer palletSelect with magic wand,
make sure you get all the large circles.
Flood fill with a color of choice, or a paper
from the kit. I used WP_HBM_PP11

18.) Resize paper by 60 per cent copy and paste
as a new layer>invert>hit delete.
Deselect

19.) Same inner bevel as before.
Layers merge down.

20.) Drop shadow as before.
Except change the blur to 10

21.) Highlight 11 in layer pallet, selection all>
Selection float>De float>Selection modify
expand by 2>flood fill with color of choice.
Deselect.

22.) Same inner bevel as before,
add the drop shadow.

23.) Highlight 12 in layer pallet, select with magic wand.
Flood fill with color of choice or a paper from the kit.
I used WP_HBM_PP16
Resize by 60 percent>copy and paste as a new layer
Move how you want it to look.
Invert and hit delete.
Deselect

24.) Layers>merge down

25.) High light 13 magic wand and flood fill with a color
of choice or a paper, I'm using WP_HBM_PP15
from the kit.......resize, copy and paste as a new layer
move how you want it.
Selection>invert and delete.
Deselect

26.) Layers>merge down
Same inner bevel as before.

27.) Highlight layer 14 selection>select all>Selection float>selection
De float, Copy and paste as a new layer a paper of choice, or flood
fill with a color. I used WP_HBM_PP8
Resize it by 60 percent and copy and paste as a new
layer, move how you want it selection invert and hit delete.
Deselect

28.) Layers>merge down

29.) Inner bevel, and drop shadow, same as before.

30.) Highlight layer 15 and do the same as you just
did with layer 14. I used WP_HBM_PP7

31.) On the background copy and paste as a new layer
a paper of choice, WP_HBM_PP14
or add a new raster layer and flood fill with a nice color.

32.) Layers>Load mask from disc


Click ok
Layers merge group.
You can now move it how you want it to look.
Give it the same bevel if you wish, and the same drop shadow.

34.) Copy and paste your tube of choice.
Add any accents you wish>resize them as needed.
I used the bee's from the kit and resized them until they looked right.

Added the bee hive, and the bee bears.
Added some words to the tag.

Close of the back ground when your done.
Merge all visible layers.

35.) Crop off any extra you don't want in your tag,
and resize to your liking.

36.) Flood fill the back ground with a nice color.
I used a yellow.

37.) Effects>plug ins>textures


38.) Add a 3 Pixel border color white.

39.) Add a 3 pixel border color of choice.

40.) Add a 10 Pixel border background color.
Select and give it the same texture as your background.

41.) Give it a nice bevel
Deselect

You can now add your water mark
And a name to your tag if you wish.


Your now ready to save and share your work of art.


Yippee your all done.

Would love to see what you do with this.
Thank you for giving my tutorial a try.
I do hope you have enjoyed this tutorial, as much
as I did writing it,
and learned something new.

Have any questions or need help.
Just let me know, I'm always happy to help any way I can.
Jcuttlebear01@aol.com


This one is done by Mary
thank you dear for testing this out for me.


Tuesday, August 17, 2010

Panda Delight

Tutorial by Jcuttlebear01 aka JoAnn
8/17/2010

I do these tutorials for fun and not
for any profit. I use them also as a learning tool to
help others learn the fun and art of paint shop pro.
All things I use are collected, the only thing I claim
Is the tag I make with these as my work.

This tutorial is written with the idea you
have some basic knowledge of PSP.
This was done in PSP 9 but should work with any.

Supplies:
3 graphics of choice.
Tubes of choice
Font of choice.
Everything I used HERE

Open the template we are going to use, shift D on key board and make a copy
of the template. Close the original.

On the layer pallet delete the copy write we don't need that.

1.) on your layer pallet high light the half circle.

2.) Magic wand tool>click on the half circle on the template we
are working on.

3.) Flood fill with the background color.
Deselect

4.) Effects Texture effects>Weave


5.) Highlight in you layer pallet the rectangle.
Magic wand and select it. Flood fill with a nice color
from the graphic. I used> #74a773
Deselect

6.) Effects>texture>blind effect


7.) Inner bevel


8.) Layer pallet and highlight ric rac next.
Selection all>selection float>selection de float>
Selection modify expand 2>flood fill with a color of choice.
I'm using white.
Deselect

9.) Add same bevel as before, its saved in your settings.

10.) Highlight the large frame background>Click on the
center with magic wand>Keep selected>Highlight in the layer
Pallet the Large frame layer>selection>float>de float and hit delete
on your key board one time.
Deselect

11.) Magic wand click in the white frame there with the magic wand.
Flood fill with a pattern, or a color of choice.
Deselect

12.) Inner bevel same as before.

13.) Layer Pallet>highlight the large frame background.
Click on the center with magic wand.
and delete that layer.

14.) Selection>Modify expand by 4>add a new raster layer> Copy and paste
a graphic into the selection.
Deselect.

15.) Layers arrange>move down.

16.) Frame 1 background select with magic wand.
Copy and paste into selection another graphic of choice.
Deselect.

17) Select frame 1 with magic wand and flood fill with color of choice.
Deselect
Add same inner bevel as before.

18.) Select frame 2 background and copy and paste another graphic
of choice into the selection.
Deselect.

19.) Select frame 2 with magic wand and flood fill with color of choice.
Deselect
Add same bevel.

20.) Its up to you if you want to use word art or not.
I did and this is how I did it.
Move with mover tool up above the half circle, along with the heart.
This is what I have so far.


21.) Select the heart and flood fill with a color of choice.
Deselect
Add same bevel as before.

22.) Font tool>settings I used


I typed the letter I and placed it on the heart. Layer convert to raster layer.
Then I typed>My little panda friends
Place how you want it>Layer convert to raster layer.
Its up to you.
I also duplicated the heart and placed it where I wanted it.


22.) You can now add tubes you wish to use.
I added a couple little panda bears to it.

23.) Had to resize them to 40 percent to make them look right.
The one little bear, I moved him down until he was under the edge of frame 2.

24.) add a drop shadow


25. Add the other bear, or one of choice.
I mirrored him.
Resize to 40 percent> move him where you want him.
Add the same drop shadow.

26.) If your happy with the way it looks now
then merge all visible layers.

27.) Crop your image so that some of the extra
around the edge is gone.


28.) Add a new raster layer>layer arrange>send to bottom.
Flood fill with a background color of choice, or a pattern.

29.) 3 Pixel border color of choice, I used white.

30.) 3 pixel border background color or color of choice.

31.) 3 pixel border make it the first one you used.

32.) Add a 20 Pixel border second color of choice.
Select with magic wand and

Add same bevel as earlier>except change the width to 10.
Deselect.

You can add a couple of corner accents if you wish or any thing else at this time.
Add a new raster layer and add your water mark.

Your now ready to save and share your work of art.


Yippee your all done.

Would love to see what you do with this.
Thank you for giving my tutorial a try.
I do hope you have enjoyed this tutorial, as much
as I did writing it,
and learned something new.

Have any questions or need help.
Just let me know, I'm always happy to help any way I can.
Jcuttlebear01@aol.com

Another one I made
Tag below is by
GGmom9 aka Mary
Thank you for testing my tutorial for me.