This tutorial was inspired by me, I was making a tag
for my daughter, she loves bull dogs.
Tutorial by Jcuttlebear01 aka JoAnn
7/20/2009
I do these tutorials for fun and not
for any profit. I use them also as a learning tool to
help others learn the fun and art of paint shop pro.
All things I use are collected, the only thing I claim
Is the tag I make with these as my work.
Supplies
Filters Unlimited HERE
Graphic plus HERE
Eye candy Impact HERE
PSP your choice did this in 9
Open graphic of choice
Duplicate it and close the original.
Remember to save often in case your psp closes.
1. Image add border 3 pixel color that isn't in your graphic.
2. Select and flood fill with gold bead, or one of choice.
Adjust sharpen, selection invert.
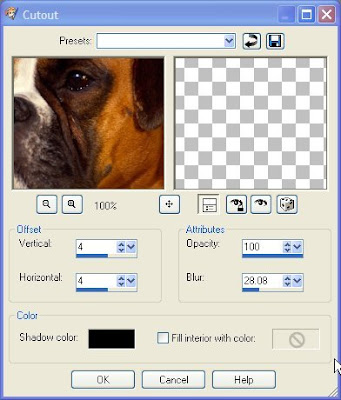
3. Add cut out using these settings.
 4. then repeat but change the V and H to -4
Then selection and none.
5. Add another 3 pixel border using a color from your graphic.
6. Add another 3 pixel border using a different color and select
and flood fill with the gold beads,
then adjust sharpen, and deselect.
7. Add a 20 pixel border, and select. Then I used
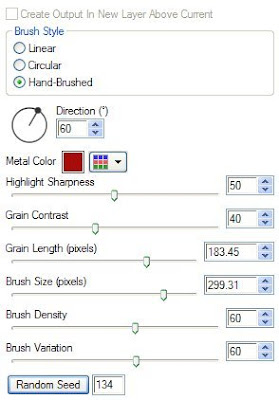
eye candy 5 Impact brushed metal. With these settings.
There is a lot of different options.
just play around until you get what you like
depending on your graphic of choice.

8. Add another 3 pixel border and select, flood fill with the gold beads.
Adjust sharpen then deselect.
9. Add another 3 pixel border using the same color you did earlier.
10. repeat step 8.
11. Add a 30 pixel border and select.........Graphic plus
quick tile 2 with default settings.
12. Keep selected and filters unlimited with button frame glass 1
change the top setting only
to 20 apply, deselect.
13. Repeat step 8 and 9.........now your done.
14 Add your water make and any thing else you wish to your finished tag.
Would love to see what you do with this.
Thank you for giving my tutorial a try.
I do hope you have enjoyed this tutorial, and learned
something new.
Have any questions or need help.
Just let me know, I'm always happy to help any way I can.
Jcuttlebear01@aol.com
This beautiful one done by
GGMOM9 Aka MaryThanks Mary.
This beautiful one done by
GGMOM9 Aka MaryThanks Mary.


No comments:
Post a Comment