


Tutorial by Jcuttlebear01 aka JoAnn
7/20/2009
I do these tutorials for fun and not
for any profit. I use them also as a learning tool to
help others learn the fun and art of paint shop pro.
All things I use are collected, the only thing I claim
Is the tag I make with these as my work.
Supplies
Tube of choice or ones I used here
Font of choice
Filters unlimited HERE
Open new image 600 x 400
1. Open tube of choice and
pick 2 colors you wish to use for your
tag. Light for foreground and dark for background.
2. Flood fill new image with color of choice.
3. Selection tool draw a square out
250 x 250
You can use your ruler or just
watch the bottom of the psp screen.
4. Add a new raster layer and flood fill with another color
of choice from your tube.
Deselect.
5. Move the square to the center for now. Select, modify
expand by 1 selections, and go to select, selections border
 6. Layer new raster layer and flood fill with gold,
or one of choice.
Deselect.
7. Select the inside of the frame
Layer new raster layer effects 3 D cutout
 8. Add a new raster layer and repeat cut out
except change the V and H to -1

9. This is what you should have now, I rename my layers
as I go to keep me straight.
Deselect and close off the bottom 2 layers, then
merge all visible. Make sure you are on one of the
layers that you don't have closed before you merge.
Keep selected.
 10. Layer new raster layer, call it tube, find the
tube you want to use and copy and paste into
your selection.
Deselect.
11. Add a drop shadow

12. Activate your dark layer with in the frame and give it
some kind of effect.
I used filters unlimited special effects aged film.
If your happy with the way everything looks so far merge
visible layers, you should of still had the bottom one closed off.
13. Open the bottom layer now and activate it.
Now effects and I used
 14. Then effects and texture effects mosaic antique effects.
15. Selection tool and draw a line down one side of your tag

16. Layer new raster layer and flood fill with the gold or color of choice.
Deselect
17. Repeat this but this time don't make it as wide.
Add a new raster layer and flood fill this one.
Deselect.

18. Place them how you want them, then close off all layers except for the 2 lines.
and merge these together.
19. Effects 3 D inner bevel
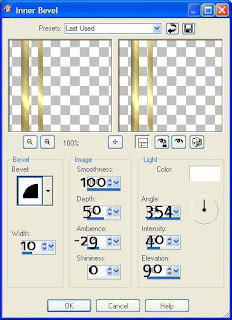
20. Add the same drop shadow as you did earlier, but change the
blur amount to how you like it........I used 2
21. Duplicate this layer and then image rotate 90 degrees.
Make sure that you don't have all layers checked.
22. Get your
 22. Get your
and pull out this one tell it touches the other side of your tag.
Arrange these lines like you want them.
23. I used a couple of brushes to make some accents and added
brush butterflies, and words to my tags.
Its all up to you what you would like to add.
24. Once your done adding what you wish, then
merge all layers.
25. Crop tool and get rid of what you don't want around your edges

I saved enough room to add a name down the side or anything else I wanted to.
26. Add a 1 pixel white border or one of your choice.
27. Add a 3 pixel border light color, or what ever you want to use.
28. Add a 10 pixel border and select it and filters unlimited special effects 1
aged film.......effects blinds, then repeat same bevel as we used earlier.
Deselect.
29. Add a 2 pixel border select and flood fill with the gold pattern.
Deselect
30. Add a 1 pixel border color of your choice.
Wow now we are done.
Add your watermark and anything else and save your work of art.
Would love to see what you do with this.
Thank you for giving my tutorial a try.
I do hope you have enjoyed this tutorial, and learned
something new.
Have any questions or need help.
Just let me know, I'm always happy to help any way I can.
Jcuttlebear01@aol.com
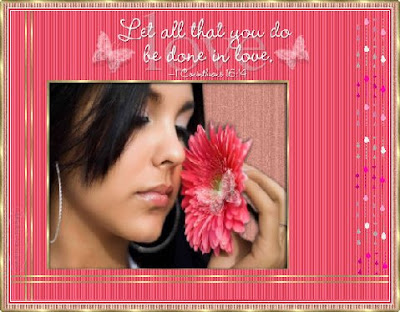
Examples by me


19. Effects 3 D inner bevel
20. Add the same drop shadow as you did earlier, but change the
blur amount to how you like it........I used 2
21. Duplicate this layer and then image rotate 90 degrees.
Make sure that you don't have all layers checked.
22. Get your
22. Get yourand pull out this one tell it touches the other side of your tag.
Arrange these lines like you want them.
23. I used a couple of brushes to make some accents and added
brush butterflies, and words to my tags.
Its all up to you what you would like to add.
24. Once your done adding what you wish, then
merge all layers.
25. Crop tool and get rid of what you don't want around your edges

I saved enough room to add a name down the side or anything else I wanted to.
26. Add a 1 pixel white border or one of your choice.
27. Add a 3 pixel border light color, or what ever you want to use.
28. Add a 10 pixel border and select it and filters unlimited special effects 1
aged film.......effects blinds, then repeat same bevel as we used earlier.
Deselect.
29. Add a 2 pixel border select and flood fill with the gold pattern.
Deselect
30. Add a 1 pixel border color of your choice.
Wow now we are done.
Add your watermark and anything else and save your work of art.
Would love to see what you do with this.
Thank you for giving my tutorial a try.
I do hope you have enjoyed this tutorial, and learned
something new.
Have any questions or need help.
Just let me know, I'm always happy to help any way I can.
Jcuttlebear01@aol.com
Examples by me


No comments:
Post a Comment