
Tutorial by
Jcuttlebear01 aka JoAnn
4/6/2010
I do these for fun and as a learning tool.
I don't sell or make a profit from any of the
supplies I have collected. Or from writhing these tutorials.
I don't claim to have done any of the graphics and that, just the tags
I make and share.
Some knowledge of psp is most helpful.
Supplies
Graphic of choice
Tube of choice
Font of choice
I used AR BONNIE
Or you can use mine HERE
Plug ins
Filters unlimited HERE
Graphic plus HERE
Alien skins Xenofex 2 HERE
PSP 9
or any other will do.
Open graphic of choice and duplicate
and close the original.
Pick a light color from the graphic for your foreground,
and a dark color for the background.
Pick a nice gold color to use, from your
textures, I'm using the gold bead.
Re size your graphic to
400 X 300
1. Add a 5 pixel border white, select it and flood fill with the gold pattern.
2. Selection invert and effects 3 D cutout
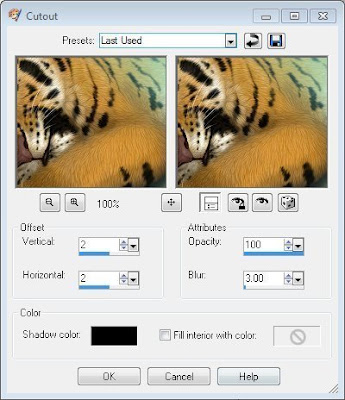 3. Repeat but change the V, and H to -2
Deselect
4. Add a 3 pixel border the foreground color.
5. Add a 5 pixel border white, select and flood fill with the gold pattern.
Deselect.
6. Add a 10 Pixel border foreground color.
select
7. effects texture effects, blinds
change the color to you background color.
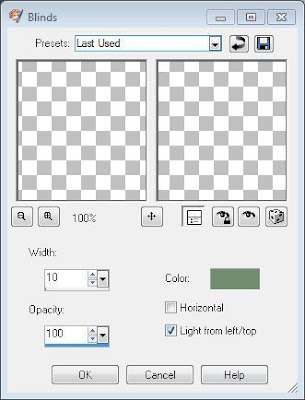 8. Effects 3 D inner bevel
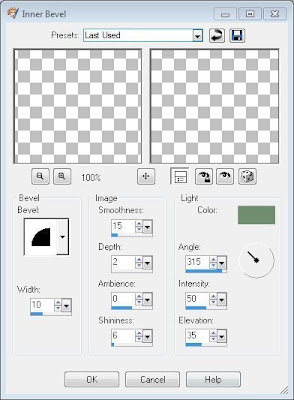
Deselect
9. Add a 5 pixel border and select, flood fill with the gold pattern.
10. Selection invert and add the cutout.
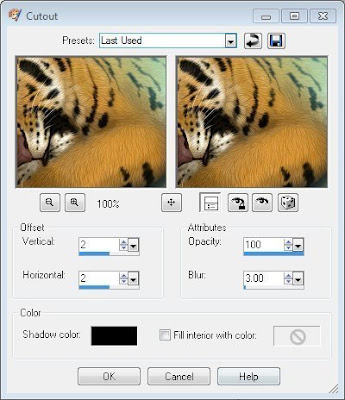
11. Repeat but change the V, and H to -2
Deselect
12. Add 3 pixel border your foreground color.
13. Add 5 pixel border, flood fill with the gold pattern.
14. Add a 20 pixel border background color,
select add a new raster layer,
Effects, plug in Alien skins Xenofex 2 crumple
Setting glossy paper.
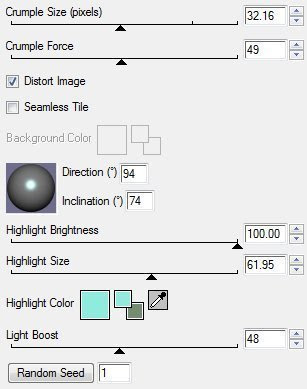
15. Layers merge down.
16. Effects plug in Filters unlimited Glass frame 1
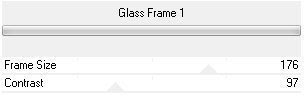 you can play with the settings and get them how you like them.
Deselect
17. Add 5 pixel border select and flood fill with the gold.
Deselect
18. Add 3 pixel border your foreground color
19. Add 5 pixel border select and flood fill with gold pattern.
Deselect.
20. Add 30 pixel border background color.
Effects graphic plus Kaleidoscope
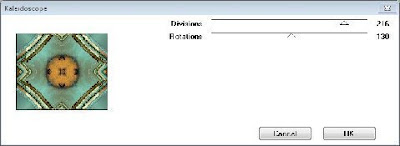
Or play around and change the setting how you would like.
Deselect
21. With your selection tools select the 4 corners.
Add same blind effect as you did earlier except change the color
to your foreground color.
Keep selected.
22. Graphic plus and add a cross shadow.
Diagonal 58
Center 51
Horizontal 57
Horizontal 57
Diagonal 79
Horizontal 64
Vertical 40
Intensity 80
Brightness 128
Glass frame 1
Frame size 64
Contrast 128
If happy with it deselect.
25. Add a 2 pixel border of your background color.
26. Add a 2 pixel border of your foreground color.
27. Add a 30 pixel border of your background color, select.
Add same cross shadow as you did earlier.
Add same filter unlimited glass frame as earlier.
If you wish add any accents you want to it now.
Add a new layer and place your watermark.
Merge all layers.
Re size to your liking.
After I re size I do adjust clarify to brighten it up.
Your now all done and ready to share your work of art.
Would love to see what you do with this.
Thank you for giving my tutorial a try.
I do hope you have enjoyed this tutorial, and learned
something new.
Have any questions or need help.
Just let me know, I'm always happy to help any way I can.
Jcuttlebear01@aol.com
Another one by me


No comments:
Post a Comment