


 Tutorial by Jcuttlebear01 aka JoAnn
4/7/2010
I do these tutorials for fun and not
for any profit. I use them also as a learning tool to
help others learn the fun and art of paint shop pro.
Everything I use I have collected don't claim to have
made anything other then the tag.
Notes:
All settings will remain the same unless otherwise noted
This tutorial assumes you have a working knowledge of PSP
Remember to save often in case your psp crashes.
I did this in PSP 9 but sure any one will work.
Supplies:
Graphic of choice
Tubes of choice.
Font of choice.
Or the ones I used HERE
Plug ins:
Eye candy 5 texture HERE
AAA frame works HERE
Graphic plus HERE
Open a new image 400 X 400
Pick a light color from the graphic for you foreground. #dbc8a8
And a dark color for you background. #b99058
1. Add a new raster layer, and flood fill with the background color.
2. Selection, select all
Selection modify contract by 15
Selection invert.
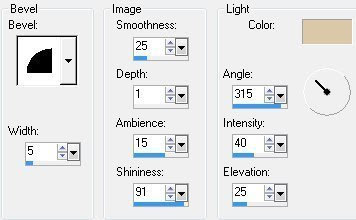
3. Effects 3 D inner bevel
 4. Adjust > add noise
With these settings.
Uniform, Micro checked, and noise 35
5. Image rotate by 45 degrees left.
Make sure that all layers isn't checked.
Deselect
6. Layers>Merge>Merge Visible
7. Take magic wand set to this, then select the inside of your frame

Hit delete on your key board one time.
Deselect
8.. Get the graphic you wish to use copy and paste it as a new layer.
Layers arrange and move down.
Graphic should be no larger then 400 X 400 take mover tool
and move it how you want it to look
9. Merge>Merge Visible
10. Magic wand and select the four corners.
11. Effects plug in~Alien skins eye candy 5 weave
Settings I used. Colors I used were my back ground and
Foreground colors.

12. Effects 3 D Inner bevel
Deselect
13. Add a 20 pixel border>background color.
Select
Effects>Plugins>Eyecandy 5 Weave
Same settings we just used.
Deselect
14. Add a 30 Pixel border>foreground color.
Select
Effects graphic plus and cross shadow.
Use default settings.
15. Effect plug in~AAA frame works
(Note) you can change the color to go with your work.
Down where it says gold......use what goes well with your graphic.

16. Add 10 pixel border background color,
add eye candy weave to this.
17. Effects 3 D inner bevel

Deselect
You can now add any tubes or accents you wish to add.
Merge all layers.
New raster layer and add your watermark.
Re size to your liking, adjust brighten and contract......clarify
By 5 or less if you don't want it that bright.
Your all done and ready to save your work of art.
Would love to see what you do with this.
Thank you for giving my tutorial a try.
I do hope you have enjoyed this tutorial, and learned
something new.
Have any questions or need help.
Just let me know, I'm always happy to help any way I can.
Jcuttlebear01@aol.com
Another one by me

This one I used blind effects on it.

Tag below by
GGMOM9 aka Mary
Thank you for being one of my testers.

Tags below by
Mydachshund aka Barb
Thanks for being one of my testers.


No comments:
Post a Comment