


Tutorial by
Jcuttlebear01 aka JoAnn
4/6/2010
I do these for fun and as a learning tool.
I don't sell or make a profit from any of the
supplies I have collected. Or from writhing these tutorials.
Some knowledge of psp is most helpful.
Plug in
Eye candy 4 HERE
Template HERE
Its the work of Butterfly flutterby creations.
Called jungle fever.
Tube of choice or the one I used you can find it HERE
It's the work of Russ Docken.
tube number 7907
Scrapbook kit is the awesome work from Lynn Earwicker
called Mysterious its a new kit and you can find it HERE
Font of choice I used
Mon Amour Script Alt it's a pay font so can't share it.
I used psp 9 for this tutorial but sure any of them
would work just fine.
1. Open your template and duplicate it, close the original.
I like lots of room so I canvas sized my work area
We will re size it when done.

2. Delete the raster 1 and also the one you see that is closed off.
I also never used the Label 1 and 2. It's all up to you.
I also never used the Label 1 and 2. It's all up to you.

3. Selection select all and float, get a paper you want to use for the
mask. I'm using paper 3 from the kit. Copy and paste it into selection.
Deselect
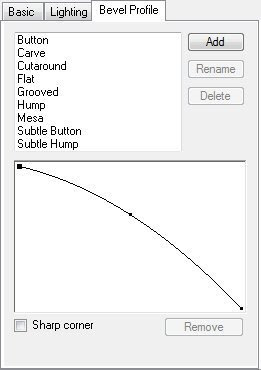
4. Effects eye candy 4 bevel settings I used.
mask. I'm using paper 3 from the kit. Copy and paste it into selection.
Deselect
4. Effects eye candy 4 bevel settings I used.


5. Activate the fat lines select all, float, get the paper
you want to use, I'm using paper 2 from the kit.
Copy and paste into selection.
Deselect
6. Add a bevel to it I used the same one as earlier.
The eye candy 4.
7. Activate the thin lines, and select all, float, use
another paper for them......or you can flood fill with a color.
I used paper 8 copy and paste into selection.
Deselect
8. Add your bevel to this also same as before.
9. Activate the top fill layer, selection all, float and copy and paste
a paper of choice into it.
I used paper 2.
Deselect
10. Repeat the same steps for bottom layer.
I used same paper and mirrored it, to give it
a different look.
Deselect.
11. Activate top back plate, and selection all, and float, then
either flood fill with a color of choice.
Or a paper I used paper 10, copy and paste into selection.
Deselect
12. Give it the same bevel as before.
This is what mine looks like so far.

Now your ready to add accents and your tube.
13. I added ivy 1 and took my deform tool and turned it like I wanted it
to look.
14. Add a drop shadow to this.

14. Copy and paste your tube and place it where and how you like it.
Add the same drop shadow as before.
15. Add some wording if you wish, and accent with some butterflies.
It is up to you, how you want it to look.
16. When you are happy with everything then merge all layers.
I took and copied and pasted as a new layer another paper
for the background.....I used paper 3.
17. Crop tool and get rid of the extra you don't want.
18. Re size all layers to the size you wish your tag to be.
19. Add a 2 pixel border and flood fill it with a nice gold pattern.
20. Add a 5 pixel border and fill it with a color of choice.
21. Add a 2 pixel border and fill it with the gold patter.
22. Add a new layer add your water mark, and your all done.
Would love to see what you do with this.
Thank you for giving my tutorial a try.
I do hope you have enjoyed this tutorial, and learned
something new.
Have any questions or need help.
Just let me know, I'm always happy to help any way I can.
Jcuttlebear01@aol.com
Another one I did using the same kit.


No comments:
Post a Comment