Tutorial by Jcuttlebear01 aka JoAnn
11/16/2011
I do these tutorials for fun and not
for any profit. I use them also as a learning tool to
help others learn the fun and art of paint shop pro.
Everything I use I have collected don't claim to have
made anything other then the tag.
Notes:
All settings will remain the same unless otherwise noted
This tutorial assumes you have a working knowledge of PSP
Remember to save often in case your psp crashes.
I did this in PSP 9 but sure any one will work.
Supplies:
Scrap kit is by Wicked Princess and it is on sale
it's called SPARKLING SOLSTICE
and you can buy the kit HERE
Tube is by Leonardo55
and you can buy the tube HERE
In my supplies all 3 items below:
Font is CCYuletideLog
Mask is DBV Xmas Mask 02
My supplies:
Plugs in optional
Super blade pro HERE
Eye candy 4 HERE
Open the template
Make a copy>Shift D on key board
and close the original.
delete the top layer
Image>Canvas size
Need room to work>will resize later.
Highlight the glittered oval>add a new raster layer>
flood fill with a nice gold pattern.
Deselect
Highlight the oval layer>Copy and paste as a new layer
a paper of choice>WP_SS_PP10 is what I'm using.
Hit delete on your keyboard and
Deselect
Highlight the circle 1 layer>Selection invert>add new raster
layer and flood fill with a color from your tube.
I used>#78b7e3
Effects>blinds
Deselect
Highlight the circle 2 layer>copy and paste as a
new layer a different paper of choice.
I'm using WP_SS_PP1>Selection>invert>delete.
Selection>
Add new raster layer>flood fill with the gold patter.
Deselect
Highlight the glittered rectangle>selection Invert
Selection>select, select borders.
New raster layer>and flood fill with the gold patter.
Or you can just leave it alone.
Deselect
Highlight the rectangle layer>copy and paste
as a new layer a paper of choice.
I'm using>WP_SS_PP3.
Selection invert and hit delete on keyboard.
Deselect
I decided not to use the frame background
or the frame so I deleted them.
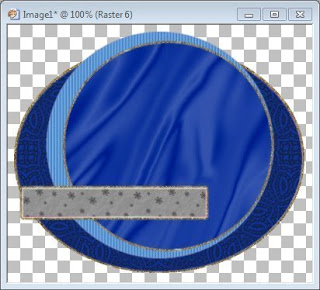
What I have so far.
Activate the top layer>we are going to start adding
accents now.
Open and copy and paste as a new layer
WP_SS_TREE>resize it by 80 percent
Move with mover tool over to the middle of your work, or
where ever you want it.
Add a drop shadow
Open and copy and paste as a new layer>
WP_SS_ROUND PRESENT>resize by 25 percent
Move over and down by the tree.
Add drop shadow.
Open and copy and paste as a new layer>
WP_SS_HOLLYPRESENT>resize by 25 percent
move over by the other present how you want it.
Add drop shadow
Duplicate the first present and resize by 50 percent
move and place it where you want it. This is how mine looks.
Open and copy and paste as a new layer>
WP_SS_SNOWMAN resize by 50 percent and move
over to the left of your work.
Add drop shadow
Open and copy and paste as a new layer>
WP_SS_SNOWFLAKE resize by 15 percent
Duplicate a few times and arrange on your circle 2
How many ever you want
Open and copy and paste as a new layer>
WP_SS_BELLORNAMENT resize by 65 percent
add drop shadow
Open and copy and paste as a new layer>
WP_SS_HOLLY
Resize by 50 percent>move up to the top of the
loop on the bell
Add drop shadow
Copy and paste your main tube now>resize as needed.
Add drop shadow.
Close off the word art and if your happy with every thing
merge all layers.
Reopen the word art and resize it by >colorize it to your liking
Settings I used.
Add a couple candy canes if you wish, and place them
where you want.
Make any finally adjustments you might want to make
and merge all layers.
Add a new layer>arrange and send to bottom.
Select all>copy and paste into a paper of choice,
this will be the mask layer.
I used WP_SS_PP7
Open the mask your going to use and minimize it in your psp.
Layer>new mask layer>from image.
Merge group
I added a blade pro effect to the mask.
I just clicked on the dice until I got an effect I liked.
Eye candy 4 Gradient glow
Thin and picked a color from my tube.
If your happy with it merge all layers
add watermark>and name if you wish.
Resize if you wish
Your now ready to save your work of art.
Would love to see what you do with this.
Thank you for giving my tutorial a try.
I do hope you have enjoyed this tutorial, as much
as I did writing it,
and learned something new.
Have any questions or need help.
Just let me know, I'm always happy to help any way I can.
Thank you Mary


No comments:
Post a Comment