Pages

Sunday, May 15, 2011

Tiger Delight

Tutorial by
Jcuttlebear01 aka JoAnn
5/11/2011
I do these for fun and as a learning tool.
I don't sell or make a profit from any of the
supplies I have collected. Or from writhing these tutorials.
I don't claim to have done any of the graphics
and that, just the tags I make and share.
Some knowledge of psp is most helpful.
I used psp 9 any will work.
Supplies
3 graphics of choice
Tube
Accents of choice
Font AR Decode
All supplies I used are HERE
Plug ins
Xero HERE
Filters unlimited HERE
Alien Skins Xenofex 2 HERE
AAA frame HERE
open a new image 500 X 800
will resize when done
Selection tool>draw out a square
I went about 7 gray squares by 7 gray squares.
any where on your new image.
Selection>modify>select, selection border

 use a color or a gold patter for the frame.
It's all up to you>I used gold beads
set at angel 0 and size 200
 duplicate move down so it touches the first one
duplicate it again and move it down with you mover tool.
they should all be lined up now.
 Merge visible layers.
With your mover tool>move it over so you have lots
of room to work.
Top>magic wand and modify expand by 3
Layer new raster layer>copy and paste into
selection the first graphic you want to use.
Layer arrange move down.
Deselect
Repeat the above step for all 3 of the frames.
Just make sure your on the right frame layer each time.
When your all done with the frame, and are happy
with how it looks>merge all layers
This is what I have so far.
Now we will add some leaves to the frame,
Copy and paste as a new layer>Leaves 1
Resize by 50 percent>with mover tool move over to the right side
of the frame and layer arrange move down. 
Duplicate the leaves>image flip and place them
how you want them at the bottom of your frames.
Duplicate and move that layer up to the middle.
I took my eraser tool and did away with
a couple of leaves I didn't want there. 
 Once you have them placed close off the frame>
and merge visible.
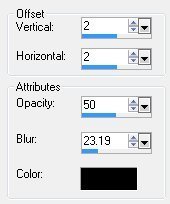
Give them a drop shadow.
Layer duplicate>mirror image.
I then took my free hand selection tool and
went around the leaf tube and just took a couple
and copied and pasted as a new layer
Resize the by 45 percent. and kind of fill in
where you think they need to be.

I closed off the layers so you could see how I placed them.
Be sure and add the same drop shadow.

I now took and added the same leaves
on the top of the frame.
Resized them by 40 percent.
Add the drop shadow and arrange them.


 This is what I have now.
If your happy with the way it all looks
Then merge all layers.

Pick a nice color you want for the back ground.
I used>#e1c798
Add a new raster layer>arrange and move it down.
Flood fill with color of choice.

Effects>plug in Alien Skins Xenofex 2 burnt edges.
Settings I used, you can mess around and see if you

like something better.
 With mover tool>arrange your frame and that in the center of this.

Add a new raster layer arrange and send to the bottom.
Flood fill with a nice dark color>#89554a
Selection>select all>modify>contract by 25
Effects>plug ins>AAA photo frame>

 Keep selected>selection>modify>select border
Flood fill with the gold pattern you used on your frame.
Deselect

On the same layer>magic wand and select the outside part of the frame.
Flood fill with the light color>effects>texture effects>blinds

Keep selected
Effects>plug in>filters unlimited>glass frame 1
settings>20>and 70
Depends on how you want it to look.
Deselect

Add the tube you wish to use.
Add same drop shadow as before.
Merge all layers
Effects>plug in Xero>Porcelain
you can play around with the settings but this
is the ones I used.


Add a new layer>add your water mark and now your done.
Resize to your liking.
Would love to see what you do with this.
Thank you for giving my tutorial a try.
I do hope you have enjoyed this tutorial, and learned
something new.
Have any questions or need help.
Just let me know, I'm always happy to help any way I can.
Another example by me

Thank you for giving this a try.


 Thank you Mary
Thank you Wendy


Monday, May 2, 2011

You Rock Babe


Tutorial by Jcuttlebear01 aka JoAnn

5/2/2011
I do these tutorials for fun and not
for any profit. I use them also as a learning tool to
help others learn the fun and art of paint shop pro.

All things I use are collected, the only thing I claim
Is the tag I make with these as my work.

This tutorial is written with the idea you
have some knowledge of PSP.
This was done in PSP 9 but should work with any.

Supplies:
Tube of choice
Font of choice
All I used are HERE

Plug-Ins
AAA frames texture HERE
Penta dot and cross HERE
Filters Unlimited HERE

Open new image 800 X 700
We will resize later.

Open the tube you wish to use, and
pick a light color for the foreground #e6c57f
and a dark color for the background. #924527
Minimize the tube in PSP for now.

Take your preset shape tool set to the settings below.
Letter G in your preset shapes>it's in the supplies if you
don't have it>place in your preset shapes folder.
NOTE
I have made a template that you can use
in psp 7 that is in the supplies.
If you can't get the preset to work.

Draw out a frame large, we will resize when we are all done.

Layer convert to raster.

Magic wand and click on the dark part of the frame
AAA frames texture effects>
Deselect

Select in the brown area once again and>
Effects>plug in penta dot and cross>use default settings.
Deselect

Change your preset shape to oval and draw a circle in the middle of your frame.

Change the background color, to a color of choice.
I used #d8d4c9
Convert to raster layer
Click on the inside of the circle>selection modify and contract by 25
new raster layer copy and paste into selection the record.
Deselect

Add a drop shadow


Make sure your on the top layer>merge down.

Preset tool>and go rectangle shape>set the width
at 5
Highlight layer 2 in the layer pallet>draw out a rectangle
Don't make it to large. Layer>convert to raster>
click on the inside of it.
Effects>blind effects


Deselect

Select the frame around it>effects>texture>
you can use a texture of choice, this is what I did.
This is what I have so far.
Repeat the step above but change the colors

on the blinds change it to light from top, so
it runs the other way.

Select small frame around the edge of this one,
add another texture.
Deselect

Now draw another rectangle up and down this time,
change colors>move it how you want it.

Layer duplicate and mirror>Leave that one
alone for now.
Convert to raster layer

Go back to the one on the left side and select inside
I used filters unlimited paper background>fabrous paper fine
with default setting and give it a texture.

Select>
Then I gave it filters unlimited
Glass frame 2>change frame size to 35

Deselect>select on the inside of this one
filters unlimited>paper background one of choice>I
used canvas nature coarse.
Deselect
This is what we have now.
I took my deform tool and moved and pulled down on
the ones we just made, not to much.

Take your selection tool and cut out, so the side ones
look like they kind of weave>if it helps take and lower
the occupancy down so you can see where you are at.
Make sure your on the right layer.
Do the same with the other side, but at the top.
Go back to the bottom frame and select it>selection modify expand by 5
add a new raster layer.
Add a background of choice.

flood fill #63390f is what I used.
layer arrange and move down.
Deselect

If your happy with the way things look now
you can add any accents you wish to at this time.
I added a branch and resized it by 50 percent

added a drop shadow>2, 2, 75 and 7 color black
Took deform tool and turned it how you want it.

Add the notes bar resize as needed.
Add a drop shadow.

Add the little guys with music instruments, and the others
resize as needed and place them where you want them.

Add your wording, and any thing else you wish to at this time.
Add your tube of choice and resize as needed, add drop shadow.
If your happy with every thing merge all layers.

Select all>invert>image>crop to selection.
It will get rid of all the extra empty back ground.
Image>add border 10 pixel background color.

Add your water mark and resize as you wish, we
are all done.
Your ready to save and share your work of art.

Would love to see what you do with this.
Thank you for giving my tutorial a try.
I do hope you have enjoyed this tutorial, and learned
something new.

Have any questions or need help.
Just let me know, I'm always happy to help any way I can.
Jcuttlebear01@aol.com

Another I did

Thank you Mary.
Thank you Jessica
Thank you Wendy

Wednesday, April 20, 2011

Vacation Time

Tutorial by Jcuttlebear01 aka JoAnn
                                  4/20/2011                                      
I do these tutorials for fun and not
for any profit. I use them also as a learning tool to
help others learn the fun and art of paint shop pro.
All things I use are collected, the only thing I claim
Is the tag I make with these as my work.

This tutorial is written with the idea you
have some knowledge of PSP.

This was done in PSP 9 but should work with any.

I'm using this great kit called Going deep.
by Wicked Princess
it's a FTU one and you can find it HERE
Can't find on her site kit is HERE  (Dropbox)

Supplies:
Tube of choice~Tube I used is by Anna BR.
She share her tubes HERE
Font of choice I used is called~AmerikaSans
Graphic of choice
All that I used is HERE (4 share) or
HERE (drop box)

No plug ins used for this tag.

Open new image 800 X 700
We will resize later.

1. Open the frame>WP_GD_SOSLIFESAVER
from the kit and resize by 80 percent.

2. Magic wand and click inside the frame.
Selection>modify expand by 6>new raster layer>
and copy and paste into selection the graphic or the
paper you wish to use.

3. Layer arrange and move down.
Deselect

4. You can colorize the frame to go with your back ground if
you would like to.

5. We will now start adding some accents.
Copy and paste the tube of your choice.
I'm using a nice one by Anna Br.
Resize by 60 percent, and move to the right.
Then I took the eraser tool and put it like she was inside the frame.


6. Add a drop shadow

7. Add from the kit WP_GD_BARREL resize 40 percent,
and copy and paste as a new layer. Move over to the
right by the lady. Add same drop shadow.

8. Add from the kit WP_GD_PALMTREE resize by 55 percent>
take deform tool and turn how you would like it to look.
Then I took the eraser tool and did away with what I didn't want.

9. The tree should still be in your memory so just paste it
once again to your work.
Resize this one by 40 percent.

10. Activate your large tree and duplicate>mirror
move it down under the lady tube.
Take your deform tool and move it around how you would like it.
Once you have all 3 trees place give them the same drop shadow.

11. Add WP_GD_BOAT resize by 30 percent>move over to the left.
Add drop shadow.

12. Add WP_GD_FENCE resize by 30 percent move over by the
boat and add drop shadow.

13. Add some sea shells of choice.
I resized the ones in the kit, by 20 percent and moved them to the left.
I took the deform tool and turned them and moved them like I wanted.
Add a drop shadow to each one.

This is what I have so far.

14. I then added the drift wood. Resized by 45 percent.
Move it over by the sea shells.

15. I took the mesh warp tool and pulled and turned the wood,
so it didn't look so straight. It's up to you.
Add drop shadow.
Bring a couple of the sea shells up to the top>so they are
or the wood.

16. Add WP_GD_BIRD2 from the kit resize by 20 percent.
Duplicate mirror and set them on the wood.
Duplicate the mirrored one again and place on the barrel.
You can give each of them a drop shadow.

17. If your happy with everything merge all layers.
Add a new raster layer and flood fill with color of choice.
We will add the mask WSL_mask 99.
Merge group

18. I resized the mask by 90 percent.
I add the same drop shadow, but changed the color to a light blue.
Merge all layers>resize by 90 percent>crop off extra you don't want.
Add your watermark and your name at this time.
You are now ready to save your work of art.

Would love to see what you do with this.
Thank you for giving my tutorial a try.
I do hope you have enjoyed this tutorial, and learned
something new.

Have any questions or need help.
Just let me know, I'm always happy to help any way I can.
Thank you Mary for testing it out for me.


Thank you
DreamsRmaid for giving my tut a try.
Photobucket

Tuesday, April 12, 2011

Peep and Friends

Tutorial by
Jcuttlebear01 aka JoAnn
4/13/2011

I do these for fun and as a learning tool.
I don't sell or make a profit from any of the
supplies I have collected. Or from writhing these tutorials.
I don't claim to have done any of the graphics and that, just the tags
I make and share.

Some knowledge of psp is most helpful.
I used psp 9 any will work.

I'm using the awesome kit from Wicked Princess aka Shani
you can find this darling kit New! Lil Bo Peepers PTU Exclusive
If you can't click on the link then use this:
Tube I'm using is from Gary Rudisill and you can
I can't supply it cause its a PTU tube
find it HERE

Template I used is from the great work of Melissa
I used #83 and you can find it here

The little sheep I used are from

Font of choice:
Ones I used are in the supplies

Supplies

Open the template
and duplicate it and close the original.

delete layer 1
Image>Canvas Size so you have  room to work, we will resize later on.

In the layer pallet start with raster 10
Highlight>select with magic wand tool
and change feather to 5
It gives your work a smoother look.

Now copy and paste a paper of choice from the kit>
I'm using WP_LBP_PP3
Resize by 60 percent copy and past as a new layer>
Take your mover tool and move it how you want it.
Selection>invert>delete>
Deselect

Delete layer 10

In layer palette click highlight layer 3
Magic wand and change the feather back to 0
Find a paper> I'm using WP_LBP_PP10
resize by 60 percent.
copy and paste as a new layer.
Selection invert and delete.
Deselect

Delete raster 3

In layer palette click highlight layer 9
Magic wand and select it>Find a paper>
I'm using WP_LBP_PP4> resize by 60 percent.
copy and paste as a new layer.
Selection invert and delete.
Deselect

Delete raster 9

In layer palette click highlight layer 8
Magic wand change the feather back to 0>
and select it>Find a paper>
I'm using WP_LBP_PP6
resize by 60 percent.
copy and paste into selection.
Deselect

Add a drop shadow


 In layer palette click highlight layer 2
Magic wand and select it>you can
use the same paper for all the frames if you wish.
Or find another you want to use, it's all up to you.

Deselect

Add a drop shadow same as before.

Layer palette highlight copy of raster 9>
Magic wand and select it>Find a paper>
I'm using WP_LBP_PP14
resize by 60 percent.
copy and paste as a new layer.
Selection invert>delete
Deselect

Delete copy of layer 9
Copy of raster layer 8>do the same
as for the other frame you just did.
In layer palette click highlight layer 5
Magic wand and select it>Find a paper>
I'm using WP_LBP_PP7>resize by 60 percent.
copy and paste as a new layer.
Selection invert and delete.

Deselect

Delete raster 5
Raster 4 do the same as the other frames.

Raster layer 7>select all 3 squares.
Copy and paste as a new layer>paper of choice.
I'm using WP_LBP_PP5
move how you want it, depending on the
tube your using.
Selection invert and delete.
Deselect

Hide the background layer you just put in>
Click in the center of each of the squares again
and copy and paste your tube as a new layer.
Move how you want it, selection>invert>delete.
Deselect

Raster 6 you can do the same as the
other frames.

Note
If your not going to place any thing else inside the frames
go and highlight layer 2 and merge down, do the same with the rest
of those with frames.........this way you can move them and

arrange as you wish.
Now we will add some accents.

I add a couple little lambs
Resized them like I wanted
Gave them each a drop shadow.

Then added some grass
WP_LBP_GRASSFLOWERS
I didn't want the flowers on so
took eraser tool and removed them.
Then took WP_LBP_ROSEBRANCHES
Resized and took deform tool and turned how I liked.

Then played around with the mesh tool and pulled it around.
Add drop shadow when your happy with it.
Copy your main tube and resize and place where you want
Move any thing else and get it like you want.
Add a drop shadow to your tube.

This is how mine looks now.

If your happy with what you have then merge all layers


add a new layer>flood fill with color
you wish your mask to be.

Layer>new mask from image>and find
WSL-143 and hit ok.
Merge group

With deform tool you can move it in size like you want.
Crop any extra you don't want on your tag.

Add a new layer and place your watermark.
Merge all layers.

Resize to your liking.
After I resize I do adjust clarify to brighten it up.

Your now all done and ready to share your work of art.

Would love to see what you do with this.
Thank you for giving my tutorial a try.
I do hope you have enjoyed this tutorial, and learned
something new.
Have any questions or need help.
Just let me know, I'm always happy to help any way I can.
Jcuttlebear01@aol.com

Thank you Mary for testing my tutorial for me.
My newest tutorial

Wednesday, April 6, 2011

Easter friends

Tutorial by Jcuttlebear01 aka JoAnn

4/6/2011
I do these tutorials for fun and not
for any profit. I use them also as a learning tool to
help others learn the fun and art of paint shop pro.
All things I use are collected, the only thing I claim
Is the tag I make with these as my work.

This tutorial is written with the idea you
have some knowledge of PSP.

This was done in PSP 9 but should work with any.

I'm using this darling scrap kit by
Randy's Sin it's a FTU kit It's called EasterBabe and you can find it HERE

My supplies HERE

Open new image
700 X 700

1) Open egg of choice, I'm using rs_egg11.png
image resize


2) Effects>plug in Mura filter copies
settings I used.


 3) With magic wand click on the inside of this frame
Selection>modify>expand by 10

4) New raster layer>copy and paste
paper> rs_pap13.jpg
or you can flood fill with color of choice.
Layers arrange move down.
Deselect

5) Activate the frame layer
and add a drop shadow.


 Now we will add some accents.

I took the basket and made a flower arrangement. All tubes
are from the scrap kit.

You can make your own if you wish, but I did add the one
I did with supplies.

6) If your using mine.
Copy and paste basket as a new layer,
resize by 50 percent.
3D effects>drop shadow

 7) Add rs_duckypair.png and copy and paste as a new layer.
resize by 30 percent>image mirror. Arrange how you want them.

8) Add rs_duckie1.png and copy and paste as a new layer.
resize by 25 percent. Arrange how you want.

9) Layers merge down.

10) Effects>3D drop shadow
same as before.

11) Add a rabbit of choice, I'm using
rs_bunny3.png from the kit.
Copy and paste as a new layer>resize
by 60 percent.
Add same drop shadow.
Move him how you want him.

You can use your deform tool to pull things
how you want, I do that a lot

12) Add a lamb of choice>I used
rs_lamb3.png from the kit.
Copy and paste as a new layer>Resize by
35 percent>add a drop shadow

 13) Layers>arrange until it is below the frame.
You can rename your layers as you go.

14) Now you can any other accents
you wish resize and arrange how you
wish, it's all up to you.

15) I added a cross

16) Then, from the kit>rs_branch1.png
resize to around 20 percent.

17) I added some more eggs and resized
to about 20 percent. Then took deform tool and
turned and moved them how I wanted.
Add a nice drop shadow to them.

18) Add any wording you want.
Move and place where it looks the best.
I use a font called>Heart sweetheart
which is in the supplies.

19) Once you have every thing like you want
you can merge all layers.
Resize by 90 percent

20) Take a paper from the kit and copy and paste as
a new layer>rs_pap7.jpg one I use
then I colorize it with a color from one of the tubes.
So the mask would stand out better.

21) Layers>new mask layer>
 
 22) Merge group
Resize mask to 85 percent
Add a drop shadow


You can use a different color if you wish.

23) Merge all layers>resize to your liking
Crop any extra around the tag you don't want.

Add your watermark
and a name if you wish.

Your now ready to save your work of art.

Good job.

Would love to see what you do with this.

Thank you for giving my tutorial a try.
I do hope you have enjoyed this tutorial, as much
as I did writing it,
and learned something new.

Have any questions or need help.
Just let me know, I'm always happy to help any way I can.

Thank you GGmom9
for testing this out for me.

Wednesday, March 30, 2011

Leopards At Water

Tutorial by Jcuttlebear01 aka JoAnn
3/31/2011

I do these tutorials for fun and not
for any profit. I use them also as a learning tool to
help others learn the fun and art of paint shop pro.
All things I use are collected, the only thing I claim
Is the tag I make with these as my work.

This tutorial is written with the idea you
have some knowledge of PSP.
This was done in PSP 9 but should work with any.


Plug ins

Filters unlimited HERE
Graphic plus HERE

Texture is Grain long deep
Place it in your texture folder.

Open a graphic of choice, o
ruse the one that is in my supplies.

Tubes, and accents of choice

Font of choice
I used Edwardian Script ITC

Mask of choice

My supplies I used are HERE

1) Duplicate your graphic by hitting shift D

on your key board,
or by going to image and re size.


Close the original graphic.


2) Pick 2 colors from your graphic you want to use.

foreground color.>#bace75
background color>#396a11


3) Image>add border>3 pixel any color that
isn't in your graphic.


4) Magic wand tool and click on the border you just
did, and flood fill with the gold patter of choice.


5) Selection invert>effects 3D cutout


6) Repeat but change the V and H to -3

Deselect


7) Image>border>3 pixel with back ground color.


8) Image>border 3 pixel with a different color
magic wand and flood fill with the gold pattern.
Deselect.


9) Image>add border 20 pixel background color
Select>effects texture


10) Filters unlimited>glass frame 3

Settings I used>frame size 25, shading 100
you can play with the settings to get the look you want.


11) Filters>graphic plus>Quick tile 1 with default settings.
Deselect


12) Repeat steps 3 thru 8


13) Image>40 pixel border background color>
New raster layer>select>and flood fill with
 white or color you want your mask to be.


14) Layer>new mask layer>new mask from image>


 15) Layers>merge group.

If you want the mask to show up more
just duplicate it a couple of times.

Close background>Merge all visible layers.

add drop shadow to the mask layer


Keep selected

16) filters unlimited>Glass frame 1
Frame size 50>Contract 100
Deselect

17) Image 3 pixel border color of choice>select
flood fill with the gold pattern.
Deselect

18) Image 3 pixel border background color.


19) Add tube of choice
re size if you need to and move it to where you want.
I re sized by 60 percent, then took the
eraser tool and got rid of what I didn't want hanging over
into the frame.


20) Add a drop shadow to the tube
use the same as before.

21) Add the ivy to the corner if you wish

resize by 45> add same drop shadow.


22) Layer duplicate>image mirror.
If your happy with everything
Merge all layers.


23) Add any thing else you wish at this time
Add water mark
Save as a jpg and your ready to share
your wonderful work of art.


Would love to see what you do with this.
Thank you for giving my tutorial a try.
I do hope you have enjoyed this tutorial, as much
as I did writing it, and learned something new.


Have any questions or need help.
Just let me know, I'm always happy to help any way I can.
Jcuttlebear01@AOL.com
example below made by me


THANK YOU
DreamsRmaid
Photobucket