Pages

Thursday, June 11, 2009

Beauty


Tutorial by Jcuttlebear01 aka JoAnn
6/9/2009

Special thank you to the testers.
from my JoAnn's Awesome Brats
family and circle of friends for testing this for me.
Everything I use is collected and my own ideas.

No copy write infraction intended.

I use these to help people learn the art and

fun of Paint shop pro.


Used psp 9


Tube in header is by


Supplies needed
Graphic of choice
Supplies I used are HERE
Filters unlimited HERE

Remember to save often in case your
psp closes, so you don't need to start over.

Find your graphic and minimize it for now.
Duplicate and close original.

Pick a dark color for your background, from the graphic.
And a light color for the foreground.
Minimize one of them for now will use later.

If you have everything ready to go, lets get to work.

1. Open a new image 500 X 400

2. Flood fill with your background color.

3. Layers, new mask layers, from image,
this box will open up and find the mask your using.
in the window there where it will say image 1 click on that
arrow and when the box opens look for the name of your mask
and then just click OK.


4. Layer pallet and right click on the mask layer and delete,
when the box opens say yes.


then right click again


merge group layers.
This is what you should have now.


5 You can now add a bevel or other effects you like.
I used filters unlimited special effects 1
Focal blur
I played around with it tell I got something I liked.

6. Layer, add new raster layer, flood fill with foreground
color or one of choice that looks good, then layer arrange send to bottom


Now we will add a graphic to it.

7. Layers new raster layer, flood fill with your other color you have picked.
Move this layer to the bottom. Merge visible layers.

8.Get your magic wand and click on the inside of the frame,
where you want to add your graphic.
Selection modify contract by 2
then hit delete one time on your putter key board
to get rid of the inside of the frame there.
Leave selected

9. Selection modify expand by 5, edit copy and paste into selection
your graphic you want to use, then layers move down so it is under your mask.

10. Click on the rest of the background layer there,
and you can flood fill with a contrast color.

11. You can add a texture to that part or what ever you would like.
It's all us to you. I used effects eye candy weave on mine.

If your happy with it then deselect.
Now you can add any thing else you wish.

12. I added a 2 pixel border and flood filled with gold beads.

13. 1 pixel border of background color.

14. add another 2 pixel border and flood fill with the gold bead pattern again.

15. Add a border 20 pixel click on it and go to the graphic you
used pick a place that has a lot of color and selection tool and
draw around that area, copy and paste as a new image.
Go to your patterns and find the pattern you just made,
I set mine to 80 no angel. Then flood fill the border with it.
.
16. Effects art media effects, brush stokes


17. Add a inner bevel to it.


18. You can now add any tubes
or sayings any thing you wish. I have supplied
some brushes in my supplies if you want to do like I did.
I used the pattern I made and then did a bevel on the corner,
added a drop shadow, then placed where I wanted it.
Duplicated layer, image mirror, duplicate again image flip,
duplicate one more time then mirror and you should have 4 corners now.
When happy with the way it looks be sure and merge all layers.

19. Add your watermark and your now ready to save.

Thank you for trying my tutorials.
Hope you found this helpful.
would love to see what you do with this.
Need help with this tutorial just send me a note.
Beauty tutorial
JCUTTLEBEAR01@AOL.COM


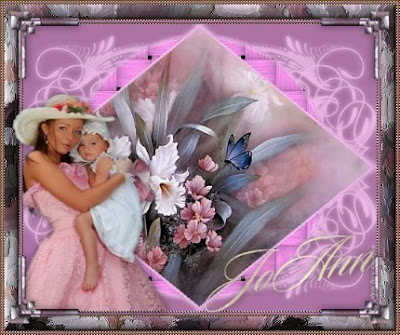
This is another example I did


Results by:
GGMOM9 aka Mary


Results by:
Fairladi101 aka Pati

Results by:

ameripex97 aka Kay


Elegance

Tutorial by
Jcuttlebear01 aka JoAnn
6/10/2009
I do these for fun and as a learning tool.
I don't sell or make a profit from any of the
supplies I have collected.

Used Psp 9
Supplies
Tube of choice
Thank you for letting me use your kit.
Scrapbook kit is from Cinnamon Scraps
you can get it here and it's free.
Called CS summerer'send vine 2

Or you can use one of your choice.
New image 600 x 500

1. Pick a paper you want to use for the background.
copy and paste as a new layer
Rename this layer paper 1

Selection tool and go to

Click on the first one there before the line


2. Pick another color of paper you want to use.
add a new layer and paste into selection.
Rename this layer paper 2

Deselect

3. Click on that layer with wand, then selection and invert.
selection modify expand by 5 then selection find border by 5.


4. Find another paper you want to use for the border
add a new layer and copy and paste into selection.
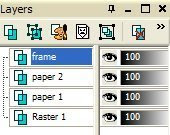
Rename the layer frame.
this is how your layer pallet should look now.


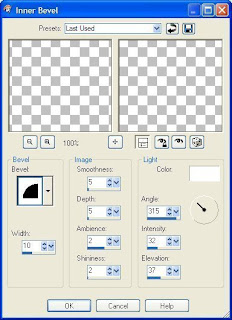
5. Apply a inner bevel to border if you wish.
This is what I used


deselect

7. Close off paper 2

8. Click on the inside of your frame,
find tube you wish to use and copy and paste into selection.
deselect and move how you want it.

9. Add a drop shadow to your liking.

If your happy with what you have so far.....close off the raster 2
then merge all visible. I renamed the merge layer to frame again.


10. Find the doodle tube and copy and paste as a new layer
resize it 90 percent might have to go smaller depending on how you want it to look.
Then flip and mirror and place how you want it. I used my deform tool to get it where
I thought it looked the best.

Then I took the eraser tool and got rid of the tail at the bottom.
duplicate layer, image mirror, flip.

I used my deform tool again to get it like I wanted it.
Once your happy with it close off the merge layer and, merge these two layers.

11. Add some leaves and cut them with my selection tool and turned
and moved them with my deform tool like I wanted them.

Once I had the one side done, merge just those layers, then take and duplicate it
Now if there are any parts showing below your frame you don't want there just take your selection tool
and cut them off.

12. mirrored and flipped and took deform tool and fixed it like I wanted.

13. Add a new layer and add a saying or what you would like to your tag,
I used a brush tube for that.

Resize and crop all extra of the back ground you don't want there.
Be sure and adjust sharpen if you need to.

14. Add a border of 2 pixel with paper 2 color

15. Add another 2 pixel border with the paper 1 color.

16. Add another layer 10 pixel, click on it and I added
special effects from filters unlimited, then added eye candy glass tube.

17. add another 2 pixel border of paper 2.

18. another border of 3 pixel, then I went to filters unlimited...and
just added a 3 d glass frame, I changed random until I got something I liked.

19. Add your water mark and save your finished tag, and it's ready to
share.

Thank you for trying my tutorial if you have any problems, or need help
feel free to send me a note.......would love to see what you create from
my tutorial.
Jcuttlebear01@aol.com


Friday, June 5, 2009

One Heart


Tutorial by
Jcuttlebear01 aka JoAnn
6/2/2009

No copy write rules broke here that I know of, I collected all
the tubes I have used, and never claimed to have done them.
This is for fun and learning not for profit.

Plug ins
AAA frame transparent Here
Graphic plus Here
Filters unlimited Here
Penta. com dots and cross (optional) Here

Supplies
Tubes of choice

Pick a color for the foreground
and the background from the tube.

I used psp 9 for this.

OK lets get started.......

1. Open a new image 600 x 500

2. Flood fill with the dark color

3. Selection tool then to custom settings
these are what I used.
4. Selection invert and delete so all you have is the colored
little square, deselect

5.Get wand and click on the square.
Selection modify contract by 3

then to selection modify and
find border


6. Flood fill with the gold beads or gold of choice.

Deselect
7. Duplicate this layer and mirror,
flip, and then close off that layer for now.

8.Go to your layer pallet and make sure you are on layer 2


9. Magic wand click on the inside of this frame
add a new layer and flood fill with the light color.

10. Effects filters unlimited--paper texture, canvas fine.
default setting or use a texture of your choice.

11. Selection float.....effects 3D cut out, I used my dark color
to kind of just highlight the frame on the inside.


then repeat but this time change the V and H to -2

12. Selection DE float.....Selection modify Contract by 5
so it clears your cut out.
new layer......click on the tube your going to
use and copy and paste into selection.
Selection and none.

13. Now UN hide your layer we closed earlier.
Drag it below layer 2


13. Click on the inside of the frame, and
You can add a different effect to the background if you wish
I added some dot and cross.

14. Then added a new layer find the tube you are using, and
copy and paste into selection.

15. Make sure that your new tube is below Raster 2

Selection none.
If your happy with everything so far you can now merge
all layers.

16. Re size all layers like you want them, I did 85 percent, then
Add a new raster layer, layers and send to bottom, or just drag it down.


17. Flood fill with dark color or one of choice
Now I used the


and got rid of any background color
you don't want there....make sure your
on your bottom layer...just get that tool and draw a square around
your work to get rid of the extra background then click on the


up on your tool bar and it will go down, if you don't get rid of enough
then edit undo and redo it.

18. Make sure on the bottom layer still and effect plug in,
Graphic plus cross shadow, do to your liking.

19. AAA transparent frame
I used width 6, stoke 6 with it checked
you want it to just go around your work not touching it.


20. Layer new, layer send to bottom, and flood fill with light color.
Select all, selection modify contract by 5 then invert.

21. Then filters unlimited gradients pick a color from the colors
that will look good with what your working with.
I used # 23 and
Intensity mapped to gradient then
just clicked on random until your happy with it.
Deselect and layers merge all.

22. Now you can add any accents you want.
I used some brushes.

23. You can now add a border of 2
if you wish and flood fill with the gold beads.
Add your water mark and merge, your all ready
to save and share now.

Hope you have enjoyed this tutorial as much as I did writing it.
Would love to have you share with me what you do.
Thank you for trying my tutorial out.
Be sure and say which one you need help with.

Need help


To see more of her tuts and creations

Thanks Chris

Tuesday, June 2, 2009

Summer fun

Tutorial by
Jcuttlebear01 aka JoAnn
6/1/2009

Scrapbook kit can be found here.
Called K-5 beach day
http://karlascrapz.blogspot.com/search/label/FREEBIES
I also used
Tropical Breeze scrapbook kit. Here
I don't know who it is by.
If anyone does let me know so I can give them credit for it.
I never claimed to have made anything other then the tag
that I have put together for this tutorial.
No copy write were meant to be broken here.

Supplies here
No outside plug ins needed.

Be sure and save often in case psp freezes up,
so you don't have to start over.

Open up psp I used 9 for this tutorial
but I believe will work on all.

Find the tubes you want to use.
I have supplied the ones I used.
Open them and minimize them to the bottom of your psp.

1. Open new image 650 X 650
I like to work large and re size later.

2. Flood fill with white.

3. Open Scrapbook kit paper and find a color you want to
use for the mask......I used paper 2 copy and paste as a new layer.

4. There are 2 ways to apply the mask.....this is the way I like to do it.
Have your mask open in psp, and then.
Go to layers, New mask layers, and a box will open up,
find the mask
that you have minimized to the bottom of your psp. You see where the
arrow is pointing that is where you will find it, click on it to highlight, then click OK.
Then go to your layer pallet


Right click on mask then delete, when box opens say yes.
Then right click on group and merge group.
Now you should only have 2 layers left.

5. Add a drop drop shadow to you mask if you like.
I used
V & H 0
Opacity 80
Blur 7 color black

6. Frame 1 from the scrapbook kit.
re size it by 90 percent.
Copy and paste as a new layer,
move it to where you like it.

7. Get your magic wand and click on the inside of the frame.
Then selection modify expand by 20, add a new raster layer,
copy and paste another paper of choice into selection, move layer below
the frame. You can also just flood fill with color of choice if you wish.
Leave selected.

8. Add another layer and find the misted scene I have supplied or one of your own.
Copy and past it into selection, it should be below your frame. Selection and none.
Use your


click on the image and pull out the sides to make it fit
like you want it to.
If your new to psp and don't know how to use this tool.
See the little squares there just take and click on the one
you need to pull out and hold down your mouse and just pull it how
you want it. The one in the middle will move it side to side.
When you have it like you want just click on the move tool and the
Deform tool will close up.


If any is outside the frame get your


and clean it up.

9. Add any elements that you wish, re size them so they look right.
I use my deform tool a lot to bring them down some more if I want to.

10. When your happy with the way your tag looks close off the background,
and merge all layers......remember edit undo if you don't like something you did.

11. Add any sayings you wish,
Then add your watermark, when done make sure all layers are merged.
Re size tag to your liking.
I use my crop tool to get rid of the extra white around the tag, that you don't need.

When happy with your tag
Save as a jpg.......then you can share your work of art with everyone.

Hope you enjoyed doing my tutorial, would love to see what
you do with it.
Need help let me know.
Need help
be sure and say which one.


Wednesday, May 27, 2009

Spring delight

Tutorial by
Jcuttlebear01 aka JoAnn
5/27/2009
Things you need.
Tube of your choice
I have sent a few things Here
Font of choice I used Betsy
No plug ins used.
Can use simple sparkle if you wish.
PSP 9 was what I used, but can be
done in other versions.
OK lets get started

1. open psp and new image 500 x 500 I like to work
large, can re size later.

2. Copy and paste tube as a new layer.
Re size if you need to.

3. Duplicate layer, go to layer pallet
Close off the top layer and make sure you are on
layer 2

4. Go to effects and rough leather. I used these
settings you can play around with it tell you get
something you like.


5. Adjust Gaussian Blur apply these settings.


6. Effects 3D add a drop shadow to your liking.

7. Click on the top layer and make it active now, and open it up.
Re size your tube to about 85 percent, depending on the size of tube your using.
Then move the tube to where you like it......


8. Add accents to your tube to dress it up if you like.
Be sure and add your watermark.
Then when your happy with everything merge all layers

10. Add another layer and flood fill with a color from your tube.
Layer arrange and send to bottom.

11. Effects blinds set to your liking.

12. Add a border of 2 pixel a color from your tube.

13. Add another border of 2 pixel of a different color.

14. Add another border of 10 your first color.

15 Click on the borders with your magic wand and add a bevel of your choice.

16. Now you can add a name or anything else.

When you have finished then save your image, and share.


Hope my little tutorial here helps you learn something new.
Need help just give me a shout at
Jcuttlebear01@aol.com

Another example I did.

Tuesday, May 26, 2009

Still life in Pink

Still Life in Pink
Hi my name is
Jcuttlebear01 aka JoAnn
I'm still kind of new to writing tutorials.
If you have any hints for me please share them.
No copy rights intended here, this is just
for fun and as a learning tool.
5/21/2009


THINGS YOU WILL NEED

Graphic of choice
PSP I'm using 9 for this tutorial.

Plug ins
AAA foto frame HERE
Graphic plus HERE
Supplies I used HERE

Find the graphic you want to use.
Duplicate it and close the original.
If to large re size it to your liking.
This is the one I used.


Pick a color for your background.....#932b40
Also pick one for your foreground........#b0686d
these are the colors I will be using.

Hint.........if at any point you don't like what you see or do, remember
edit undo is your best friend in psp and you won't need to start over.

1. Add a border of 2 pixel any color besides what is in your graphic.
Click on it and flood fill tool, and fill with the gold bead pattern, or one of your choice.
Angle 0
Size 80
Keep selected and go to selection and invert.

2. Now to effects 3D cutouts with these settings.

Now reapply but change the vertical, and horizontal to -5
Select none.

3. Add another border of 2 using your foreground color

Hint
when you open up to add your border right click on the color box


opens up...

...there you will see the background, and foreground colors you have picked,
so no need to go back and forth to your color pallet.

4. Add another border of 2 using your background color.

5. Add another border of 2 of different color, and click on it and flood fill
with the gold, the deselect.

6. Add another border of 2 of foreground color.

7. Add another border of 30 background color.
Magic wand and click on the inside of the border.

8. Effects AAA foto frame with these settings.
Or play around a pick your own......it's all up to you.


selection and none.........magic wand and click on the white and flood fill with
your back ground color keep selected.

9. Filter graphic plus quick tile 1~~~Settings 188, 142, 119
can play until you get something you like.
Then apply, go back and apply once more using the default settings.
Can add a bevel if you wish........I didn't this time. Then selection and none.

10 Add another border 3 pixel make it a color that is different from the rest so it will not bleed thru.
Then magic wand and select this border and flood fill with the gold pattern.

11. Add another border of 2 using your foreground color.

12. Add another border of using your background color, then magic wand and select this border.
Then effects graphic plus using cross shadow....settings I used


If you don't like the settings I used then play around until you get something you like.

13. Add a inner bevel

If happy with what you see select none.

14. Add another border of 3 and select and flood fill with the gold, invert
and add your cut out once again.......5, 50, 5, keep selected and repeat but
change the vert, and horz. to - 5 then deselect.

15. Add another border of 1 background color.

16. Add corners or anything you like.

Also add your water mark now and anything else you want to add to this.
Then re size to your liking.

Now your ready to save and share.......would love to see what you guys do with this.
jcuttlebear01@aol.com
Do hope you learned a few new things, and enjoyed my tutorial.
Hugs JoAnn
Happy PSP'n
Thank you ladies for trying this out for me.
Sample by
ccreations58 aka Chris

Sample by
Fairladi101 aka Pati


Sample by
GGMOM9 aka Mary