


 Tutorial by
Jcuttlebear01 aka JoAnn
6/10/2009
I do these for fun and as a learning tool.
I don't sell or make a profit from any of the
supplies I have collected.
Used Psp 9
Supplies
Tube of choice
Thank you for letting me use your kit.
Scrapbook kit is from Cinnamon Scraps
you can get it here and it's free.
Scrapbook kit is from Cinnamon Scraps
you can get it here and it's free.
Called CS summerer'send vine 2
Or you can use one of your choice.
New image 600 x 500
1. Pick a paper you want to use for the background.
copy and paste as a new layer
 Rename this layer paper 1
Selection tool and go to
 Click on the first one there before the line
2. Pick another color of paper you want to use.
add a new layer and paste into selection.
Rename this layer paper 2
 Deselect
3. Click on that layer with wand, then selection and invert.
selection modify expand by 5 then selection find border by 5.

4. Find another paper you want to use for the border
add a new layer and copy and paste into selection.
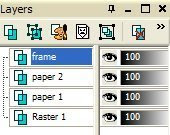
Rename the layer frame.
this is how your layer pallet should look now.
5. Apply a inner bevel to border if you wish.
This is what I used

deselect
7. Close off paper 2
8. Click on the inside of your frame,
find tube you wish to use and copy and paste into selection.
deselect and move how you want it.
9. Add a drop shadow to your liking.
If your happy with what you have so far.....close off the raster 2
then merge all visible. I renamed the merge layer to frame again.

10. Find the doodle tube and copy and paste as a new layer
resize it 90 percent might have to go smaller depending on how you want it to look.
Then flip and mirror and place how you want it. I used my deform tool to get it where
I thought it looked the best.
Then I took the eraser tool and got rid of the tail at the bottom.
duplicate layer, image mirror, flip.
I used my deform tool again to get it like I wanted it.
Once your happy with it close off the merge layer and, merge these two layers.
11. Add some leaves and cut them with my selection tool and turned
and moved them with my deform tool like I wanted them.
Once I had the one side done, merge just those layers, then take and duplicate it
Now if there are any parts showing below your frame you don't want there just take your selection tool
and cut them off.
12. mirrored and flipped and took deform tool and fixed it like I wanted.
13. Add a new layer and add a saying or what you would like to your tag,
I used a brush tube for that.
Resize and crop all extra of the back ground you don't want there.
Be sure and adjust sharpen if you need to.
14. Add a border of 2 pixel with paper 2 color
15. Add another 2 pixel border with the paper 1 color.
16. Add another layer 10 pixel, click on it and I added
special effects from filters unlimited, then added eye candy glass tube.
17. add another 2 pixel border of paper 2.
18. another border of 3 pixel, then I went to filters unlimited...and
just added a 3 d glass frame, I changed random until I got something I liked.
19. Add your water mark and save your finished tag, and it's ready to
share.
Thank you for trying my tutorial if you have any problems, or need help
feel free to send me a note.......would love to see what you create from
my tutorial.
Jcuttlebear01@aol.com


No comments:
Post a Comment