 Tutorial by
Jcuttlebear01 aka JoAnn
6/1/2009
Scrapbook kit can be found here.
Called K-5 beach day
http://karlascrapz.blogspot.com/search/label/FREEBIES
I also used
Tropical Breeze scrapbook kit. Here
I don't know who it is by.
If anyone does let me know so I can give them credit for it.
I never claimed to have made anything other then the tag
that I have put together for this tutorial.
No copy write were meant to be broken here.
Supplies here
No outside plug ins needed.
Be sure and save often in case psp freezes up,
so you don't have to start over.
Open up psp I used 9 for this tutorial
but I believe will work on all.
Find the tubes you want to use.
I have supplied the ones I used.
Open them and minimize them to the bottom of your psp.
1. Open new image 650 X 650
I like to work large and re size later.
2. Flood fill with white.
3. Open Scrapbook kit paper and find a color you want to
use for the mask......I used paper 2 copy and paste as a new layer.
4. There are 2 ways to apply the mask.....this is the way I like to do it.
Have your mask open in psp, and then.
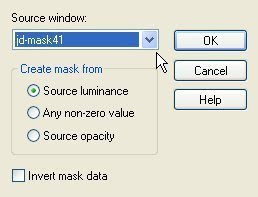
Go to layers, New mask layers, and a box will open up,
 find the mask
that you have minimized to the bottom of your psp. You see where the
arrow is pointing that is where you will find it, click on it to highlight, then click OK.
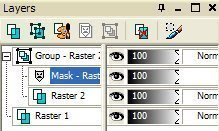
Then go to your layer pallet

Right click on mask then delete, when box opens say yes.
Then right click on group and merge group.
Now you should only have 2 layers left.
 5. Add a drop drop shadow to you mask if you like.
I used
V & H 0
Opacity 80
Blur 7 color black
6. Frame 1 from the scrapbook kit.
re size it by 90 percent.
Copy and paste as a new layer,
move it to where you like it.
7. Get your magic wand and click on the inside of the frame.
Then selection modify expand by 20, add a new raster layer,
copy and paste another paper of choice into selection, move layer below
the frame. You can also just flood fill with color of choice if you wish.
Leave selected.
8. Add another layer and find the misted scene I have supplied or one of your own.
Copy and past it into selection, it should be below your frame. Selection and none.
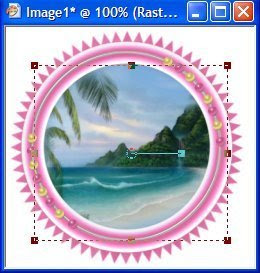
Use your

click on the image and pull out the sides to make it fit
like you want it to.
If your new to psp and don't know how to use this tool.
See the little squares there just take and click on the one
you need to pull out and hold down your mouse and just pull it how
you want it. The one in the middle will move it side to side.
When you have it like you want just click on the move tool and the
Deform tool will close up.

If any is outside the frame get your

and clean it up.
9. Add any elements that you wish, re size them so they look right.
I use my deform tool a lot to bring them down some more if I want to.
10. When your happy with the way your tag looks close off the background,
and merge all layers......remember edit undo if you don't like something you did.
11. Add any sayings you wish,
Then add your watermark, when done make sure all layers are merged.
Re size tag to your liking.
I use my crop tool to get rid of the extra white around the tag, that you don't need.
When happy with your tag
Save as a jpg.......then you can share your work of art with everyone.
Hope you enjoyed doing my tutorial, would love to see what
you do with it.
Need help let me know.
Need help
be sure and say which one.


No comments:
Post a Comment