


Tutorial by Jcuttlebear01 aka JoAnn
6/9/2009
6/9/2009
Special thank you to the testers.
from my JoAnn's Awesome Brats
family and circle of friends for testing this for me.
Everything I use is collected and my own ideas.
No copy write infraction intended.
I use these to help people learn the art and
fun of Paint shop pro.
Used psp 9
Tube in header is by

Supplies needed
Graphic of choice
Supplies I used are HERE
Filters unlimited HERE
Remember to save often in case your
psp closes, so you don't need to start over.
Find your graphic and minimize it for now.
Duplicate and close original.
Pick a dark color for your background, from the graphic.
And a light color for the foreground.
Minimize one of them for now will use later.
If you have everything ready to go, lets get to work.
1. Open a new image 500 X 400
2. Flood fill with your background color.
3. Layers, new mask layers, from image,
this box will open up and find the mask your using.
in the window there where it will say image 1 click on that
arrow and when the box opens look for the name of your mask
and then just click OK.

4. Layer pallet and right click on the mask layer and delete,
when the box opens say yes.
when the box opens say yes.
 then right click again
  merge group layers.
This is what you should have now.

5 You can now add a bevel or other effects you like.
I used filters unlimited special effects 1
Focal blur
I played around with it tell I got something I liked.
6. Layer, add new raster layer, flood fill with foreground
color or one of choice that looks good, then layer arrange send to bottom
Now we will add a graphic to it.
7. Layers new raster layer, flood fill with your other color you have picked.
Move this layer to the bottom. Merge visible layers.
8.Get your magic wand and click on the inside of the frame,
where you want to add your graphic.
Selection modify contract by 2
then hit delete one time on your putter key board
to get rid of the inside of the frame there.
Leave selected
9. Selection modify expand by 5, edit copy and paste into selection
your graphic you want to use, then layers move down so it is under your mask.
10. Click on the rest of the background layer there,
and you can flood fill with a contrast color.
11. You can add a texture to that part or what ever you would like.
It's all us to you. I used effects eye candy weave on mine.
If your happy with it then deselect.
Now you can add any thing else you wish.
12. I added a 2 pixel border and flood filled with gold beads.
13. 1 pixel border of background color.
14. add another 2 pixel border and flood fill with the gold bead pattern again.
15. Add a border 20 pixel click on it and go to the graphic you
used pick a place that has a lot of color and selection tool and
draw around that area, copy and paste as a new image.
Go to your patterns and find the pattern you just made,
I set mine to 80 no angel. Then flood fill the border with it.
.
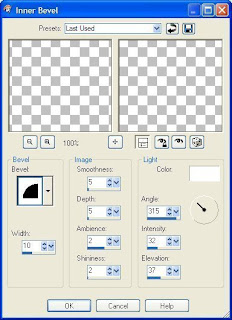
16. Effects art media effects, brush stokes

17. Add a inner bevel to it.
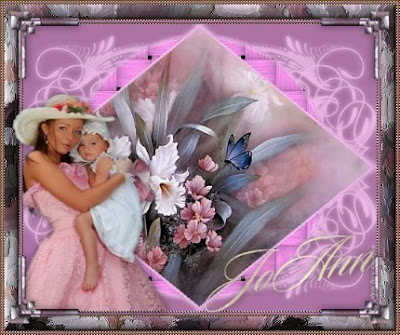


18. You can now add any tubes
or sayings any thing you wish. I have supplied
some brushes in my supplies if you want to do like I did.
I used the pattern I made and then did a bevel on the corner,
added a drop shadow, then placed where I wanted it.
Duplicated layer, image mirror, duplicate again image flip,
duplicate one more time then mirror and you should have 4 corners now.
When happy with the way it looks be sure and merge all layers.
19. Add your watermark and your now ready to save.
Thank you for trying my tutorials.
Hope you found this helpful.
would love to see what you do with this.
Need help with this tutorial just send me a note.
Beauty tutorial
JCUTTLEBEAR01@AOL.COM

This is another example I did

Results by:
GGMOM9 aka Mary

GGMOM9 aka Mary

Results by:
Fairladi101 aka Pati
 Results by:
 Results by:
ameripex97 aka Kay


No comments:
Post a Comment