
Tutorial by
Jcuttlebear01 aka JoAnn
6/2/2009
No copy write rules broke here that I know of, I collected all
the tubes I have used, and never claimed to have done them.
This is for fun and learning not for profit.
Plug ins
AAA frame transparent Here
Graphic plus Here
Filters unlimited Here
Penta. com dots and cross (optional) Here
Supplies
Tubes of choice
Pick a color for the foreground
and the background from the tube.
I used psp 9 for this.
OK lets get started.......
1. Open a new image 600 x 500
2. Flood fill with the dark color
3. Selection tool then to custom settings
these are what I used.
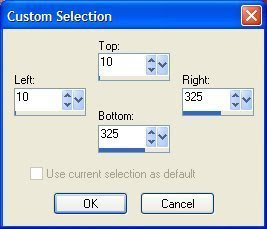 4. Selection invert and delete so all you have is the colored
little square, deselect
5.Get wand and click on the square.
Selection modify contract by 3
then to selection modify and
find border
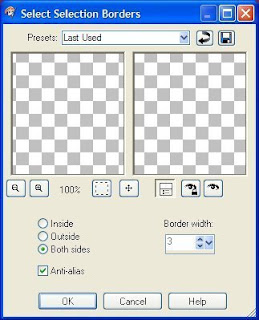
6. Flood fill with the gold beads or gold of choice.
Deselect
7. Duplicate this layer and mirror,
flip, and then close off that layer for now.
8.Go to your layer pallet and make sure you are on layer 2
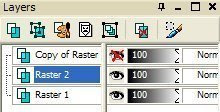
9. Magic wand click on the inside of this frame
add a new layer and flood fill with the light color.
10. Effects filters unlimited--paper texture, canvas fine.
default setting or use a texture of your choice.
11. Selection float.....effects 3D cut out, I used my dark color
to kind of just highlight the frame on the inside.
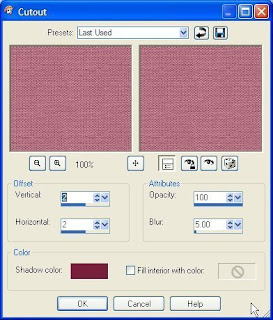
then repeat but this time change the V and H to -2
12. Selection DE float.....Selection modify Contract by 5
so it clears your cut out.
new layer......click on the tube your going to
use and copy and paste into selection.
Selection and none.
13. Now UN hide your layer we closed earlier.
Drag it below layer 2
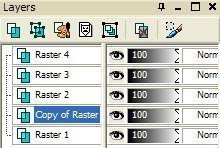 13. Click on the inside of the frame, and
You can add a different effect to the background if you wish
I added some dot and cross.
14. Then added a new layer find the tube you are using, and
copy and paste into selection.
15. Make sure that your new tube is below Raster 2
Selection none.
If your happy with everything so far you can now merge
all layers.
16. Re size all layers like you want them, I did 85 percent, then
Add a new raster layer, layers and send to bottom, or just drag it down.

17. Flood fill with dark color or one of choice
Now I used the

and got rid of any background color
you don't want there....make sure your
on your bottom layer...just get that tool and draw a square around
your work to get rid of the extra background then click on the

up on your tool bar and it will go down, if you don't get rid of enough
then edit undo and redo it.
18. Make sure on the bottom layer still and effect plug in,
Graphic plus cross shadow, do to your liking.
19. AAA transparent frame
I used width 6, stoke 6 with it checked
you want it to just go around your work not touching it.
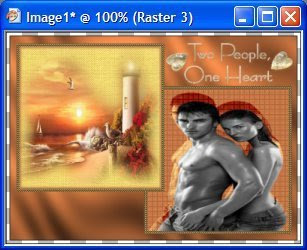
20. Layer new, layer send to bottom, and flood fill with light color.
Select all, selection modify contract by 5 then invert.
21. Then filters unlimited gradients pick a color from the colors
that will look good with what your working with.
I used # 23 and
Intensity mapped to gradient then
just clicked on random until your happy with it.
Deselect and layers merge all.
22. Now you can add any accents you want.
I used some brushes.
23. You can now add a border of 2
if you wish and flood fill with the gold beads.
Add your water mark and merge, your all ready
to save and share now.
Hope you have enjoyed this tutorial as much as I did writing it.
Would love to have you share with me what you do.
Thank you for trying my tutorial out.
Be sure and say which one you need help with.
Need help
 To see more of her tuts and creations
vist her here.
http://groups.yahoo.com/group/candccreations/
http://groups.yahoo.com/group/candccreations/
Thanks Chris


No comments:
Post a Comment