


Still Life in Pink
 Hi my name is
Jcuttlebear01 aka JoAnn
I'm still kind of new to writing tutorials.
If you have any hints for me please share them.
No copy rights intended here, this is just
for fun and as a learning tool.
5/21/2009
THINGS YOU WILL NEED
Graphic of choice
PSP I'm using 9 for this tutorial.
Plug ins
AAA foto frame HERE
Graphic plus HERE
Supplies I used HERE
Find the graphic you want to use.
Duplicate it and close the original.
If to large re size it to your liking.
This is the one I used.

Pick a color for your background.....#932b40
Also pick one for your foreground........#b0686d
these are the colors I will be using.
Hint.........if at any point you don't like what you see or do, remember
edit undo is your best friend in psp and you won't need to start over.
1. Add a border of 2 pixel any color besides what is in your graphic.
Click on it and flood fill tool, and fill with the gold bead pattern, or one of your choice.
Angle 0
Size 80
Keep selected and go to selection and invert.
2. Now to effects 3D cutouts with these settings.
 Now reapply but change the vertical, and horizontal to -5
Select none.
3. Add another border of 2 using your foreground color
Hint
when you open up to add your border right click on the color box

...there you will see the background, and foreground colors you have picked,
so no need to go back and forth to your color pallet.
4. Add another border of 2 using your background color.
5. Add another border of 2 of different color, and click on it and flood fill
with the gold, the deselect.
6. Add another border of 2 of foreground color.
7. Add another border of 30 background color.
Magic wand and click on the inside of the border.
8. Effects AAA foto frame with these settings.
Or play around a pick your own......it's all up to you.
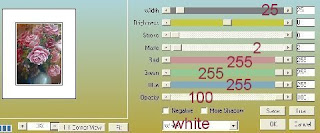
selection and none.........magic wand and click on the white and flood fill with
your back ground color keep selected.
9. Filter graphic plus quick tile 1~~~Settings 188, 142, 119
can play until you get something you like.
Then apply, go back and apply once more using the default settings.
Can add a bevel if you wish........I didn't this time. Then selection and none.
10 Add another border 3 pixel make it a color that is different from the rest so it will not bleed thru.
Then magic wand and select this border and flood fill with the gold pattern.
11. Add another border of 2 using your foreground color.
12. Add another border of using your background color, then magic wand and select this border.
Then effects graphic plus using cross shadow....settings I used
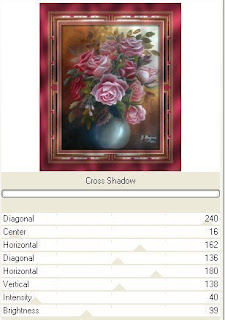
If you don't like the settings I used then play around until you get something you like.
13. Add a inner bevel
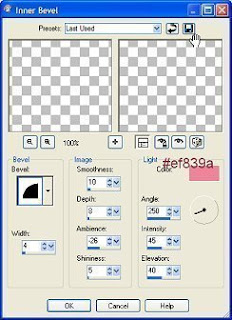 If happy with what you see select none.
14. Add another border of 3 and select and flood fill with the gold, invert
and add your cut out once again.......5, 50, 5, keep selected and repeat but
change the vert, and horz. to - 5 then deselect.
15. Add another border of 1 background color.
16. Add corners or anything you like.
Also add your water mark now and anything else you want to add to this.
Then re size to your liking.
Now your ready to save and share.......would love to see what you guys do with this.
jcuttlebear01@aol.com
Do hope you learned a few new things, and enjoyed my tutorial.
Hugs JoAnn
Happy PSP'n

opens up...

...there you will see the background, and foreground colors you have picked,
so no need to go back and forth to your color pallet.
4. Add another border of 2 using your background color.
5. Add another border of 2 of different color, and click on it and flood fill
with the gold, the deselect.
6. Add another border of 2 of foreground color.
7. Add another border of 30 background color.
Magic wand and click on the inside of the border.
8. Effects AAA foto frame with these settings.
Or play around a pick your own......it's all up to you.

selection and none.........magic wand and click on the white and flood fill with
your back ground color keep selected.
9. Filter graphic plus quick tile 1~~~Settings 188, 142, 119
can play until you get something you like.
Then apply, go back and apply once more using the default settings.
Can add a bevel if you wish........I didn't this time. Then selection and none.
10 Add another border 3 pixel make it a color that is different from the rest so it will not bleed thru.
Then magic wand and select this border and flood fill with the gold pattern.
11. Add another border of 2 using your foreground color.
12. Add another border of using your background color, then magic wand and select this border.
Then effects graphic plus using cross shadow....settings I used

If you don't like the settings I used then play around until you get something you like.
13. Add a inner bevel
 If happy with what you see select none.
14. Add another border of 3 and select and flood fill with the gold, invert
and add your cut out once again.......5, 50, 5, keep selected and repeat but
change the vert, and horz. to - 5 then deselect.
15. Add another border of 1 background color.
16. Add corners or anything you like.
Also add your water mark now and anything else you want to add to this.
Then re size to your liking.
Now your ready to save and share.......would love to see what you guys do with this.
jcuttlebear01@aol.com
Do hope you learned a few new things, and enjoyed my tutorial.
Hugs JoAnn
Happy PSP'n
Thank you ladies for trying this out for me.
Sample by
ccreations58 aka Chris
 Sample by
Fairladi101 aka Pati

Sample by
GGMOM9 aka Mary

ccreations58 aka Chris
 Sample by
Fairladi101 aka Pati

Sample by
GGMOM9 aka Mary


No comments:
Post a Comment