


Tutorial for beginners
How to make a basic tag.

We are going to make a tag using borders this time.......and I will teach you how
to add your name to the tag when finished. So lets get started.
This is not as long as it looks, I like to send shots so you know what I'm talking
This is not as long as it looks, I like to send shots so you know what I'm talking
about until you learn the terms.......If you have problems link is at the end of this tut.
I'm new to writing tuts so if you have any ideas how to help me do better let me know.
I'm new to writing tuts so if you have any ideas how to help me do better let me know.
May 13,2009
Things you will need
PSP of course.....silly me.
I used 9 for this one but can use any really.
Tube
Font of choice
Tube
Font of choice
Lets get started.
1. Open your psp
2. Find the tube you want to use, open and minimize for now to the
bottom of your psp.
bottom of your psp.
3. Go to file, and image and open up a new image
I like to make them big can always re size when done.
400x200
4. Now go over to your color pallet
and see the two first set of squares the top one is your foreground
and see the two first set of squares the top one is your foreground
color and the bottom is your background colors. So what you do is left click on
the top square and the box will open up
 Now you see up there in the top where it says color, gradient, and pattern you can go and explore those later on this is called your color pallet.....now go over to you tube your going to use and you will see an eyedropper open up just pick a color in the tube you want for your foreground #BC7d74 this is the color I'm using, now click OK when you have the color you want. You want to use a lighter color on the top, Then do the same for the background....color.....#65423c I'm using.
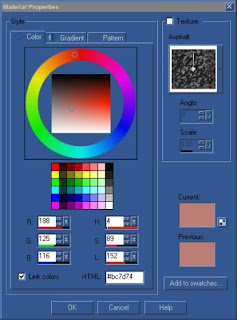 Next get your
 you will see it in the tool bar, you just go up and click on it.
Now go to the new image and click on the inside there with
the OK it will turn the color you want to use for your background,
right click does one and left the other.
If you do something you don't like remember this
EDIT UNDO IS YOUR BEST FRIEND IN PSP
you don't have to start over totally just go to edit and undo.
Now lets go to the next step, I will have you add a border to this blank image.
Now lets go to the next step, I will have you add a border to this blank image.
5. Go to image and then add border....now if this box opens up just click OK
 Then it will let you have this box...this is where you go to add the borders.
Set it like I have here......
 Then just click OK.
Now you will have a white border around your work, you get the color the same
way as you did kind of with the color pallet, see where it says color click in it and the color box will open and you can add whatever color you want just make sure its not the same as
the color you put in the center or it will not show up.
OK now with that done.....you can add another one with a different
OK now with that done.....you can add another one with a different
color and make it larger like maybe 5
you decide.....then add a 3rd color is you wish make each border a
different size or and color if you want to.
I added the 2, then 5, then 2, then 10 now get your
I added the 2, then 5, then 2, then 10 now get your
 click on the arrow on this icon and a box opens and you will see
 a wand looking tool that is your magic wand.
Now go over to you image you just added borders to and in the last border you
Now go over to you image you just added borders to and in the last border you
added click on it with the wand..now you will get what we call ants don't
worry that's what you want.
now you can go to effects and 3D and outer bevel and a box opens up there are many thing you can do. with this bevel.....this is what I did....
 you have many options in the shape of it....see the arrow up there with the shape in it click on it and you will find this icon in there......and then just change the rest of the numbers like mine if you want your choice is endless. Then just click OK to get out of there. When your tag is like you want go to selection and select none and the ants will stop.....now you can add your tube of choice. You might have to resize it....so you need to refer back to the other tut how to do that I resided mine by 50 percent. Remember edit undo if its to small or to big....and just keep trying it will fits.
Then get your
 and place your tube where you want it, be sure and save room for the name.
 Now you can add a drop shadow to your tube........go to effects 3D drop Shadow,
 Then just click on OK......
Next we will add your name to the tag. Click on this font icon and a box opens up


in this part that is where you find your fonts you want to use....see the 3rd box there click
on the arrow there and it will show you all the fonts you have in there......just
pick one.....now the next box is the size you want your letters to be......the nest one
is the stroke which you can make your font 2 different colors if you wish.
those are the main ones you will use for now. Vector will put a little box
those are the main ones you will use for now. Vector will put a little box
around your name when you add it,
When your name is like you want you need to go to layers and
When your name is like you want you need to go to layers and
convert layers and it gets rid of that box.
 see that is a vector around your name
You can do a lot with it but will teach you that later.
When your done you can add a drop shadow to your
name and even bevel it if you wish.
A lot of fun things to do here. When your done just go to layers
and merge all......your done
Now you can resize if you need to.....go to image and resize, you can either us
pixel, or percent.......I used 80 percent on mine, when happy with the size, then you
are ready to save your work.
If you don't know how just give me a shout.
Need help don't be scared to ask me.....
need help with beginner lesson 2
Do hope I have helped you learn something new.
If you don't know how just give me a shout.
Need help don't be scared to ask me.....
need help with beginner lesson 2
Do hope I have helped you learn something new.
Would love to see what you have done.

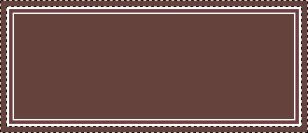
This is my finished tag.
Good luck


No comments:
Post a Comment